Hello! Welcome back to our series on the Power Apps Component Framework (PCF).
In the last lesson, we focused on making your components look professional. You learned how to apply CSS, leverage modern theming to match the host app's style, and implement responsive designs that adapt to any screen size. We briefly used the local test harness to check our responsive layouts.
Today, we're going to master that local test harness. An efficient development cycle is the key to productivity, and for PCF, that means being able to build, test, and debug your component locally without needing to deploy it to Dataverse for every single change. This lesson is all about that inner loop. Our goal is to build, test, and debug PCF components locally using the local test harness.
1. The Local Development Workflow
The foundation of local PCF development is a command that starts a local web server, runs your component in a "sandbox" called the test harness, and automatically recompiles your code when you make changes.
You start this process from the terminal in Visual Studio Code, within your PCF project's root directory, using this command:
npm start watch
npm startcompiles your code and launches the test harness in a browser.- The
watchflag keeps the process running, watching for any changes to your project files (likeindex.tsor your CSS). When you save a change, it automatically rebuilds the component and refreshes the test harness. This gives you near-instant feedback.
This video provides a great overview of the initial project creation, build, and test cycle.
How to create a PowerApps PCF control | Tutorial
Watch this clip from Tiyani 365 to see the standard workflow in action: creating the project, installing dependencies, and then building and testing the component.
Watch from 03:47 to 08:33. Pay attention to the sequence of commands: pac pcf init (creates the project) npm install (installs required packages) npm run build (builds the project once) The presenter uses a tool (PCF Builder) to run the test, which is equivalent to running npm start. Notice how changes in the code are reflected in the test harness after rebuilding.
2. Navigating the Test Harness
When you run npm start watch, a browser tab will open showing the PCF test harness. It's your local sandbox for component development.
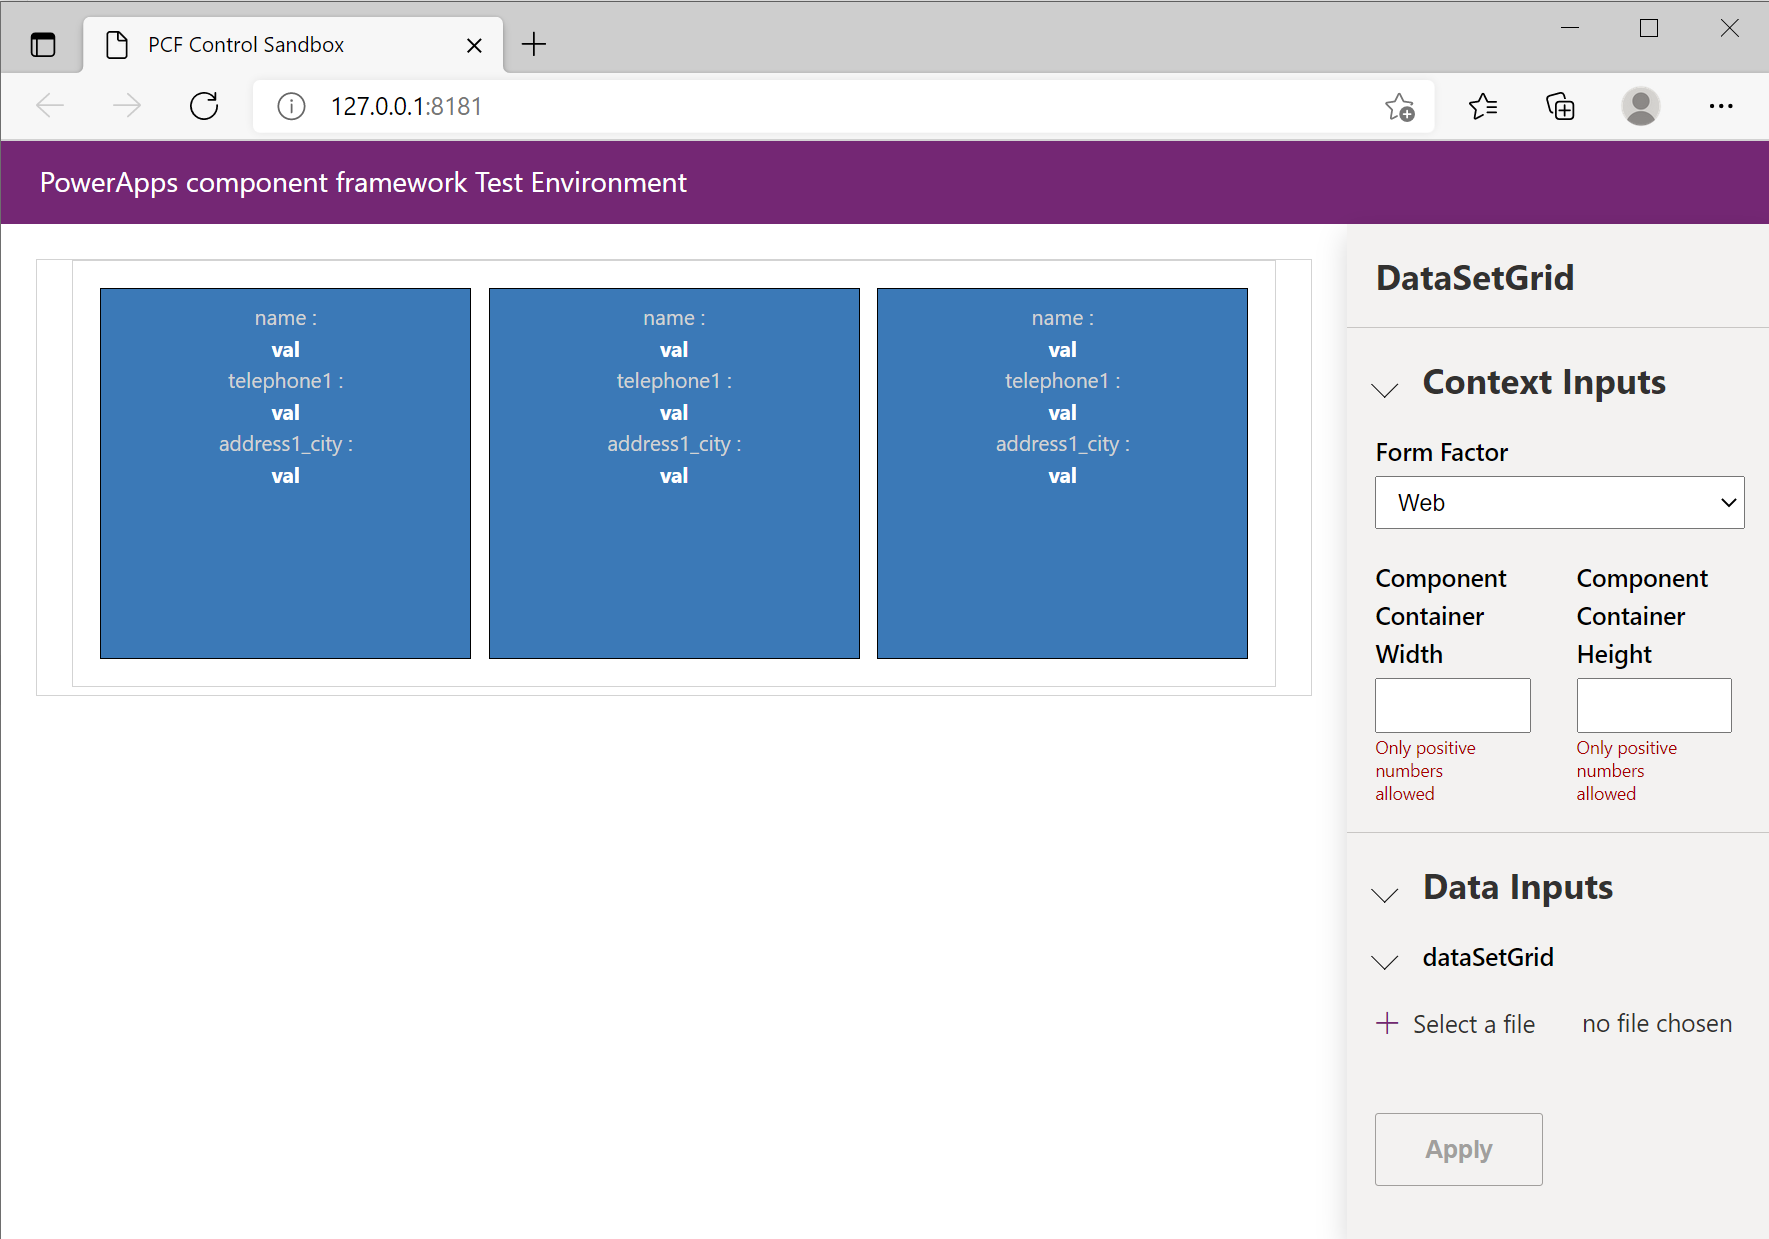
Let's break down the key areas of the test harness. The official Microsoft documentation provides the definitive guide to its features.
This Microsoft Learn article details the features of the browser test harness. We will focus on the main UI components first.
Read the section 'Debugging using the browser test harness'. Focus on understanding the purpose of the three main areas of the right-hand pane: 'Context Inputs', 'Data Inputs', and 'Outputs'.
As you read, you'll find the harness is divided into a few key areas:
- Component Pane (Left): This is where your PCF component is rendered.
- Context Inputs: This section allows you to simulate different environments:
- Form Factor: Test how your component looks on Web, Tablet, and Phone layouts.
- Container Width & Height: As we saw in the last lesson, you can enter pixel values here to test your responsive design at specific container sizes.
- Data Inputs: This is where you provide mock data to your component's properties. This is essential for testing your component's logic.
- Outputs: This area shows the data that your component passes back to the host application via the
getOutputsmethod. It's how you verify that your component correctly returns updated values.
3. Testing with Mock Data
A component is useless without data. The test harness allows you to simulate the data that would normally come from Dataverse. The method depends on whether you're building a field component or a dataset component.
Now, let's dive into the practical details of providing test data. This section of the same Microsoft Learn article explains how to handle both simple properties and complex datasets.
Read the section 'Test code components with mock data'. Pay close attention to the process for dataset components: creating a CSV file, loading it, and mapping the CSV columns to the properties defined in your manifest.
Testing Field-Bound Components:
For components bound to a single field (like a text input or a number slider), the "Data Inputs" pane will show a simple input box for each property defined in your ControlManifest.Input.xml. You can type values directly into these boxes, and the harness will pass them to your component, triggering the updateView method.
Testing Dataset-Bound Components:
For components that display a grid or list of records, you need to provide a set of mock records. The test harness supports this using a .csv file.
The process is:
- Create a CSV file: In a text editor or spreadsheet program, create a file with column headers that match the data you want to display (e.g.,
name,email,phone). Add a few rows of sample data. - Load the CSV: In the "Data Inputs" section of the harness, find your dataset property and click the "Select a file" button to load your CSV.
- Map Properties: After loading, the harness will ask you to map the
<property>elements from your manifest's<data-set>node to the columns in your CSV file. This tells the harness, for example, that thenamecolumn from the CSV should be passed to the property you've namedcontactNamein your manifest. - Apply: Click "Apply" to load the data into your component.
Test your understanding!
You are building a dataset PCF to display a list of active "Account" records. Your manifest defines three properties within the data-set node to show the account's name, primary contact's email, and phone number. What would the header row of your test CSV file look like, and what would you do in the test harness after loading it?
Show answer
The header row of your accounts.csv file could be: accountname,primarycontactemail,telephone1.
After loading this CSV file into the test harness, you would need to map your manifest properties to these columns. For example, if your manifest properties are named accName, contactEmail, and mainPhone, you would map:
accName->accountnamecontactEmail->primarycontactemailmainPhone->telephone1
Then you would click "Apply" to see the data in your component.
4. Debugging Your TypeScript Code in the Browser
Seeing your component render is one thing; stepping through your code to fix bugs is another. Thanks to a technology called source maps, you can debug your original TypeScript code directly in your browser's developer tools, even though the browser is actually running the compiled JavaScript bundle.
This is a powerful feature that leverages your existing development skills. Given your background, you'll be familiar with setting breakpoints and inspecting variables, and you can do all of that here.
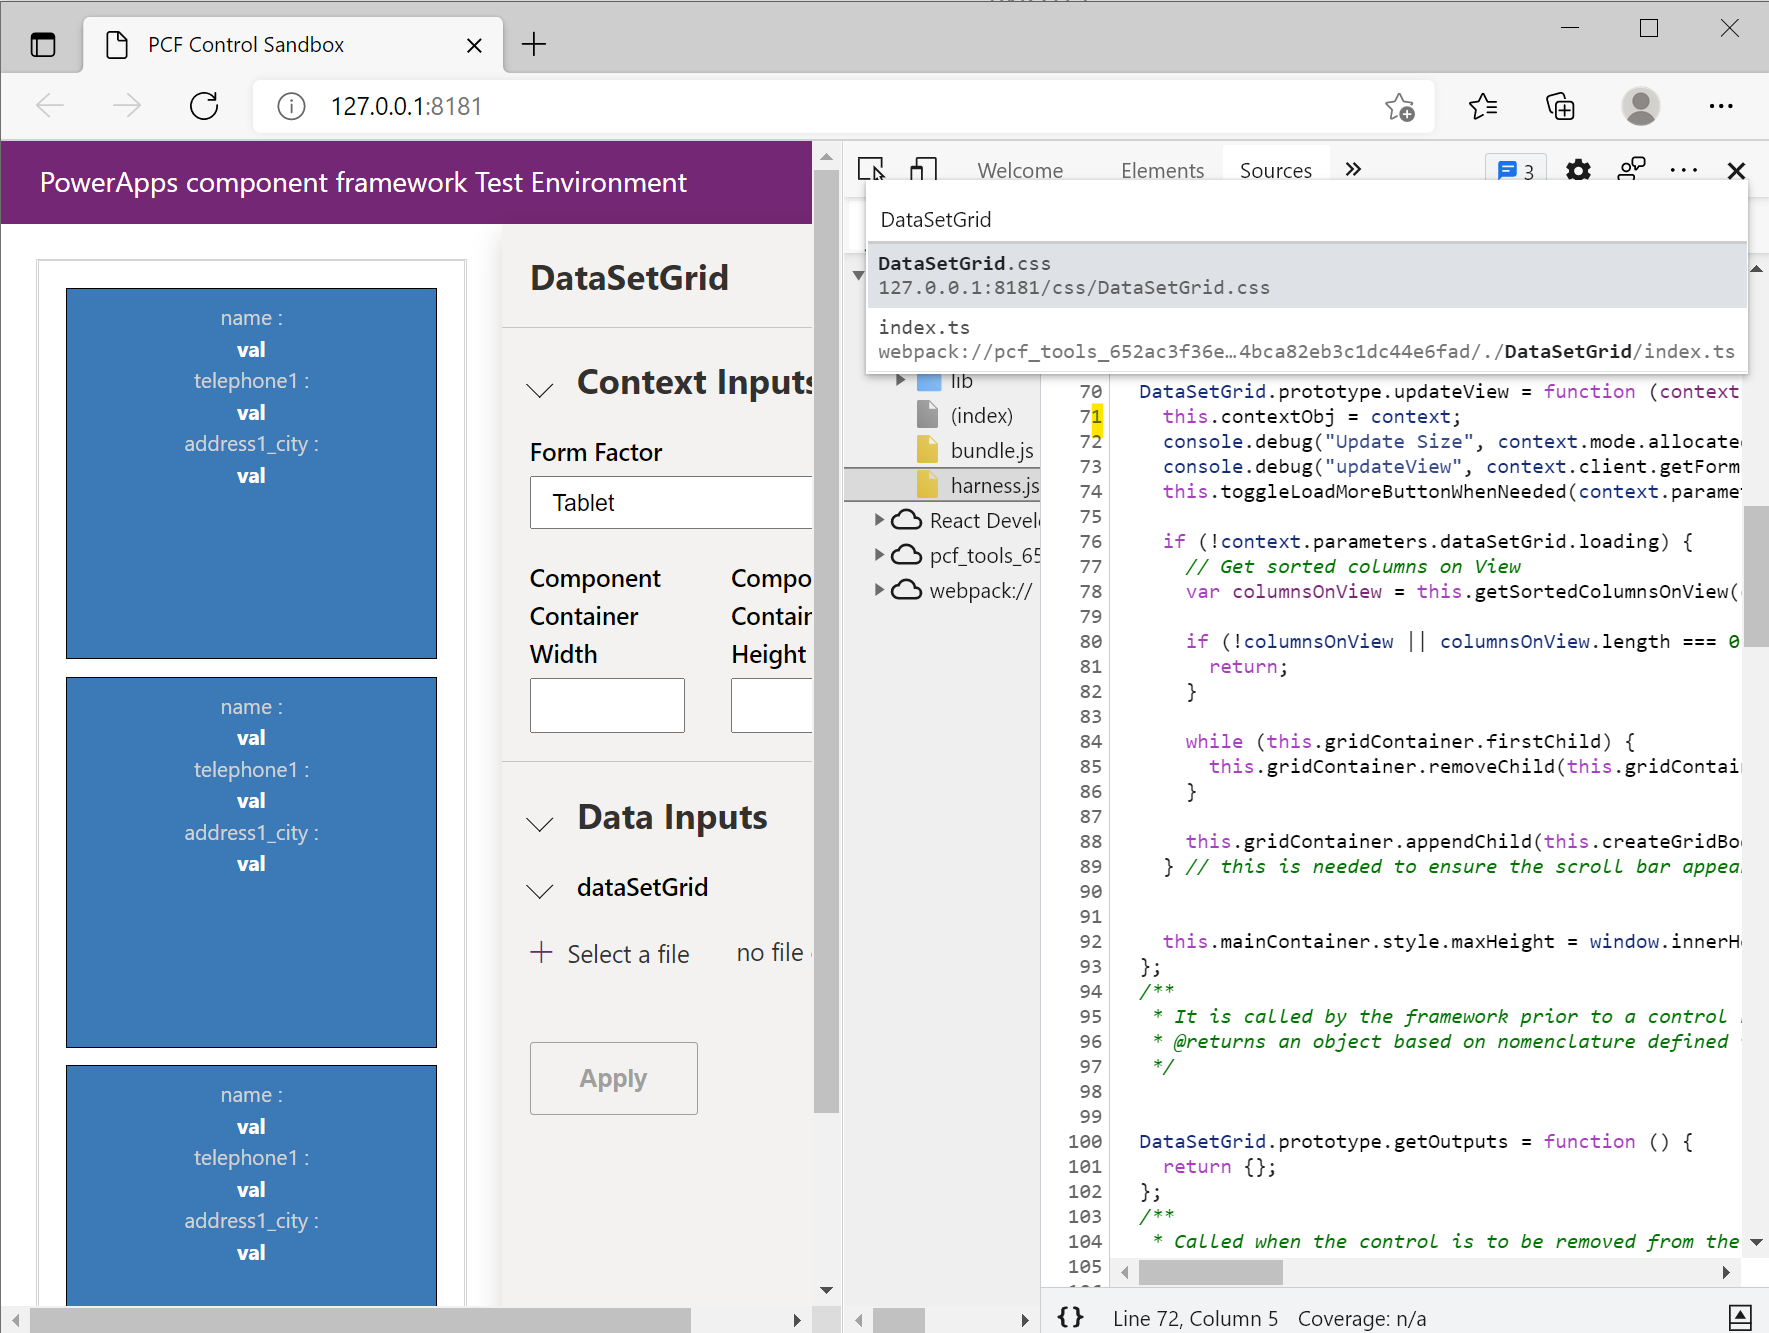
Let's walk through how to do this.
This final reading section from the Microsoft Learn page provides a step-by-step guide to using your browser's built-in developer tools for debugging.
Read the sections 'Using browser developer tools to debug your code component' and 'Using developer tools with code components'. Focus on the steps to open the developer tools, find your TypeScript source file, and set a breakpoint.
Here is the condensed debugging workflow:
- With the test harness running in your browser, open the developer tools (press
F12orCtrl+Shift+I). - Go to the Sources tab.
- Use the "open file" shortcut (
Ctrl+P) and start typing the name of your component's TypeScript file (e.g.,index.ts). You should see a result under awebpack://path. Select it. - You are now viewing your original TypeScript code. Find the method you want to debug, such as
updateView. - Click in the gutter to the left of a line number to set a breakpoint. A blue marker will appear.
- Go back to the test harness UI and change a value in the "Data Inputs" pane.
- This action will trigger your component's
updateViewmethod, and the code execution will pause at your breakpoint. You can now inspect the values of variables (likecontext), check the call stack, and step through your code line by line.
5. Knowing the Limitations of the Test Harness
The local test harness is fantastic for UI development and testing component logic with mock data. However, it is a sandbox and not a fully functional Power Apps environment. It's crucial to know what it cannot do.
To be an effective developer, you need to know the limits of your tools. This short section of the guide lists the key features that will not work in the local test harness.
Read the section 'Common limitations when using the test harness'. This will help you understand when you must deploy your component to a real environment for further testing.
In summary, the most common limitations are:
- No
context.webAPIcalls: Any attempt to call the Dataverse Web API will fail. You'll need to mock the data you expect to receive from these calls. - No live dataset operations: Paging, sorting, and filtering on datasets do not work. The harness simply displays the static data from your CSV.
- Simplified metadata: Advanced properties of columns, like the full set of options for a Choice/Optionset field, are not available.
- No model-driven app specifics: Features like command bar integration, navigation APIs, and field-level security cannot be tested locally.
To test these scenarios, you must deploy your component to a Dataverse environment.
Conclusion
You have now mastered the local development cycle for PCF components. This is the workflow you will use for the majority of your development time, enabling you to build and iterate rapidly.
Key Takeaways:
- Use
npm start watchto launch a local development server that automatically rebuilds your component on any change. - The local test harness is your sandbox for testing UI, responsiveness, and component logic.
- Use the Data Inputs pane to provide mock data, either through simple inputs or by loading CSV files for datasets.
- Leverage your browser's developer tools and source maps to set breakpoints and debug your original TypeScript code directly.
- Be aware of the limitations of the test harness, especially regarding Web API calls and other live data operations.
What's Next?
You've built, styled, and now thoroughly tested a component on your local machine. The next logical step is to get it into a real Power Platform environment. In our next lesson, we will cover how to package and deploy a PCF component as part of a Dataverse solution, making it available for use in your Model-driven and Canvas apps.