Hello! Welcome back to our module on Power Apps Component Framework (PCF) Development.
In our last lesson, we built the visual foundation of a PCF component by implementing the init and updateView methods. You now have a component that can render itself and react to data changes from the host application. However, it's currently a one-way street—it can receive data, but it can't send any updates back.
Today, we'll complete our tour of the essential component lifecycle methods. Our goal is to implement the getOutputs and destroy methods to return data to the host and perform cleanup. By the end of this lesson, you will be able to build a truly interactive component that can update form data, and you'll understand the professional best practices for resource management to prevent memory leaks.
1. The Component Lifecycle: Sending Data Back
So far, data has flowed from the Power Apps host into our component via the context object in init and updateView. To send data back, we need to reverse this flow. The PCF provides a specific, two-step mechanism for this:
- Signal a Change: The component must notify the framework that its internal value has changed, usually due to a user interaction.
- Provide the New Value: The framework then asks the component for the new value, which is then passed back to the host form.
Let's watch a short video that provides a high-level overview of this entire data flow, which will help contextualize the methods we're about to implement.
Getting started with PowerApps Component Framework
This clip from the official 'Getting started with PowerApps Component Framework' video on the Microsoft Power Platform channel explains the main component lifecycle flow. Pay close attention to the sequence involving notifyOutputChanged and getOutputs.
Watch from 22:53 to 25:29. Focus on understanding the roles of notifyOutputChanged and getOutputs in the data exchange process between the component and the host framework.
As you saw, notifyOutputChanged is the trigger, and getOutputs is the payload delivery.
2. Implementing getOutputs
The getOutputs method is your component's way of telling the host application, "Here is the new data you should save." However, the framework won't call this method unless you tell it to.
Step 1: notifyOutputChanged - The Signal
In the init method, alongside context, state, and container, the framework passes a fourth parameter: a function named notifyOutputChanged.
Your first job is to capture this function and store it in a private class member so you can call it later.
// In your class definition
private _notifyOutputChanged: () => void;

// In your init method
public init(context: ComponentFramework.Context<IInputs>, notifyOutputChanged: () => void, ...): void {
    this._notifyOutputChanged = notifyOutputChanged;
    // ... rest of your init code
}
Next, you need to call this._notifyOutputChanged() whenever the user does something that should change the bound field's value. This is typically done inside an event handler. For example, if you have an HTML <input> element, you would call it in the handler for the input or change event.
Step 2: getOutputs - The Payload
After you call notifyOutputChanged, the framework will, at its own discretion, call your getOutputs method. The implementation of this method is usually very simple: you return an object whose properties match the output properties defined in your ControlManifest.Input.xml.
The ManifestTypes.d.ts file, which is auto-generated, provides the IOutputs interface that your return object must conform to.
public getOutputs(): IOutputs {
    return {
        // 'controlValue' must match the name of the property in your manifest
        controlValue: this._value
    };
}
Here, this._value would be a private class member that you updated in your event handler before calling notifyOutputChanged.
Let's see this in a complete example from the Microsoft documentation we've been following.
Create your first component using Power Apps ...
The Microsoft Learn article 'Create your first component using Power Apps' walks through building a linear slider. We'll focus on the sections that implement the two-way data binding.
Please review the section 'Edit the getOutputs function'. Notice how it returns an object with a single property, controlValue, which is populated from a private variable _value. This is the standard pattern for returning data.
This pattern ensures that data is only requested by the framework when necessary, which is an important performance consideration.
Test your understanding!
Imagine you've built a custom component with a button. When the user clicks the button, the component should set the bound field's value to "Completed". You've correctly implemented the getOutputs method. However, when you test the component, clicking the button does nothing. What is the most likely cause of this issue?
Show answer
The most likely cause is that you forgot to call this._notifyOutputChanged() in your button's click event handler. Without this call, the Power Apps framework is never notified that the component has a new output ready, and therefore it never calls your getOutputs method to retrieve the new value.
3. The destroy Method: Professional Resource Cleanup
Your experience in software development has undoubtedly taught you the importance of resource management. Just as you'd use a finally block or IDisposable in C# to release resources, PCF components require a dedicated cleanup mechanism. The destroy method serves this purpose.
The framework calls destroy right before your component is removed from the DOM. This can happen when a user navigates away from the page, closes a form, or when the component is conditionally hidden. Its job is to undo everything you set up in init that could cause a memory leak.
Common items to clean up include:
- Event Listeners: Any listeners added with
addEventListenermust be removed withremoveEventListener. - Timers: Intervals or timeouts set with
setIntervalorsetTimeoutshould be cleared. - Web Sockets: Any open network connections should be closed.
- React Components: If using React, you must call
ReactDOM.unmountComponentAtNodeto allow React to clean up its internal state.
Failing to do this can lead to "zombie" components that consume memory and CPU cycles long after they are gone from the screen, degrading application performance.
Let's see how to implement this.
Create your first component using Power Apps ...
Let's return to the Microsoft Learn tutorial to see the implementation of the destroy method. It's a direct counterpart to the setup performed in init.
Now, read the section 'Edit the destroy function'. The example is straightforward: since an event listener was added to an input element in init, the destroy method simply removes that same listener.
For further context on why this is a critical best practice, the following documentation is highly valuable.
Best practices for code components - Power Apps
The 'Best practices for code components' article emphasizes the importance of proper cleanup. It provides a concise summary of what should be handled in the destroy method.
Read the section titled 'Clean up resources inside the destroy method'. It reinforces the concepts and mentions specifics for different scenarios, like using React.
4. Hands-On: Building the Interactive LinearInputControl
Now it's time to put all the pieces together. We will replace the simple component from the last lesson with the full LinearInputControl from the Microsoft documentation. This will give you a complete, working example of all four lifecycle methods.
First, let's look at the complete code so you can see how init, updateView, getOutputs, and destroy all work together.
Create your first component using Power Apps ...
This link points to the complete index.ts file for the LinearInputControl. Take a moment to read through it and identify the key parts we've discussed.
Find the code block under the heading 'The complete index.ts file should look like this:'. As you read, locate: Where _notifyOutputChanged is stored. The refreshData event handler and the call to _notifyOutputChanged(). How the getOutputs method returns the _value. How the destroy method removes the event listener.
Your Task:
- Open the PCF project you created in the last lesson in Visual Studio Code.
- Replace the entire content of your
index.tsfile with the code for theLinearInputControlfrom the link above. - In your
ControlManifest.Input.xmlfile, ensure your property is namedcontrolValueand its type is bound to a numeric type group, as the code expects. The property definition should look like this:<property name="controlValue" display-name-key="controlValue" description-key="controlValue" of-type="Whole.None" usage="bound" required="true" /> - Save all your changes.
- Build and test your component by running the following commands in the VS Code terminal:
npm run build npm start - In the test harness that opens, you will see a slider.
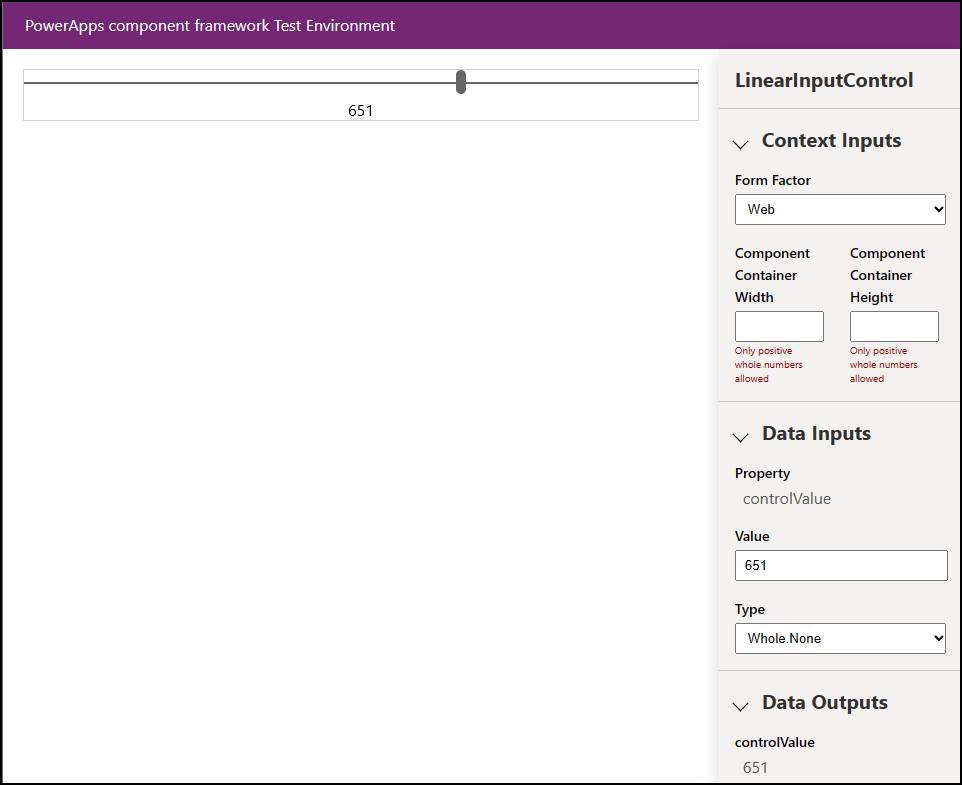
To verify your implementation:
- Test
getOutputs: Drag the slider. You should see thecontrolValuein the Data Outputs panel on the right update in real-time. This confirms that your event handler,notifyOutputChanged, andgetOutputsare all working correctly. - Test
destroy: To "see" thedestroymethod work, addconsole.log("Component is being destroyed!");inside yourdestroyfunction and rebuild (npm run build). In the test harness, change the property type fromWhole.NonetoSingleLine.Text. The framework will unmount your component to load a new one, and you will see your message in the browser's developer console.
Conclusion
Excellent work! You have now implemented all four fundamental methods of the PCF component lifecycle. Your component is no longer just a passive viewer of data; it is a fully interactive control that can participate in the form's data model, and it does so in a robust and efficient way by managing its resources correctly.
Key Takeaways:
- Two-Way Data Flow: Data is sent back to the host via a two-step process: call
notifyOutputChanged()to signal a change, then return the new data ingetOutputs(). getOutputsReturns Bound Properties: The object returned bygetOutputsmust match theIOutputsinterface, with property names corresponding to those in your manifest.destroyis for Cleanup: Always use thedestroymethod to remove event listeners and clean up any other resources created ininitto prevent memory leaks and performance issues.- The Lifecycle is a Whole:
init,updateView,getOutputs, anddestroywork together to manage the state and behavior of your component from creation to removal.
What's Next?
So far, we have built and tested our component in the local test harness. While this is great for rapid development, the ultimate goal is to use these components in real applications. In the next lesson, "Bind PCF components to field and dataset properties within a Model-driven or Canvas App," we will take our completed LinearInputControl, package it into a solution, and deploy it to a Dataverse environment. You'll learn how to configure it on a model-driven app form, binding it to a real Dataverse column.