Hello! Welcome back to your advanced Power Platform journey.
In our previous lessons, we've focused on automating processes by communicating with services through APIs, culminating in building flexible custom connectors with policy templates. This is the modern, preferred way to integrate systems. But what happens when you need to automate a process involving a legacy desktop application, an old website, or any system that doesn't have an API?
This is where Robotic Process Automation (RPA) comes in. Today, we shift our focus from the backend to the frontend. Our learning outcome is to create a desktop flow using Power Automate for Desktop to automate a UI-based task. You will learn how to build automations that mimic human actions—clicking buttons, typing text, and extracting data directly from the user interface.
For someone with your development background, think of this as programmatic control over a user session, where you're not calling an API endpoint but are instead interacting with the application's controls as a user would.
1. Introduction to Power Automate for Desktop (PAD)
Power Automate for Desktop is Microsoft's RPA tool. It enables you to automate repetitive, manual tasks across both modern and legacy applications on your Windows desktop. Instead of writing code to call an API, you create a "desktop flow" that performs a sequence of UI actions.
Using Power Automate to Manage Process
Let's start with a foundational overview from an article in CODE Magazine. This will introduce the core concepts of Power Automate for Desktop and its place within the Power Platform ecosystem.
Please read the sections titled 'Power Automate for Desktop' and 'Example Two: Stop Manual and Repetitive Tasks!'. Focus on understanding: The definition of RPA and its purpose. The difference between 'Attended' and 'Unattended' flows. The two primary methods for creating a desktop flow: dragging and dropping actions (manual design) and using the recorder.
As the article explained, you can either meticulously build your automation step-by-step or use the recorder to capture your actions, which PAD then translates into a flow. For today's lesson, we'll focus on the manual, action-based approach, as it gives you more control and a deeper understanding of how PAD works under the hood—something that will appeal to your developer mindset.
2. Building Your First Desktop Flow: A Guided Walkthrough
The best way to learn PAD is to build something. We will now walk through the process of creating a desktop flow that automates a series of tasks on a website. This will involve launching a browser, logging in, searching for data, and extracting the results.
This comprehensive video tutorial is an excellent guide. We'll break it down into manageable segments. Please have Power Automate for Desktop open so you can follow along.
Get Started with Power Automate Desktop: Tutorial for Beginners (2026)
This tutorial by Anders Jensen provides a fantastic, practical introduction to building a desktop flow. We'll start with the basics of setting up the flow and interacting with a web page.
Watch from the beginning to 05:33. This segment covers: Creating a new flow in PAD. The concept of 'subflows' for organizing your logic (similar to functions or methods). Using variables to store data like URLs. Launching a browser to a specific page.
With the basic structure in place, the next step is to perform the core UI interactions: entering text and clicking buttons.
Get Started with Power Automate Desktop: Tutorial for Beginners (2026)
Now, let's automate the login process. This is where you'll see how PAD targets specific elements on the screen.
Continue watching from 10:06 to 15:15. Pay close attention to how the 'Populate text field on web page' and 'Click link on web page' actions are used. Notice the process of selecting the target UI element (the username field, the password field, the login button) on the web page.
You've just automated data entry and clicks. One of the most powerful features of RPA is the ability to not just input data, but to extract it from a user interface.
Get Started with Power Automate Desktop: Tutorial for Beginners (2026)
Finally, let's see how to extract structured data from the web page. This is a common requirement in web scraping and data migration scenarios.
Watch the segment from 15:15 to 22:14. Focus on the 'Extract data from web page' action. Observe how the tool intelligently identifies a pattern (like a table or a list) after you select the first couple of examples, and how it stores the output in a variable.
At this point, you have successfully created a desktop flow that performs a meaningful, multi-step UI-based task. The rest of the video goes into more advanced topics like Excel integration and loops, which are excellent for further learning, but we have covered the core of today's learning outcome.
3. The Core Mechanism: UI Elements and Selectors
You've seen PAD in action, but how does it know exactly which button to click or which text box to populate? The answer lies in UI Elements and their Selectors.
A UI Element is an object that represents a component in an application's user interface (e.g., a button, a text field, a window).
A Selector is the "address" that uniquely identifies that UI element within the application's hierarchy. Given your background in C# and web development, this is analogous to an object reference in code, a CSS selector, or an XPath query in the HTML DOM.
Let's turn to the official Microsoft documentation for a formal definition of these concepts.
Read the sections 'UI elements', 'UI elements types', 'Distinguish desktop from web UI elements', and 'UI elements properties'. Focus on: How UI elements are captured and stored in the UI elements pane. The distinction between Desktop UI elements and Web UI elements. The statement that all UI elements consist of one or more selectors.
The PAD designer provides dedicated tools for managing these elements and their selectors.
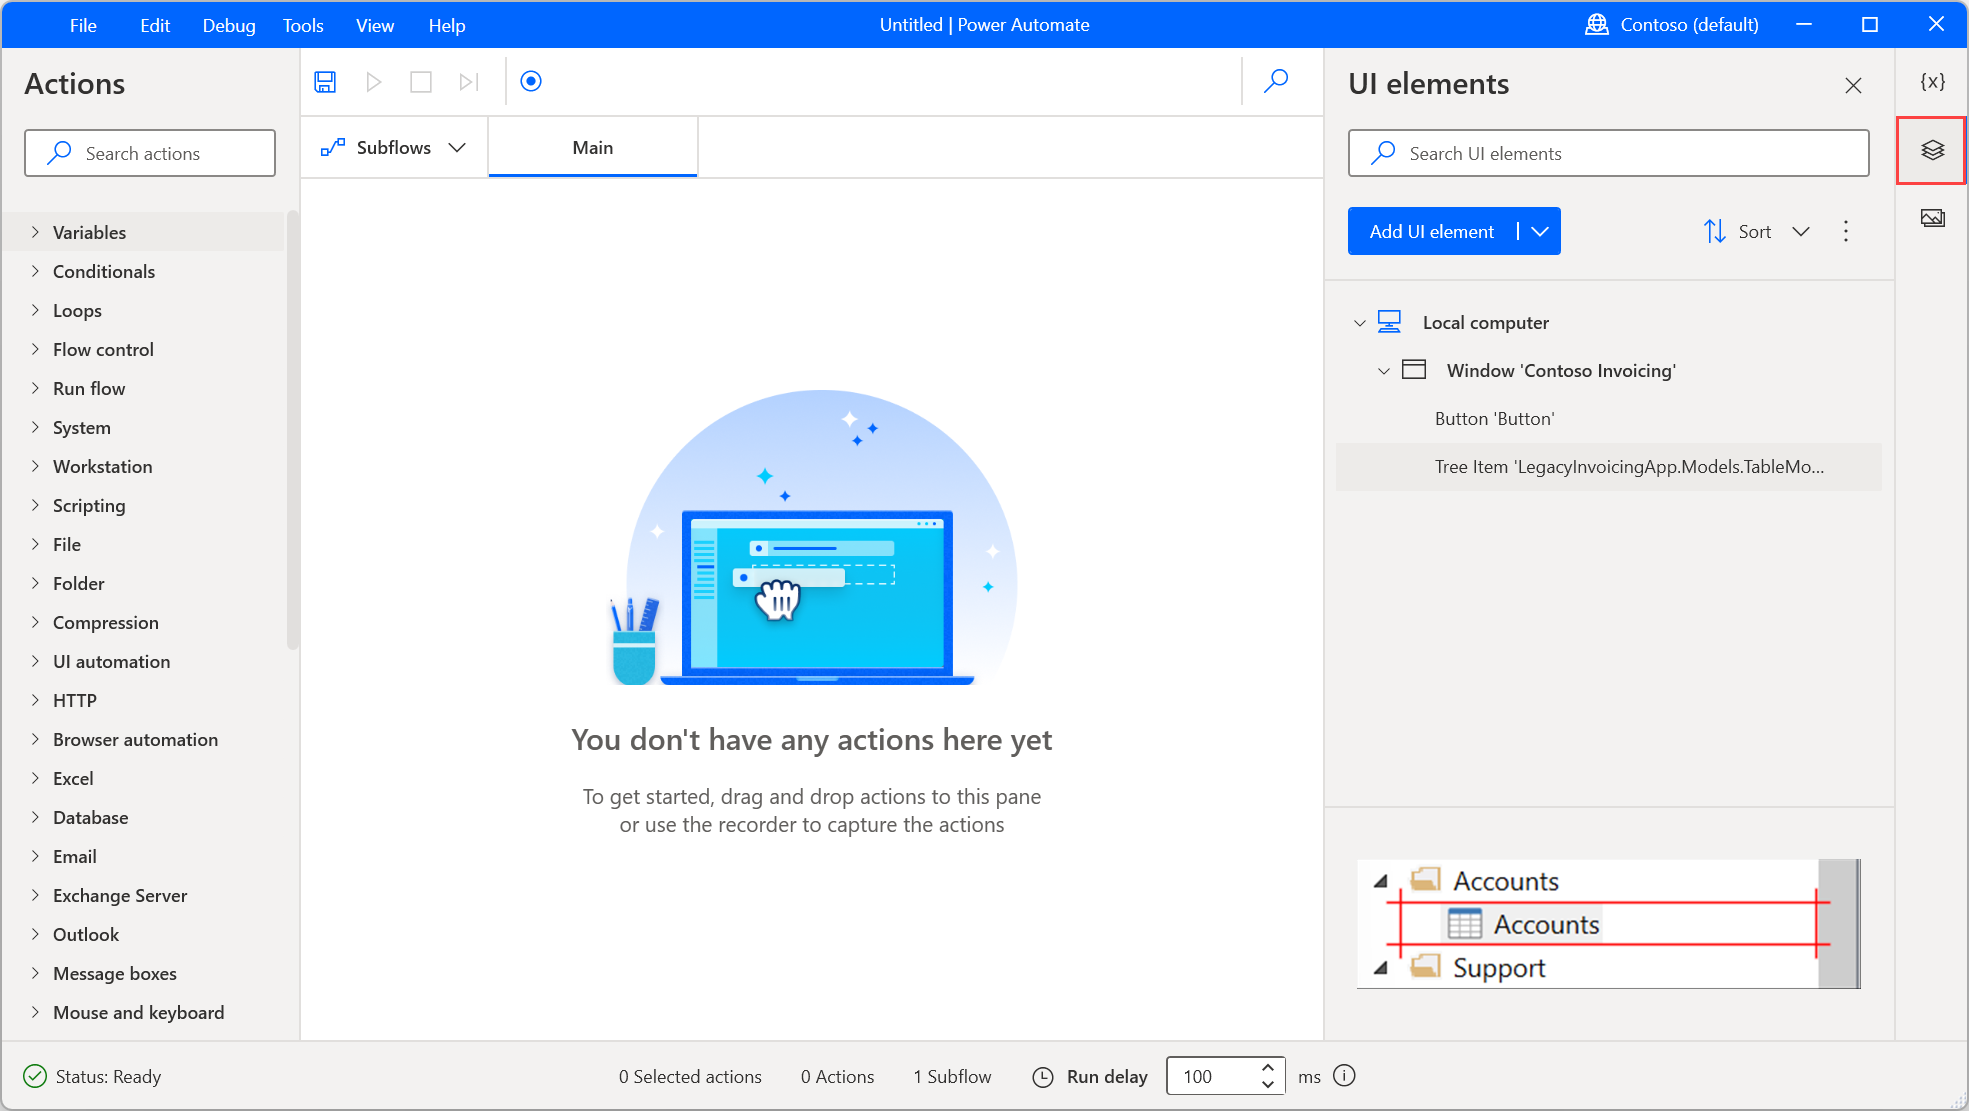
When you edit a UI element, you can inspect and modify its selector. This is where you can apply your developer skills to create more robust and reliable automations.
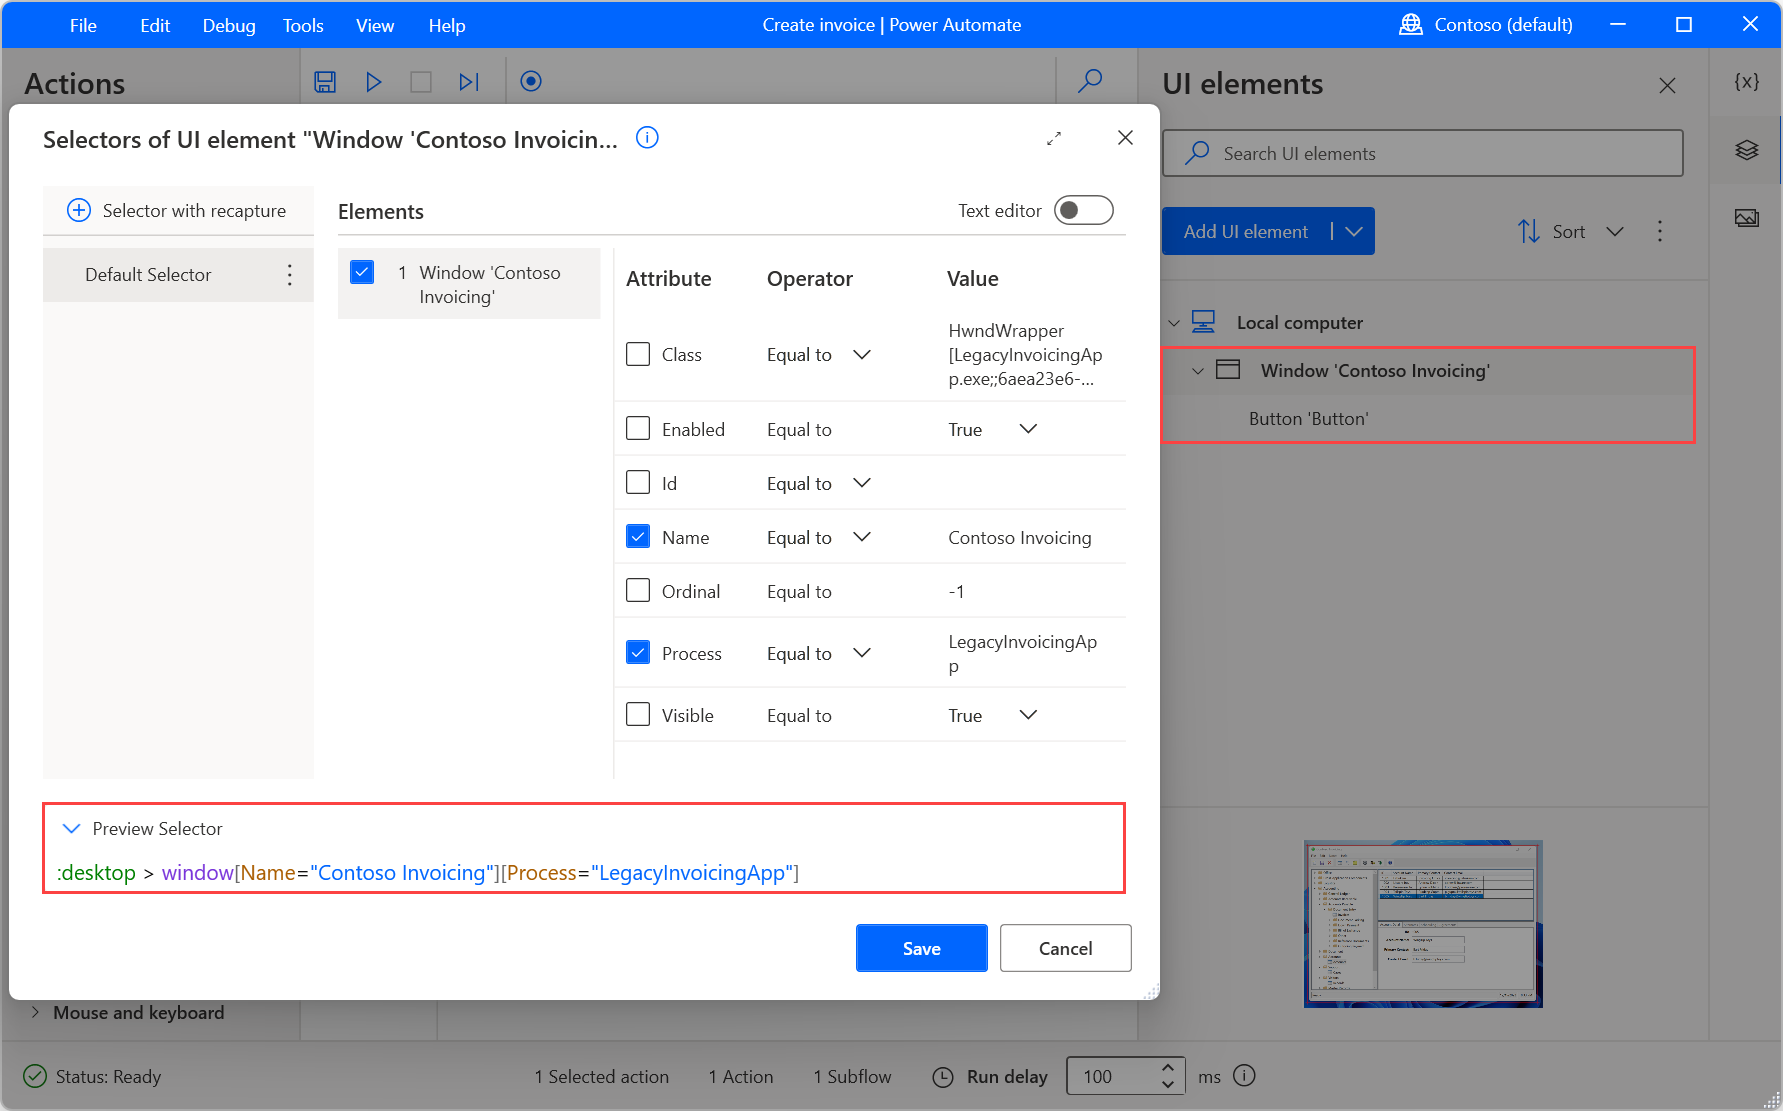
For a deeper dive into how selectors are constructed and how you can make them more resilient, this next resource is invaluable.
UI Elements and Selectors in Power Automate Desktop - Full Tutorial
This video from Anders Jensen specifically focuses on selectors. It will help you understand their structure and how to build better ones.
Watch the segment from 02:34 to 09:14. This part explains: What a selector is and how to read its structure. How to use your browser's developer tools (F12) to inspect the underlying code and understand how PAD constructs the selector. Why some attributes (like auto-generated IDs) can make selectors brittle and how to choose more stable ones.
Understanding selectors is the key to moving from basic recording to professional RPA development. It allows you to debug failing flows and proactively build automations that don't break when minor UI changes occur.
Test your understanding!
You are automating a web application where a button's ID attribute is dynamically generated and changes every time the page loads (e.g., id="button-xyz-123"). However, the button's text is always "Submit". Your recorded desktop flow keeps failing because its selector is based on the dynamic ID.
How would you edit the selector to make it more robust?
Show answer
You would open the UI element for the button in the selector editor. Instead of relying on the ID attribute, you would look for a more stable attribute. Since the button text is constant, you could:
- Find the
NameorTextattribute in the selector's properties. - Set its value to "Submit".
- Disable or remove the part of the selector that relies on the dynamic
IDattribute.
This makes the selector dependent on the static text of the button rather than its volatile ID, resulting in a much more reliable automation. This is an example of using a text-based selector.
Conclusion
Today you've stepped into the world of Robotic Process Automation with Power Automate for Desktop. You've moved beyond API-level integration to automating tasks directly through the user interface, a critical skill for dealing with systems that lack modern APIs.
Key Takeaways:
- RPA for the Front End: Power Automate for Desktop is your tool for automating UI-based tasks when APIs are not an option.
- Building a Flow: You can create desktop flows by dragging and dropping actions from the library or by using the recorder to capture your steps.
- UI Elements are the Targets: Every interactable component on the screen (a button, a form, a window) is captured as a UI Element.
- Selectors are the Address: The robustness of your automation depends on its selectors. Understanding and editing selectors is what distinguishes a simple macro from a resilient RPA bot.
What's Next
You've now successfully created a standalone desktop flow that runs on your machine. But how do you trigger this automation from the cloud? How do you pass data into it (like a customer ID to look up) and get data back out (like the extracted results)?
In our next lesson, we will bridge the gap between the cloud and the desktop. You will learn how to integrate a desktop flow with a cloud flow, passing input and output parameters. This will unlock the full potential of RPA by allowing you to orchestrate and manage your desktop automations as part of a larger, end-to-end business process.