Hello! In our last lesson, we completed our deep dive into automation by learning how to strategically choose between Power Automate and Azure Logic Apps based on developer needs, governance, and licensing. This architectural awareness is a crucial skill for a Power Platform developer.
Today, we pivot from process automation to conversational automation. We're beginning our journey into Microsoft Copilot Studio, the platform for building intelligent chatbots. Your goal for this lesson is to learn how to design chatbot topics with trigger phrases, conditions, and conversation nodes. This is the absolute foundation of creating structured, predictable, and helpful chatbot experiences, and a core skill tested in the PL-400 exam.
We'll cover what topics are, how they are triggered, and how you can build out a conversational path using questions, variables, and conditional logic.
1. Introduction to Copilot Studio and Topics
Microsoft Copilot Studio (formerly known as Power Virtual Agents) is a low-code platform for creating powerful chatbots. As a developer, you can think of it as an environment where you define the logic and flow of a conversation that a user will have with an AI agent.
The fundamental building block of any conversation in Copilot Studio is the Topic. A topic is a self-contained conversation path designed to handle a specific user intent. For example, you might have one topic to handle questions about store hours, another for checking an order's status, and a third for booking an appointment.
When you create a new copilot, you'll see two types of topics:
- Custom Topics: These are the topics you will create to handle the specific needs of your business.
- System Topics: These are pre-built topics that handle common conversational events like greetings (
Conversation Start), escalations, errors, and goodbyes. You can customize most of these.
To get a quick overview of what topics are and see how to customize the initial greeting, please watch the first couple of minutes of the following video.
Copilot Studio Tutorial: Work with Topics
This video from Lisa Crosbie provides a concise introduction to topics in Copilot Studio and demonstrates how to edit the 'Conversation Start' system topic to personalize your bot's greeting.
Watch from the beginning to 02:10. Focus on the distinction between custom and system topics and how the 'Conversation Start' topic defines the initial user experience.
2. The Anatomy of a Topic
From a developer's perspective, a topic is like a function or method. It's invoked by a specific trigger, it executes a series of steps (nodes), and it uses variables to manage state.
The following resource provides a clear, developer-focused breakdown of a topic's components.
Copilot Studio for Developers: Building Conversational AI
This article, 'Copilot Studio for Developers', breaks down the core components of a topic in a structured way that will feel familiar to you.
Read the section 'Understanding Topics' and pay close attention to the list under 'Anatomy of a Topic'. This provides the conceptual framework for what we are about to build.
Let's break down these components:
- Trigger: This is what starts the topic. It's how the copilot recognizes the user's intent.
- Conversation Nodes: These are the building blocks of the conversation flow. The most common nodes are:
- Send a message: Displays text, images, or cards to the user.
- Ask a question: Prompts the user for input.
- Add a condition: Creates branching logic, similar to an
if/elsestatement in C#. - Call an action: Invokes a Power Automate flow or another action to perform tasks, which we'll cover later.
- Variables: These store information collected from the user or retrieved from other systems. Just like in your C# development, variables are essential for creating dynamic and stateful applications.
3. Triggering a Conversation
A copilot needs to understand when to start a particular topic. This is handled by the trigger. Copilot Studio offers two primary methods for this.
Method 1: Trigger Phrases (Classic Orchestration)
This is the traditional method. You provide a list of 5-10 short phrases or keywords that a user might type to express their intent. The copilot's NLU (Natural Language Understanding) model uses these phrases to match the user's input to the correct topic.
Method 2: Generative Triggers (Modern Orchestration)
This is the more advanced, AI-driven approach. Instead of a list of phrases, the trigger is based on the topic's name and description. The underlying large language model (LLM) uses the semantic meaning of your description to determine if a user's query matches the topic's purpose. This is more flexible and powerful than relying on exact phrase matching.
The video below demonstrates both creating a topic with the modern generative approach and then explains how to enable it if you're starting from the classic phrase-based method.
Copilot Studio Tutorial: Work with Topics
Continuing with Lisa Crosbie's tutorial, this segment shows how to create a topic and then how to enable generative AI triggers, upgrading from static phrases to a more dynamic, description-based approach.
Watch from 02:10 to 05:41. Observe how the topic is first created with trigger phrases, and then see how to switch to the generative AI setting that uses the topic's description instead. This is a key evolution in the platform.
For a comprehensive list of all available trigger types, which is useful knowledge for the exam, you can refer to the official Microsoft documentation.
Set topic triggers - Microsoft Copilot Studio
This Microsoft Learn page provides a definitive table of all trigger types available in Copilot Studio, from user messages to system events.
Review the table under the 'Trigger types' section. You don't need to memorize it, but be familiar with the main types like 'The agent chooses' (generative) and 'User says a phrase' (classic).
4. Building the Conversation Flow
Once a topic is triggered, the conversation flows from one node to the next on the authoring canvas. This is where you visually build the logic.
The following video provides a fantastic, in-depth walkthrough of building a complete topic from scratch. It covers adding triggers, asking questions, saving the response to a variable, and using conditional logic.
Copilot Studio Beginner to Pro | Full AI Chatbot Course 🤖💻
This comprehensive video from Pragmatic Works will guide you step-by-step through creating a 'Schedule' topic. It's a practical, hands-on demonstration that directly aligns with your learning preference.
Watch from 25:40 to 40:15. Follow along as the presenter: Creates a new topic from blank. Adds multiple trigger phrases. Adds a Question node to ask for more details. Saves the user's response in a named variable. Uses a Generative answers node (a type of action) to respond based on the variable's value. Adds a node to End the current topic.
Key Steps in Building the Flow:
- Start with the Trigger: Define your trigger phrases or description.
- Ask for Information: Use a Question node to gather input from the user. You can specify what kind of information you expect (text, number, date, etc.).
- Store the Response: Every question node needs to save the user's answer into a variable. It's a best practice to give your variables meaningful names (e.g.,
userEmailinstead ofVar1). - Implement Logic: Use a Condition node to create branches based on the value of a variable. This allows your copilot to respond differently in various scenarios.
- Provide an Answer: Use a Message node to give information back to the user. You can insert variables directly into messages for a personalized response (e.g., "Thank you, {userName}!").
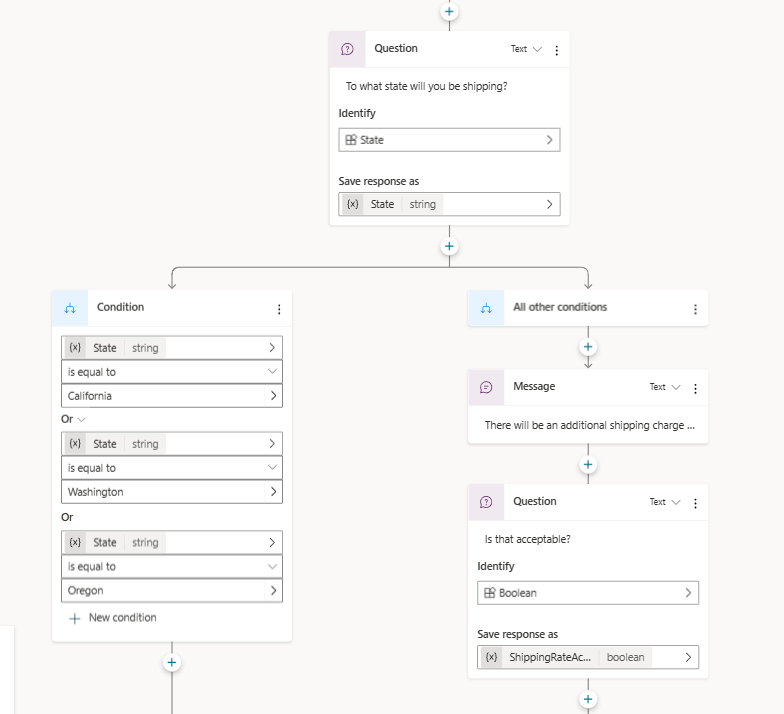
This image from the documentation perfectly illustrates a simple flow with a message, a question, and a condition based on the user's input.
Test your understanding!
You need to design a new topic for a company's internal IT helpdesk copilot. The topic's purpose is to allow employees to request a password reset for one of two systems: "CRM" or "Finance Portal".
Outline the design of this topic. What would you include for the following components?
- Topic Name & Description (for generative triggers)
- Trigger Phrases (for classic triggers)
- Conversation Nodes (in order)
Show answer
Here's one possible design:
-
Topic Name & Description:
- Name:
Password Reset - Description:
This topic helps an employee reset their password for the CRM or the Finance Portal system.
- Name:
-
Trigger Phrases:
reset my passwordI forgot my passwordcan't log inpassword helpneed a new password
-
Conversation Nodes:
- Node 1 (Question):
- Message: "I can help with that. Which system do you need to reset your password for?"
- Identify: Multiple choice options
- Options: "CRM", "Finance Portal"
- Save response as (Variable):
systemChoice(Text)
- Node 2 (Condition):
- Branch 1: If
systemChoiceis equal to "CRM"- Message Node: "Okay, I've initiated the password reset process for the CRM system. Please check your email for a reset link."
- Branch 2 (All other conditions): If
systemChoiceis equal to "Finance Portal"- Message Node: "Got it. I've started the password reset for the Finance Portal. You'll receive an email with instructions shortly."
- Branch 1: If
- Node 3 (End Conversation): End the topic with a success message.
- Node 1 (Question):
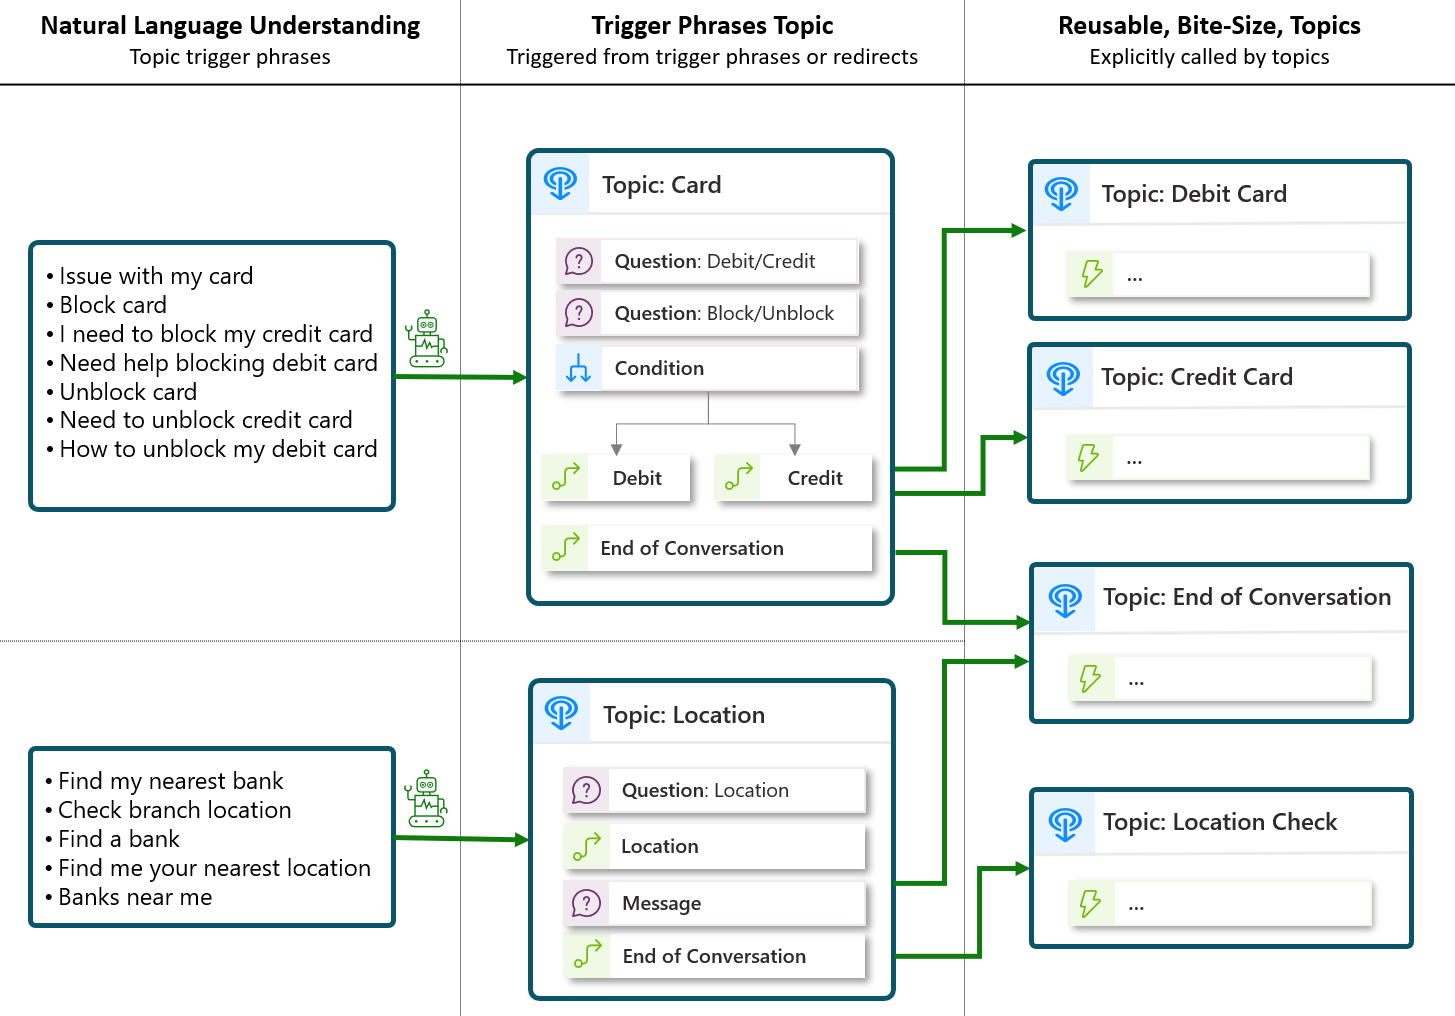
As you build more complex copilots, it's a best practice to break down large, monolithic topics into smaller, reusable ones. You can use a Redirect action within one topic to call another, passing variables to maintain context. This is analogous to calling a helper function in your code.
Conclusion
In this lesson, you've learned the fundamental principles of designing conversational flows in Microsoft Copilot Studio. You now understand that topics are the core building blocks, how they are activated by triggers, and how to construct a conversation using nodes for questions, messages, and conditions.
Key Takeaways:
- Topics are self-contained conversational paths that handle a specific user intent.
- Triggers activate topics, either through classic trigger phrases or modern AI-driven generative descriptions.
- The authoring canvas is where you visually build the conversation flow using nodes.
- Question nodes are used to collect user input, which is stored in variables.
- Condition nodes use variables to create branching logic, enabling your copilot to handle different scenarios dynamically.
What's Next?
We've only scratched the surface of what you can do with user input. In the next lesson, we will go deeper into managing the conversation's state. You will learn how to manage conversation state using variables and extract user information with entities. This will allow you to capture more structured data from a user's free-form text, such as dates, email addresses, and custom patterns, making your copilot even more intelligent.