Hello! Welcome back to the course.
In our last lesson, we built a professional workflow for creating and bundling client-side logic with TypeScript and Webpack. We saw how to structure our code into organized, reusable namespaces, ready for deployment.
Today, we will put that knowledge to immediate use. Your goal is to customize the app command bar for tables and forms using the modern command designer. This is the contemporary approach that largely replaces the classic Ribbon Workbench you're likely familiar with from your Dynamics 365 experience. We'll explore how to add buttons and define their logic using both low-code Power Fx and the professional JavaScript functions you now know how to build.
This is a critical skill for the PL-400 exam, moving beyond form scripts to user-initiated actions in the application's chrome.
1. Introduction to the Modern Command Designer
The modern command designer provides a streamlined, WYSIWYG experience for editing the command bars in a Model-driven App. You can access it directly from the app designer.
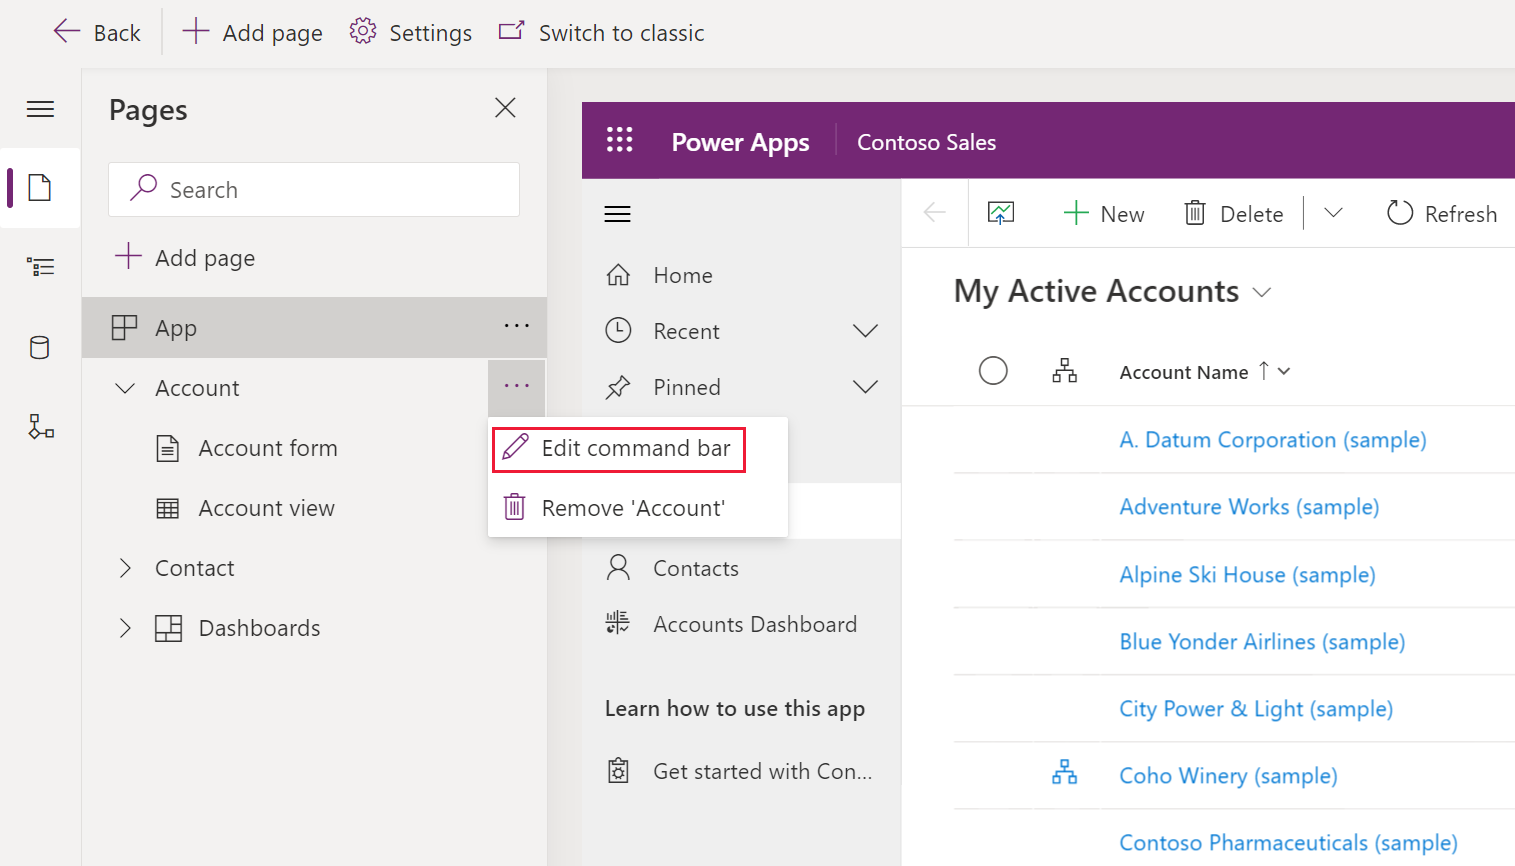
Once selected, you'll be prompted to choose which command bar you want to edit. The four main locations are:
- Main grid: The command bar visible on a table's main view page.
- Main form: The command bar visible when a single record's form is open.
- Subgrid view: The command bar on a subgrid control placed on a form.
- Associated view: The command bar visible when viewing related records from a form's navigation.
For any new command, you'll define its properties, such as the label, icon, and, most importantly, the Action and Visibility. The Action can be either a Power Fx formula or a call to a JavaScript function.
2. Customizing with Power Fx
For many common scenarios, Power Fx provides a powerful, low-code way to implement command logic without leaving the designer. This is ideal for data operations, navigation, and simple user notifications.
The key concepts to understand are:
- Context: Power Fx provides access to the app's context.
Self.Selected.Item: Refers to the current record when on a form.Self.Selected.AllItems: Refers to the collection of selected records in a grid.
- Action (
OnSelectproperty): This is where you write the Power Fx formula that executes when the button is clicked. You can use functions likePatch,Navigate,Notify, andConfirm. - Visibility: You can set a button's visibility based on a Power Fx formula that evaluates to
trueorfalse. For example, you can check the status of a record or the user's role.
Let's dive into a comprehensive example that showcases these concepts in a real-world scenario.
5 Tips & Tricks when customizing the Command Bar in model-driven #PowerApps
The video '5 Tips & Tricks when customizing the Command Bar' by Scott Durow, the original creator of the Ribbon Workbench, is an excellent resource. We'll use it to explore several advanced Power Fx patterns. Let's start with creating a 'Clone' button that duplicates a parent record and its children.
Watch the first two tips in the video (timestamps 00:00 - 09:02). Pay close attention to: How Patch, Defaults, and ForAll are combined to create a new parent record and then iterate through the original's child records to create copies. The use of the With function to temporarily hold the newly created parent record's context so it can be used to link the new child records. The use of Navigate to open the newly created record after the process is complete. How to set the Visible property using a formula based on Self.Selected.State to hide the button for new, unsaved records.
As you saw, Power Fx can handle relatively complex, multi-step data operations. The pattern of wrapping a Patch inside a ForAll is powerful for batch processing, and nesting the entire operation inside Navigate provides a seamless user experience.
The visibility rule Self.Selected.State <> FormMode.New is a common and essential pattern to ensure your commands only appear when they have a valid record context to work with.
3. Advanced Power Fx: Performance, Error Handling, and Debugging
A professional developer also needs to consider performance, error handling, and how to debug when things go wrong. Power Fx in modern commanding has provisions for all three.
5 Tips & Tricks when customizing the Command Bar in model-driven #PowerApps
Let's continue with Scott Durow's video to cover these crucial advanced topics.
Watch the remaining three tips in the video (timestamps 09:02 - 16:49). Focus on: Publishing & Debugging (Tip 3): Understand the publishing process and the role of the Command Checker tool. Notice how it lets you inspect the compiled JavaScript, which is invaluable for troubleshooting. Performance (Tip 4): Grasp the critical difference between the 'slow' method (ForAll containing Patch) and the 'fast' method (Patch containing ForAll). The latter sends updates in a batch, which is significantly more performant. Error Handling (Tip 5): See how the IfError function can be used to wrap your entire operation, allowing you to catch failures and provide meaningful feedback to the user via the Notify function.
These techniques elevate your command customizations from simple actions to robust, production-ready features. The Command Checker, in particular, is an essential tool for your developer toolkit when working with Power Fx commands.
4. Customizing with JavaScript
While Power Fx is excellent, certain scenarios require the full power and flexibility of JavaScript. This is where the skills from our previous lesson come directly into play.
Choose JavaScript over Power Fx when you need to:
- Implement highly complex business logic that is difficult to express in Power Fx.
- Perform intricate DOM manipulation (though this is rare and discouraged in Model-driven Apps).
- Integrate with third-party libraries.
- Navigate to custom pages or open dialogs with fine-grained control using
Xrm.Navigation.
The process involves:
- Writing your function in TypeScript and bundling it into a JavaScript web resource (as we did in the last lesson).
- Adding this web resource library in the command designer.
- Specifying the full namespaced function name (e.g.,
MySolution.Forms.Contact.myFunction). - Passing form or grid context as parameters to your function.
Customize Command bar using Command Designer in Model-Driven App
Let's watch a practical demonstration of using JavaScript to open custom pages and pass record context—a common requirement in advanced solutions.
Watch the sections on using JavaScript in the command bar (timestamps 08:47 - 15:26 and 26:57 - 31:58). Focus on: How a JavaScript web resource is created and added as a library to the command. How the function name is specified. Most importantly, how parameters like SelectedControlSelectedItemIds are passed from the command designer to the JavaScript function. This allows you to get the GUID of the selected record(s) and pass it to a custom page or another process.
This directly connects the dots from our previous lesson. The bundled JavaScript file containing MySolution.Forms.Contact.onLoad can now be called from a command button, not just a form event. By passing FirstPrimaryItemId (on a form) or SelectedControlSelectedItemIds (on a grid), you give your function the context it needs to perform actions on specific records.

Test your understanding!
You need to add a button to the Account main form called "Generate Quote". When clicked, it should open a custom page that allows the user to build a new quote record related to the current account. What would be your implementation choice (Power Fx or JavaScript) and why? Briefly outline the steps.
Show answer
Choice: JavaScript would be the better choice.
Reason: The requirement is to open a specific custom page, and you need to pass the current Account's ID to that page as context. While Power Fx's Navigate function can open a custom page, the Xrm.Navigation.navigateTo API in JavaScript provides more granular control over the target and how context is passed, which is standard practice for this scenario.
Outline of Steps:
- Create a JavaScript function (likely using TypeScript) that accepts the execution context as a parameter.
- The function would retrieve the Account ID from the form context:
formContext.data.entity.getId(). - It would then call
Xrm.Navigation.navigateToto open the custom page, passing the Account ID in thepageInputobject. - In the command designer, add a new button "Generate Quote".
- Set the action to "Run JavaScript".
- Add your bundled JS web resource as the library.
- Set the function name to your fully qualified function (e.g.,
MySolution.Ribbon.Account.generateQuote). - You could pass
PrimaryControlas a parameter to get the form context directly.
5. Strategic Limitations of Power Fx
While powerful, it's important to know the current limitations of Power Fx in commands. This knowledge is crucial for making the right architectural decisions.
Using Power Fx on Power Apps command bar
To round out our understanding, let's review a short article that highlights some of the current limitations and provides a balanced summary.
Read the sections 'Created component library', 'Starting a flow from the command bar', and 'Summary'. These sections explain that while you can add Dataverse tables to the command's component library, you cannot use other connectors (like SharePoint or Office 365) or trigger a Power Automate flow directly from a Power Fx command.
The key takeaway is that Power Fx commands are currently sandboxed to Dataverse operations. If you need to integrate with external services or trigger a cloud flow, you must use a different mechanism, such as a JavaScript function that calls a custom API or a custom connector, which are topics we will cover later.
Conclusion
In this lesson, you've mastered the modern command designer, a fundamental tool for customizing the user experience in Model-driven Apps. You now have a clear framework for deciding when to use Power Fx for rapid, data-centric actions and when to leverage the full power of TypeScript/JavaScript for complex logic and UI interactions.
Key Takeaways:
- The modern command designer is the standard for customizing command bars in four key locations: Main Grid, Main Form, Subgrid, and Associated View.
- Power Fx is excellent for actions involving Dataverse data (
Patch,ForAll), navigation (Navigate), user feedback (Notify), and confirmations (Confirm). - JavaScript is the choice for complex logic, integrating external libraries, and advanced UI navigation like opening side panes or dialogs using
Xrm.Navigation. - Passing context (like record IDs) from the command designer to your function is a critical pattern for building responsive applications.
- Debugging with the Command Checker is essential for troubleshooting Power Fx formulas.
Up Next:
We will now shift from client-side code and commands to a more declarative method of guiding users. In the next lesson, we will explore how to implement business process flows with stages, steps, and branching logic, another essential component for building structured business applications on the Power Platform.