Hello! Welcome to the next lesson in your PL-400 preparation journey.
In our last session, we focused on user-initiated actions by customizing the command bar with both Power Fx and JavaScript. This gave you the tools to empower users to perform specific tasks on demand.
Today, we shift from on-demand actions to guided processes. Your goal for this lesson is to learn how to implement business process flows with stages, steps, and branching logic. Business Process Flows (BPFs) are a cornerstone of Model-driven Apps, providing a visual roadmap that guides users through a predefined business protocol, ensuring consistency and reducing the need for training. This is the modern evolution of the guided processes you've likely encountered in classic Dynamics 365, but with a more powerful and flexible designer.
1. Understanding Business Process Flows
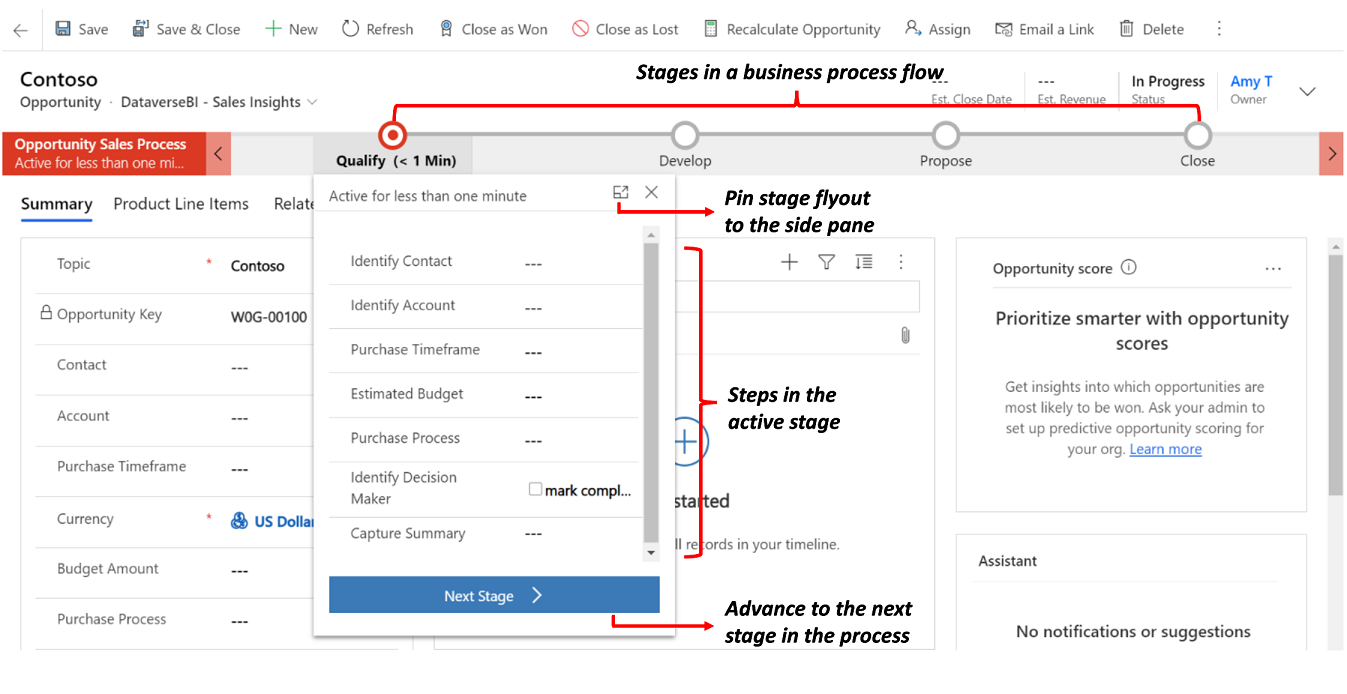
At its core, a Business Process Flow (BPF) overlays a set of stages and steps on a Model-driven App form, guiding a user from start to finish. It's a powerful tool for standardizing processes across your organization.
To start, let's get a clear visual and conceptual understanding of what BPFs are and why they are used.
Business Process Flows: Tutorial for Beginners
This video from Lisa Crosbie provides an excellent introduction to the concept of Business Process Flows and their purpose.
Watch the first three minutes of the video (timestamp 00:00 - 02:54). Focus on how a BPF visually represents a process and guides the user through distinct stages and steps.
The key components you saw are:
- Stages: The major phases of your process (e.g., Qualify, Develop, Propose, Close).
- Steps: The specific data points (columns/fields) a user needs to complete within each stage.
- Active Stage: The stage the user is currently working on.
2. Building and Configuring a Business Process Flow
Now let's move from concept to practice. You build BPFs using a dedicated visual designer that allows you to drag and drop components to map out your process.
Given your background, you'll find the designer intuitive. It's where you define the stages, the steps within them (by binding them to Dataverse table columns), and the behavior of those steps, such as making them required. Making a step required is known as stage-gating, as it prevents the user from moving to the next stage until the required data is provided.
Your guide to building Business Process Flows like an Expert 😎
The following video by Elaiza Benitez provides a concise, hands-on walkthrough of the BPF designer. It will guide you through creating a new BPF, adding stages, and defining the steps within them.
Watch the segment from 01:25 to 03:24. Observe the process of: Creating a new BPF from within a solution. Defining the primary table for the process. Adding and naming stages. Adding data steps to a stage and linking them to table columns. Making a step required to enable stage-gating.
3. Implementing Conditional Branching
Static, linear processes are useful, but real-world scenarios often require different paths based on the data. This is where branching comes in. Using if-else logic, you can dynamically alter the flow of the BPF.
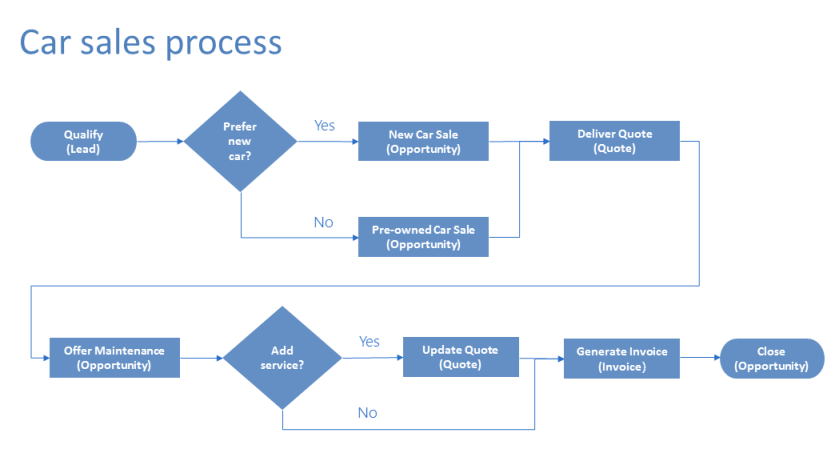
You implement branching by adding a Condition component to the designer. The rule you define in the condition must be based on a step in the stage immediately preceding it.
Your guide to building Business Process Flows like an Expert 😎
Let's return to the video to see how to implement this branching logic in the designer.
Watch the section from 04:39 to 05:44. Notice how a condition is added after a stage to check the value of a field ('Project is funded'). Based on the outcome, the BPF can be directed to different subsequent stages.
4. Advanced BPF Capabilities
To truly leverage BPFs and meet complex business requirements, you'll need to go beyond the basics. For a developer preparing for the PL-400, understanding these advanced patterns is crucial.
Multi-Table Processes
A single BPF is not limited to a single Dataverse table. You can design a process that starts on one table (e.g., Lead) and continues on a related table (e.g., Opportunity). This requires a 1:N (one-to-many) relationship between the tables.
Your guide to building Business Process Flows like an Expert 😎
The ability to span multiple tables is a powerful feature. Let's see how this is configured.
Watch the segment from 03:24 to 04:39. Pay close attention to how a new stage is associated with a secondary table ('Team Project') and how the relationship to the primary table ('Idea') is selected. This linkage is what allows the process to flow across tables.
Triggering Automation from a BPF
You can embed automation directly into your BPF stages. This allows users to trigger server-side logic without leaving the process flow. This is an area where your background in plugins and classic workflows will provide a strong foundation. There are two primary ways to do this:
- Cloud Flows (Modern): Add a "Flow Step" to a stage that allows a user to run an on-demand Power Automate cloud flow. This is the modern, flexible approach for tasks like sending notifications, calling APIs, or performing complex data manipulations.
- Classic Workflows (Legacy): Add a "Workflow Step" to trigger a classic, synchronous Dataverse workflow. While classic workflows are being superseded by Power Automate, they are still used, especially for simple, synchronous on-demand validations that can stop a process.
Your guide to building Business Process Flows like an Expert 😎
Let's see how both modern Cloud Flows and classic Workflows can be integrated as steps within a BPF stage.
Watch the segment from 08:26 to 14:55. This is a packed section, so focus on these key distinctions: Cloud Flow Integration (08:26 - 10:56): Notice how an instant flow is created with the trigger 'When a flow step is run from a business process flow'. This flow can take user input and perform actions like posting to Teams. Classic Workflow Integration (10:56 - 14:00): Observe how a synchronous, on-demand workflow is created to perform validation. The key here is using the 'Stop Workflow' step with a status of 'Canceled' to display an error message and prevent stage progression. Adding Steps to the BPF (14:00 - 14:55): See how the created Cloud Flow and Workflow are added as distinct step types in the BPF designer.
This ability to blend guided UI with powerful backend automation is a key strength of the Power Platform.
Test your understanding!
You are designing a BPF for a university's student application process. The process starts on the Application table.
- Stage 1 (Submission): The applicant fills out their details.
- Stage 2 (Review): An admissions officer reviews the application.
- Stage 3 (Interview): If the applicant's GPA is 3.5 or higher, an
Interviewrecord (from a relatedInterviewtable) must be created and scheduled. Otherwise, this stage is skipped. - Stage 4 (Decision): A final decision is made.
How would you implement the logic for Stage 3? What component would you use, and what relationship is required?
Show answer
- Component: You would use a Condition component placed after the 'Review' stage.
- Logic: The condition would check the 'GPA' column on the
Applicationrecord. The rule would beGPA >= 3.5. - Pathing: The 'true' path of the condition would lead to the 'Interview' stage. The 'false' path would connect directly to the 'Decision' stage, skipping the interview.
- Relationship: To move the process from the
Applicationtable to theInterviewtable, a 1:N (one-to-many) relationship must exist betweenApplication(the 'one' side) andInterview(the 'many' side).
5. Under the Hood: The BPF Data Model
As a developer, it's beneficial to understand what happens behind the scenes. When you activate a BPF, Dataverse automatically creates a new custom table to store the instances of that flow.
- Naming: The table is named using the pattern
prefix_uniquename(e.g.,new_mycustombpf). - Data: Each row in this new table represents one active BPF instance running against a specific record (e.g., one Opportunity record running the "Sales Process"). The row stores the current active stage (
activestageid) and the path taken so far (traversedpath). - Security: This is critical. Access to the BPF is controlled by security role privileges on this custom table. By default, only System Administrators and Customizers have access. You must explicitly grant other security roles (e.g., 'Salesperson') Create, Read, Update, and Delete permissions on the BPF's custom table for them to be able to use it.
Work with business process flows using code
The official Microsoft documentation provides the definitive explanation of this underlying architecture. Understanding this is key to troubleshooting and programmatically interacting with BPFs.
Read the following sections to understand the BPF data model: Define business process flow: Find the part that explains where the definition is stored (the workflow table) and where stage information is stored (processstage table). Business process flow table: Read this section carefully. It explains how the custom table for BPF instances is automatically created upon activation and how you can find its name. Manage security for business process flows: This is a very important section. It details how security is managed and why you must grant privileges on the custom BPF table to your users.
Knowing that a BPF instance is just a row in a custom Dataverse table demystifies the entire feature and aligns it with the standard Dataverse security and data model you are already familiar with.
Conclusion
In this lesson, you have learned how to implement structured, guided user experiences using Business Process Flows. We moved from basic stage and step creation to implementing dynamic paths with conditional branching and integrating powerful backend automation.
Key Takeaways:
- BPFs are built in a visual designer using Stages, Steps, and Conditions.
- Stage-gating enforces data completion by making steps required.
- Branching logic allows you to create dynamic process paths based on data in preceding stages.
- BPFs can span multiple tables, provided a 1:N relationship exists between them.
- You can trigger Cloud Flows (modern) or Classic Workflows (legacy) from BPF stages to automate tasks.
- Architecturally, an activated BPF creates a custom Dataverse table to store its instances, and security for the BPF is managed through privileges on this table.
Up Next:
While BPFs are excellent for guiding users through processes on standard forms, sometimes you need to provide a completely unique UI that isn't tied to a form's layout. In our next lesson, we will dive into how to create custom pages in Model-driven Apps to provide tailored user experiences. This will empower you to build rich, bespoke interfaces that can be seamlessly integrated into your apps.