Hello! Welcome back to our module on Azure and Power Platform Integration Patterns.
In our last lesson, we configured Dataverse to send asynchronous messages to an Azure Service Bus, creating a robust, decoupled integration. Today, we'll explore another powerful method for pushing data out of Dataverse: Webhooks.
Your goal for this lesson is to learn how to register and configure a webhook to call an external service from a Dataverse event. This is a fundamental skill for the PL-400 exam and for building real-world integrations.
We will start by understanding what webhooks are and how they compare to the Service Bus pattern. Then, we'll get hands-on, first by configuring a webhook to call a Power Automate flow, and then by setting one up to call a more powerful Azure Function, a pattern that will be very familiar given your C# and .NET background.
1. Webhooks vs. Service Bus: A Quick Comparison
Before we dive in, let's clarify the distinction between the two asynchronous patterns we've seen. In the last lesson, you learned that Azure Service Bus acts as a message broker.
- Service Bus (Brokered Messaging): Dataverse sends a message to a central broker (the queue or topic). It doesn't know or care who picks up the message. This pattern provides resilience, fan-out capabilities (with topics), and guaranteed delivery, making it ideal for critical, enterprise-wide systems.
A Webhook is a more direct approach.
- Webhook (Direct HTTP Push): Dataverse makes a direct HTTP POST request to a specific URL you provide. Think of it as Dataverse "calling a phone number" for an external service when an event happens. It's simpler to set up for point-to-point communication but lacks the advanced features of a broker.
The good news is that the payload sent by a webhook is the same as with a Service Bus integration: a JSON serialization of the IPluginExecutionContext. This means all your experience with plugin context—Target, Pre/Post Images, InitiatingUserId—is directly applicable.
2. Pattern 1: Calling Power Automate with a Webhook
The easiest way to create an external service to receive a webhook call is by using Power Automate. Let's walk through a video that demonstrates this entire process from end to end.
Dynamics 365 Webhooks + Power Automate | #PowerPlatformTV 040
This video by Carl de Souza provides a clear demonstration of using a Power Automate flow as a webhook endpoint. We will use this as our first hands-on example.
Please watch the following segments: Creating the Endpoint (02:40 - 05:20): See how an automated cloud flow is created with the 'When an HTTP request is received' trigger. This trigger generates the unique URL that our webhook will call. Registering the Webhook (05:20 - 08:28): Observe the process in the Plugin Registration Tool (PRT). Pay close attention to how the long URL from Power Automate, which includes authentication parameters in its query string, is correctly configured in the PRT's webhook registration form. Testing and Verification (08:38 - 10:42): Watch how creating a contact record in Dynamics 365 triggers the webhook, which in turn runs the Power Automate flow. Notice how the execution context is visible as the 'body' of the received HTTP request.
This video covers the complete cycle. The most critical and often tricky part is correctly configuring the authentication in the PRT. As shown, for a Power Automate trigger, you must:
- Set Authentication to
HttpQueryString. - Paste the entire URL from Power Automate into the PRT.
- Manually separate the query string parameters (everything after the
?) into individual key/value pairs in the PRT's interface.
This pattern is excellent for simple notifications or for kicking off automation that is already built in Power Automate.
3. Pattern 2: Calling an Azure Function with a Webhook
For scenarios requiring complex logic, custom code, or high performance, an Azure Function is the ideal endpoint. This is where your developer skills truly shine.
We will follow a structured lab guide from Microsoft Learning that details the process of creating an Azure Function and registering it as a webhook endpoint.
This official Microsoft Practice Lab provides a step-by-step guide to creating an Azure Function and configuring a webhook. It's a perfect hands-on exercise to prepare for the PL-400 exam.
Please read and follow the instructions in the following sections of the lab: Exercise 4: Create an Azure Function: This will guide you through creating the Azure Function App and the HTTP-triggered function in the Azure portal. Task 5.1: Configure publishing to a webhook: This shows how to use the PRT to register a webhook that calls your new function. It also covers registering images and a step with filtering attributes. Task 5.2: Test the Webhook: This section shows you how to trigger the event and check the logs in Azure to verify success. Focus on how the authentication method and step registration differ slightly from the Power Automate example.
This lab provides an excellent, detailed walkthrough. Let's highlight some key concepts from it.
Key Configuration Details
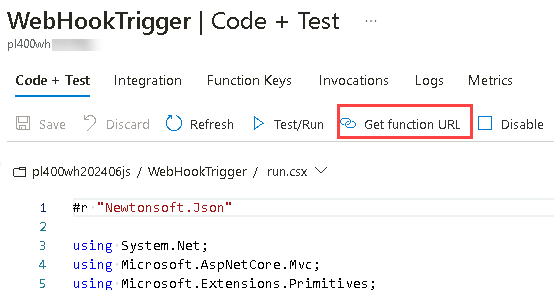
- Getting the Endpoint URL: As the lab points out, you use the Get function URL button in the Azure portal to get the endpoint address.
-
Authentication: In the lab, you use the
WebhookKeyauthentication option in the PRT. This is a common method where the Azure Function's access key is passed in the request header (x-functions-key) for authorization. Dataverse handles this automatically when you select this option and provide the key. -
Registering the Step: The process of registering a step on the webhook is identical to how you did it for plugins and Service Bus endpoints. You specify the Message, Entity, Execution Mode, and Pipeline Stage.

Test your understanding!
You need to configure a webhook that triggers when an Account record is updated. The external service it calls is computationally expensive and should only be invoked when the revenue field on the Account changes. The external service also needs to know both the old and new revenue values. How would you configure the step and images in the PRT?
Show answer
- Register a Step on your webhook for the
Updatemessage of theaccountentity. - In the Filtering Attributes for the step, select only the
revenuefield. This ensures the webhook only fires when that specific field is modified. - Register a New Image for the step. In the image registration dialog, check both Pre Image and Post Image. Give it an Entity Alias like "RevenueImage" and include the
revenueattribute in the parameters. - This configuration ensures the webhook fires efficiently and the payload sent to the external service will contain both
PreEntityImagesandPostEntityImagesarrays, allowing the receiving service to compare the old and new values.
4. Professional Practice: Scripting with the Power Platform CLI
Manually configuring webhooks with the PRT is fine for development, but in a professional DevOps environment, you need automation. The Power Platform CLI, which you've expressed interest in, is the tool for this.
Serverless CRM Mastery: Taking Azure + Dataverse Integration to the Next Level
This article provides excellent architectural insights and includes a practical example of automating webhook registration with the Power Platform CLI (PAC).
Please review 'Section 3: Webhook Configuration in Dataverse'. Focus specifically on the 'Power Platform CLI Example'. Compare the pac plugin webhook add and pac plugin step add commands to the manual steps you just learned in the PRT.
As you can see from the article, every action you perform in the PRT GUI—registering the webhook with its URL and auth, and adding a step with its message, entity, and filters—can be accomplished via script. Incorporating these PAC commands into a build pipeline is a hallmark of a mature ALM process, ensuring consistent deployments across environments.
Conclusion
In this lesson, you've added another essential integration tool to your developer toolkit. You now know how to configure Dataverse to send event-driven notifications to external services using webhooks.
Key Takeaways:
- Webhooks provide a direct, HTTP-based push mechanism for sending the Dataverse
IPluginExecutionContextto an external endpoint. - They are simpler to configure for point-to-point scenarios compared to the brokered messaging of Azure Service Bus.
- The external endpoint can be a Power Automate flow, an Azure Function, or any other web service capable of receiving an HTTP POST request.
- Configuration is done via the Plugin Registration Tool or, for automation, the Power Platform CLI. Key settings include the endpoint URL, authentication type (
HttpQueryString,WebhookKey, etc.), and the step configuration (message, entity, filtering).
What's Next?
So far, we've focused on sending the event data. In the next lesson, we'll shift our focus to the receiving end. We will dive deep into developing a C# Azure Function to process data received from a Dataverse webhook or Service Bus message. You'll learn how to deserialize the execution context from the incoming request and use the Dataverse SDK to perform follow-up actions, completing the end-to-end integration pattern.