Hello and welcome back!
In our last lesson, we contrasted early-bound and late-bound programming styles, establishing that early-bound is the preferred, strongly-typed approach for most server-side development. A key reason for writing server-side logic, like plugins, is to perform complex validation or actions based on data changes. But how do you efficiently compare the "before" and "after" state of a record?
Today, we'll answer that question by exploring a fundamental concept in advanced plugin development. This lesson addresses the learning outcome: Configure plugin pre-images and post-images for efficient access to record data.
As an experienced Dynamics 365 developer, you've certainly worked with the plugin execution context. This lesson will show you how to leverage a specific feature of that context—entity images—to write more performant and powerful code, a crucial skill for the PL-400 exam.
1. The Challenge: Accessing Unchanged Data
When a plugin triggers, for example on the Update of a record, the Target parameter in the execution context (IPluginExecutionContext.InputParameters["Target"]) contains an Entity object. However, a crucial detail is that this Entity object only contains the attributes that were changed.
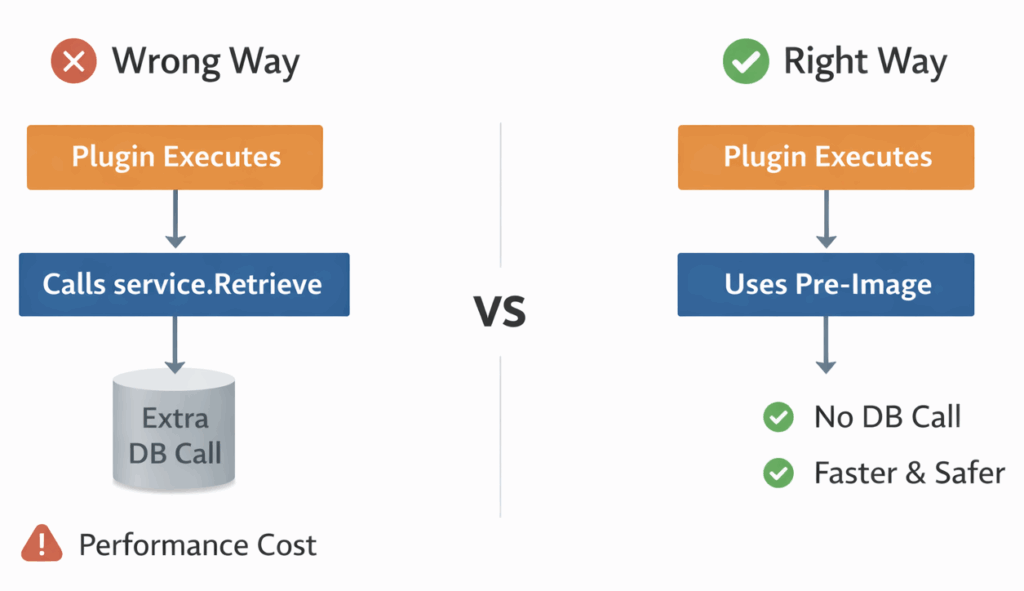
What if your business logic needs to check the value of a field that wasn't changed during the update? For instance, you might need to compare the old value of a field to the new one. The common but inefficient solution is to make an additional IOrganizationService.Retrieve() call to fetch the full record from the database before the update. This adds a network call and a database query, increasing the execution time of your plugin.
This is the exact problem that entity images solve.
2. Introducing Pre-Images and Post-Images
An entity image is a snapshot of a record's attributes taken at a specific point in the event execution pipeline. The platform makes this snapshot available to your plugin code, eliminating the need for a separate retrieve call.
There are two types of images:
- Pre-Image: A snapshot of the record's attributes before the main database operation. It shows you the "before" state.
- Post-Image: A snapshot of the record's attributes after the main database operation has completed. It shows you the "after" state.
Utilising Pre/Post Entity Images in a Dynamics CRM Plugin
This blog post from the Dynamics Community provides an excellent introduction to why entity images are necessary and the performance benefits they offer.
Please read the first two sections, down to 'So why should you go to the extra effort to use them within your plugins?'. This will clarify the core problem that images solve and their primary advantage over making a separate retrieve call.
The performance benefit is the most compelling reason to use images. The following diagram starkly illustrates the difference between retrieving the data yourself versus using a pre-image.
3. Availability of Images
You cannot use images in every situation. Their availability depends on the message (e.g., Create, Update, Delete) and the pipeline stage (PreValidation, PreOperation, PostOperation) of your plugin step.
- A Pre-Image is not available on the
Createmessage, as the record does not exist before this operation. - A Post-Image is not available on the
Deletemessage, as the record no longer exists after this operation.
This table provides a clear and concise reference for when each image type is available:

As the table shows, images are most commonly used with the Update message, where you often need to compare old and new values.
4. Implementation: Code, Configure, and Test
Implementing a plugin that uses an image is a two-part process:
- Write the C# code to access the image from the execution context.
- Configure the image on the plugin step registration using the Plugin Registration Tool.
Let's walk through this process with a complete example.
Step 1: Writing the Code
Inside your plugin's Execute method, you can access the images via the PreEntityImages and PostEntityImages collections on the IPluginExecutionContext. These collections are dictionaries where the key is a string alias that you will define during registration.
// Obtain the execution context
IPluginExecutionContext context = (IPluginExecutionContext)serviceProvider.GetService(typeof(IPluginExecutionContext));

// Check if the Pre-Image with the alias "preImage" exists
if (context.PreEntityImages.Contains("preImage"))
{
    // Retrieve the image as an Entity object
    Entity preImageEntity = context.PreEntityImages["preImage"];

    // Access attributes from the image just like any other Entity object
    if (preImageEntity.Contains("creditlimit"))
    {
        Money oldCreditLimit = preImageEntity.GetAttributeValue<Money>("creditlimit");
        // ... your logic here
    }
}
The image is returned as a standard Entity object. This means you can use the same late-bound (["attribute"]) or early-bound (.AttributeName) techniques we discussed in the previous lesson to access its properties.
Step 2: Configuring the Image
Just writing the code is not enough. You must explicitly tell Dataverse to create the image and pass it to your plugin. This is done in the Plugin Registration Tool.
After registering your plugin step, you right-click the step and select Register New Image. This opens a dialog with three crucial fields:
- Image Type: Choose
Pre ImageorPost Image. - Entity Alias: This is the string name you will use as the key to access the image in your C# code (e.g.,
"preImage"in the code above). This must match exactly. - Parameters: This is a list of the attributes you want to be included in the snapshot. Best practice is to select only the attributes your code needs. Selecting all attributes can negatively impact performance, defeating the purpose of using images.
A Complete Walkthrough
The following tutorial from Microsoft Learn demonstrates this entire process end-to-end. It implements a plugin that validates a name change on an Account, using a pre-image to access the account's previous name.
This hands-on tutorial is a perfect guide to implementing a plugin with a pre-image.
This tutorial will solidify your understanding of the end-to-end process. Please review these sections: Create a new plug-in class: Examine the C# code. Notice how it accesses context.PreEntityImages["a"] to get the old value of the account name. About the code: This section explains the code's dependencies, specifically that it requires a pre-image with the alias 'a'. Configure a new step: Review the standard step registration settings for an 'Update' message. Add an image: This is the most critical part for our lesson. Pay close attention to how the 'Pre Image' is configured with an 'Entity Alias' of 'a' and only the 'name' parameter is selected. This connects the configuration to the code. Test the plug-in: Understand how the logic behaves based on the pre-image data.
Test your understanding!
You need to implement a synchronous plugin that triggers on the Update of a Contact record. The requirement is to create a follow-up Task if the contact's jobtitle is changed from anything other than "CEO" to "CEO". If the jobtitle was already "CEO" and is changed to something else, no action is needed.
- To implement this logic efficiently, would you need a Pre-Image, a Post-Image, or both?
- What pipeline stage would be most appropriate for this plugin (
PreValidation,PreOperation, orPostOperation)? Why? - When registering the image(s) in the Plugin Registration Tool, what is the minimum set of
Parameters(attributes) you should select? - In your C# code, how would you structure the
ifcondition to check for the required change?
Show answer
-
You would need a Pre-Image. You need to know the old value of the
jobtitleto see if it was something other than "CEO". The new value ("CEO") will be available in theTargetentity. A Post-Image is not necessary. -
PostOperation. Since you are creating a new
Taskrecord, it's best to do this after the primaryContactupdate operation has successfully completed in the database. This ensures you don't create orphaned tasks if the contact update fails for some reason. The operation should be synchronous to ensure the task is created as part of the same transaction. -
You only need the
jobtitleattribute. Selecting only the required attributes is crucial for performance. -
Your C# logic would look something like this:
// Get the target entity with the new values
Entity targetContact = (Entity)context.InputParameters["Target"];

// Get the pre-image entity with the old values
Entity preImageContact = context.PreEntityImages["preImage"]; // Assuming alias is "preImage"

// Check if jobtitle was changed
if (targetContact.Contains("jobtitle"))
{
    string newJobTitle = targetContact.GetAttributeValue<string>("jobtitle");
    string oldJobTitle = preImageContact.Contains("jobtitle") ? preImageContact.GetAttributeValue<string>("jobtitle") : null;

    // The core logic: new title is CEO and old title was not CEO
    if (newJobTitle == "CEO" && oldJobTitle != "CEO")
    {
        // ... your code to create the Task record
    }
}
Conclusion
You have now completed the Advanced Dataverse Server-Side Logic module. Mastering entity images is a significant step forward, allowing you to write more sophisticated and, most importantly, more efficient plugins.
Key Takeaways:
- Purpose: Plugin images provide a snapshot of record data, primarily to avoid costly
service.Retrieve()calls within a plugin. - Types: Pre-Images contain data before the core operation, while Post-Images contain data after.
- Configuration is Key: Images must be explicitly registered on a plugin step with a matching Entity Alias and a minimal set of Parameters.
- Context is Everything: The availability of images depends on the message and pipeline stage. Use them wisely, especially for
Updatescenarios.
Up Next:
We are now moving from the server side to the client side. The next module, Building Canvas Apps with Power Fx, will kick off with our first lesson on how to design Canvas Apps with structured navigation patterns using Navigate, Back, and deep linking. This will be a significant shift from C# and the SDK to the world of low-code app building and the Power Fx language.