Hello! Welcome back to our chess project.
In the last lesson, you successfully implemented the logic to execute a move. When you click on a piece and then a valid destination square, the game's internal GameState is updated. If you run your program now, you'll see the piece magically "jump" to its new square.
Today's lesson is about understanding exactly why that visual update happens automatically. We will formalize the core engine of any game: the game loop. This will clarify the relationship between your game's data and what appears on the screen, and officially achieve our learning goal: to update the graphical display to reflect the new board state after a move.
The Heartbeat of a Game: The Game Loop
Every real-time game, from simple animations to complex 3D worlds, runs on a continuous cycle known as the game loop. It's the "heartbeat" that keeps the game world alive and responsive. At its core, the loop consists of three main stages that execute over and over, dozens of times per second.
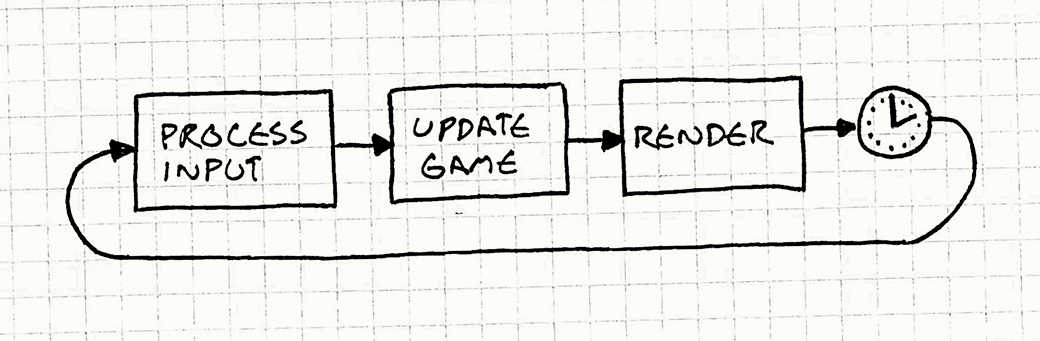
Let's break down these stages in the context of our chess game:
-
Process Input: The game checks for any actions from the player. In our case, this is primarily checking for mouse clicks with
is_mouse_button_pressed(MouseButton::Left)and getting the cursor's position. -
Update Game State: Based on the input, the game's internal data is modified. This stage is "invisible" to the player; it's all about changing variables and data structures. When you call
game_state.execute_move(...), you are performing this step. The board array insidegame_stateis changed, but nothing is drawn yet. -
Render (or Draw): The game draws the current state of the world to the screen. Your functions
draw_board(),draw_pieces(), anddraw_highlights()are all part of this stage. Crucially, they read from the currentGameStateto decide what to draw and where.
In Macroquad, this entire cycle happens between calls to next_frame().await. This function tells the system, "I'm done with this frame. Please show it on the screen and prepare for the next one."
Our Chess Game's Loop in Action
The key insight is that you have already built a game loop! Your main function is structured exactly this way. The reason the display updates automatically after a move is that the Render stage happens after the Update Game State stage within the same loop iteration.
Let's look at the structure of your main function's loop:
// The main game loop in your main.rs
loop {
    // ------------------------------------
    // STAGE 1: PROCESS INPUT
    // ------------------------------------
    if is_mouse_button_pressed(MouseButton::Left) {
        let (mouse_x, mouse_y) = mouse_position();
        let file = (mouse_x / SQUARE_SIZE).floor() as usize;
        let rank = (mouse_y / SQUARE_SIZE).floor() as usize;

        // More logic here to check if the click is on a valid move...
        let move_was_made = /* your logic to check if a move was clicked */;

        // ------------------------------------
        // STAGE 2: UPDATE GAME STATE
        // ------------------------------------
        if move_was_made {
            // This is the core update! The GameState data changes.
            game_state.execute_move(from_pos, to_pos);

            // The UI state is also updated to prepare for the next turn.
            selected_piece = None;
            valid_moves.clear();
        } else {
            // This is also an update, but for the UI state (selection).
            // It doesn't change the board itself.
            selected_piece = Some((rank, file));
            valid_moves = game_state.get_valid_moves(rank, file);
        }
    }

    // ------------------------------------
    // STAGE 3: RENDER
    // ------------------------------------
    clear_background(LIGHTGRAY);

    // The render functions read from the *current* game_state.
    // If execute_move() was called above, this will draw the new board state.
    draw_board();
    draw_pieces(&game_state.board, &textures);
    draw_selection_and_moves(&selected_piece, &valid_moves);

    // Tell Macroquad to display the rendered frame and wait for the next tick.
    next_frame().await;
}
Because draw_pieces() is called every single frame, it will always draw whatever is in game_state.board at that moment. When execute_move() changes that data, draw_pieces() naturally renders the new reality in the very same frame.
Seeing the Pattern in Another Project
This separation of "updating" and "drawing" is a fundamental pattern in game development. To see it applied in a different context, let's look at a short video tutorial for building a 'Breakout' style game. The concepts are universal and seeing them from scratch can be very illuminating.
The video 'Rust breakout game tutorial' by Tantan is a great example of building a game from the ground up using Macroquad. We'll watch the first few minutes to see how the game loop and the separation of update/draw logic are established.
Please watch from the beginning to around 04:53. Pay close attention to: The Game Loop (0:50): The loop { ... next_frame().await } is set up immediately. This is the heart of the game. The draw function (2:40): A draw() method is implemented for the Player struct. Its only job is to render the player's rectangle. The update function (3:08): An update() method is added. Its job is to handle input and change the player's position (self.rect.x). Putting it together (4:20): In the main loop, player.update() is called first, followed by player.draw(). This is the exact Input -> Update -> Render pattern in action.
The pattern you see in the video—creating separate update() and draw() functions for game objects—is an excellent practice that keeps your code organized and easy to understand. While we've placed our logic directly in main for simplicity, the underlying principle is the same.
Conclusion
You've now mastered a fundamental concept of game programming! You didn't need to write any new code for this lesson, because your existing code already followed the correct pattern. The goal was to understand the why.
Key Takeaways:
- Games operate on a continuous game loop, which typically involves three stages: Process Input, Update Game State, and Render.
- The graphical display is simply a representation of the game's internal state at a specific moment in time.
- By updating the
GameStatebefore rendering within the same loop iteration, the visual display automatically reflects the changes in the next frame shown to the user. - This separation of state logic from rendering logic is a powerful pattern for keeping your code clean and manageable.
Preview of the Next Lesson
Our game loop is fully functional, and we can now build upon it. The "Render" stage isn't just for drawing pieces; we can use it to display any information we want. In the next lesson, we will add text to the screen to show the current player's turn and important game statuses like "Check!", making the game state even clearer to the players.