Hello! In our last lesson, we took a big step forward by defining our own Movable trait. We saw how this allows us to create a common "contract" for behavior that different chess pieces can implement. However, all our code—the Square struct, the Movable trait, and the Rook and Knight structs—was placed in a single main.rs file. As you can imagine, this will get messy very quickly as we add more pieces and game logic.
Today, we'll tackle that problem head-on. This lesson is all about organization. You will learn how to structure a Rust project by splitting your code into logical units called modules. We'll cover how to declare modules, control what parts of them are public or private, and organize them across different files and directories. This is an essential skill for building any non-trivial application, especially our chess game.
1. What Are Modules and Why Do We Need Them?
In programming, a module is a way to group related code together, creating a separate namespace and controlling what is accessible to the outside world. This helps in keeping code organized, readable, and easy to maintain.
If you're coming from Java, you can think of modules as being conceptually similar to packages, but with their own specific rules. Let's start with a short video that introduces the core purpose of modules in Rust.
Rust Modules - Explained Like I'm 5
This clip from the video 'Rust Modules - Explained Like I'm 5' by Let's Get Rusty gives a great high-level overview of what modules are and why they are useful.
Watch from 00:35 to 01:34. The key points to note are that modules are for organization and privacy, and unlike in some other languages, they are explicitly declared with the mod keyword and are not automatically created from files.
2. The Module Tree and Privacy by Default
The most important rule to understand about Rust's module system is this: everything is private by default. An item (like a function, struct, or even another module) can only be accessed from outside its module if you explicitly mark it as public using the pub keyword.
All the modules in your project form a hierarchy, or a "tree," starting from a root module called crate. For a binary project, src/main.rs is the root of this tree.
Let's read a short article that explains this foundational concept with clear examples.
Understanding Rust Privacy and Visibility Model
The article 'Understanding Rust Privacy and Visibility Model' provides an excellent explanation of Rust's privacy-first approach.
Read the sections 'How to create submodules' and 'Deeply-nested modules'. Pay close attention to the compiler errors shown. They perfectly illustrate how Rust enforces privacy for both functions and other modules, and how you need to add pub to grant access.
As you saw, a parent module can see its children, but it cannot see inside them unless the items are made public. Likewise, a parent module cannot see into its grandchildren unless the child module is also public.
3. Accessing Code Across Modules: Paths and use
So, how do you access a public item from another module? You use a path, with :: as a separator. For example, if you have a module game with a public function start(), you'd call it with game::start().
These paths can get long. To shorten them, Rust provides the use keyword, which brings an item's path into the local scope, allowing you to refer to it directly.
Let's see a practical demonstration of creating modules, dealing with privacy errors using pub, and cleaning up the code with use.
Rust Modules - Explained Like I'm 5
Continuing with the 'Let's Get Rusty' video, this section walks through refactoring a messy single file into organized modules, encountering and fixing the exact issues we've just discussed.
Watch from 07:39 to 13:28. This is a very practical segment. Notice how: Related code is grouped into mod database and mod authutils blocks. Compiler errors like 'not found in this scope' are fixed by using full paths (e.g., crate::database::get_user). Privacy errors are then fixed by adding pub to the necessary functions and structs. Finally, the use keyword is introduced to shorten the long paths and make the code readable again.
One powerful combination is pub use. This allows a module to bring an item into its own scope and re-export it, making it part of its own public API. This is very useful for hiding complex internal module structures from the end-user.
4. Splitting Modules into Files and Directories
So far, we've only seen modules defined inside a single file. For our chess game, we'll want to split our code into separate files. Rust's module system connects directly to the file system with a couple of simple rules.
If the compiler sees mod my_module;, it will look for the module's code in one of two places:
- A file named
my_module.rs. - A file named
my_module/mod.rs.
The second option is for when your module is complex and has its own submodules, which would live inside the my_module/ directory.
Let's watch this in action.
Rust Modules - Explained Like I'm 5
The final part of the 'Let's Get Rusty' video demonstrates exactly how to move inline modules into their own files and directories.
Watch from 13:28 to 18:40. The video explains how to split code into separate .rs files and how to handle modules with sub-modules using directories. It covers both the older mod.rs convention and the newer, cleaner approach.
To make the directory structure clearer, here is a helpful diagram. It shows the modern file layout (which is generally recommended) and the older mod.rs style.
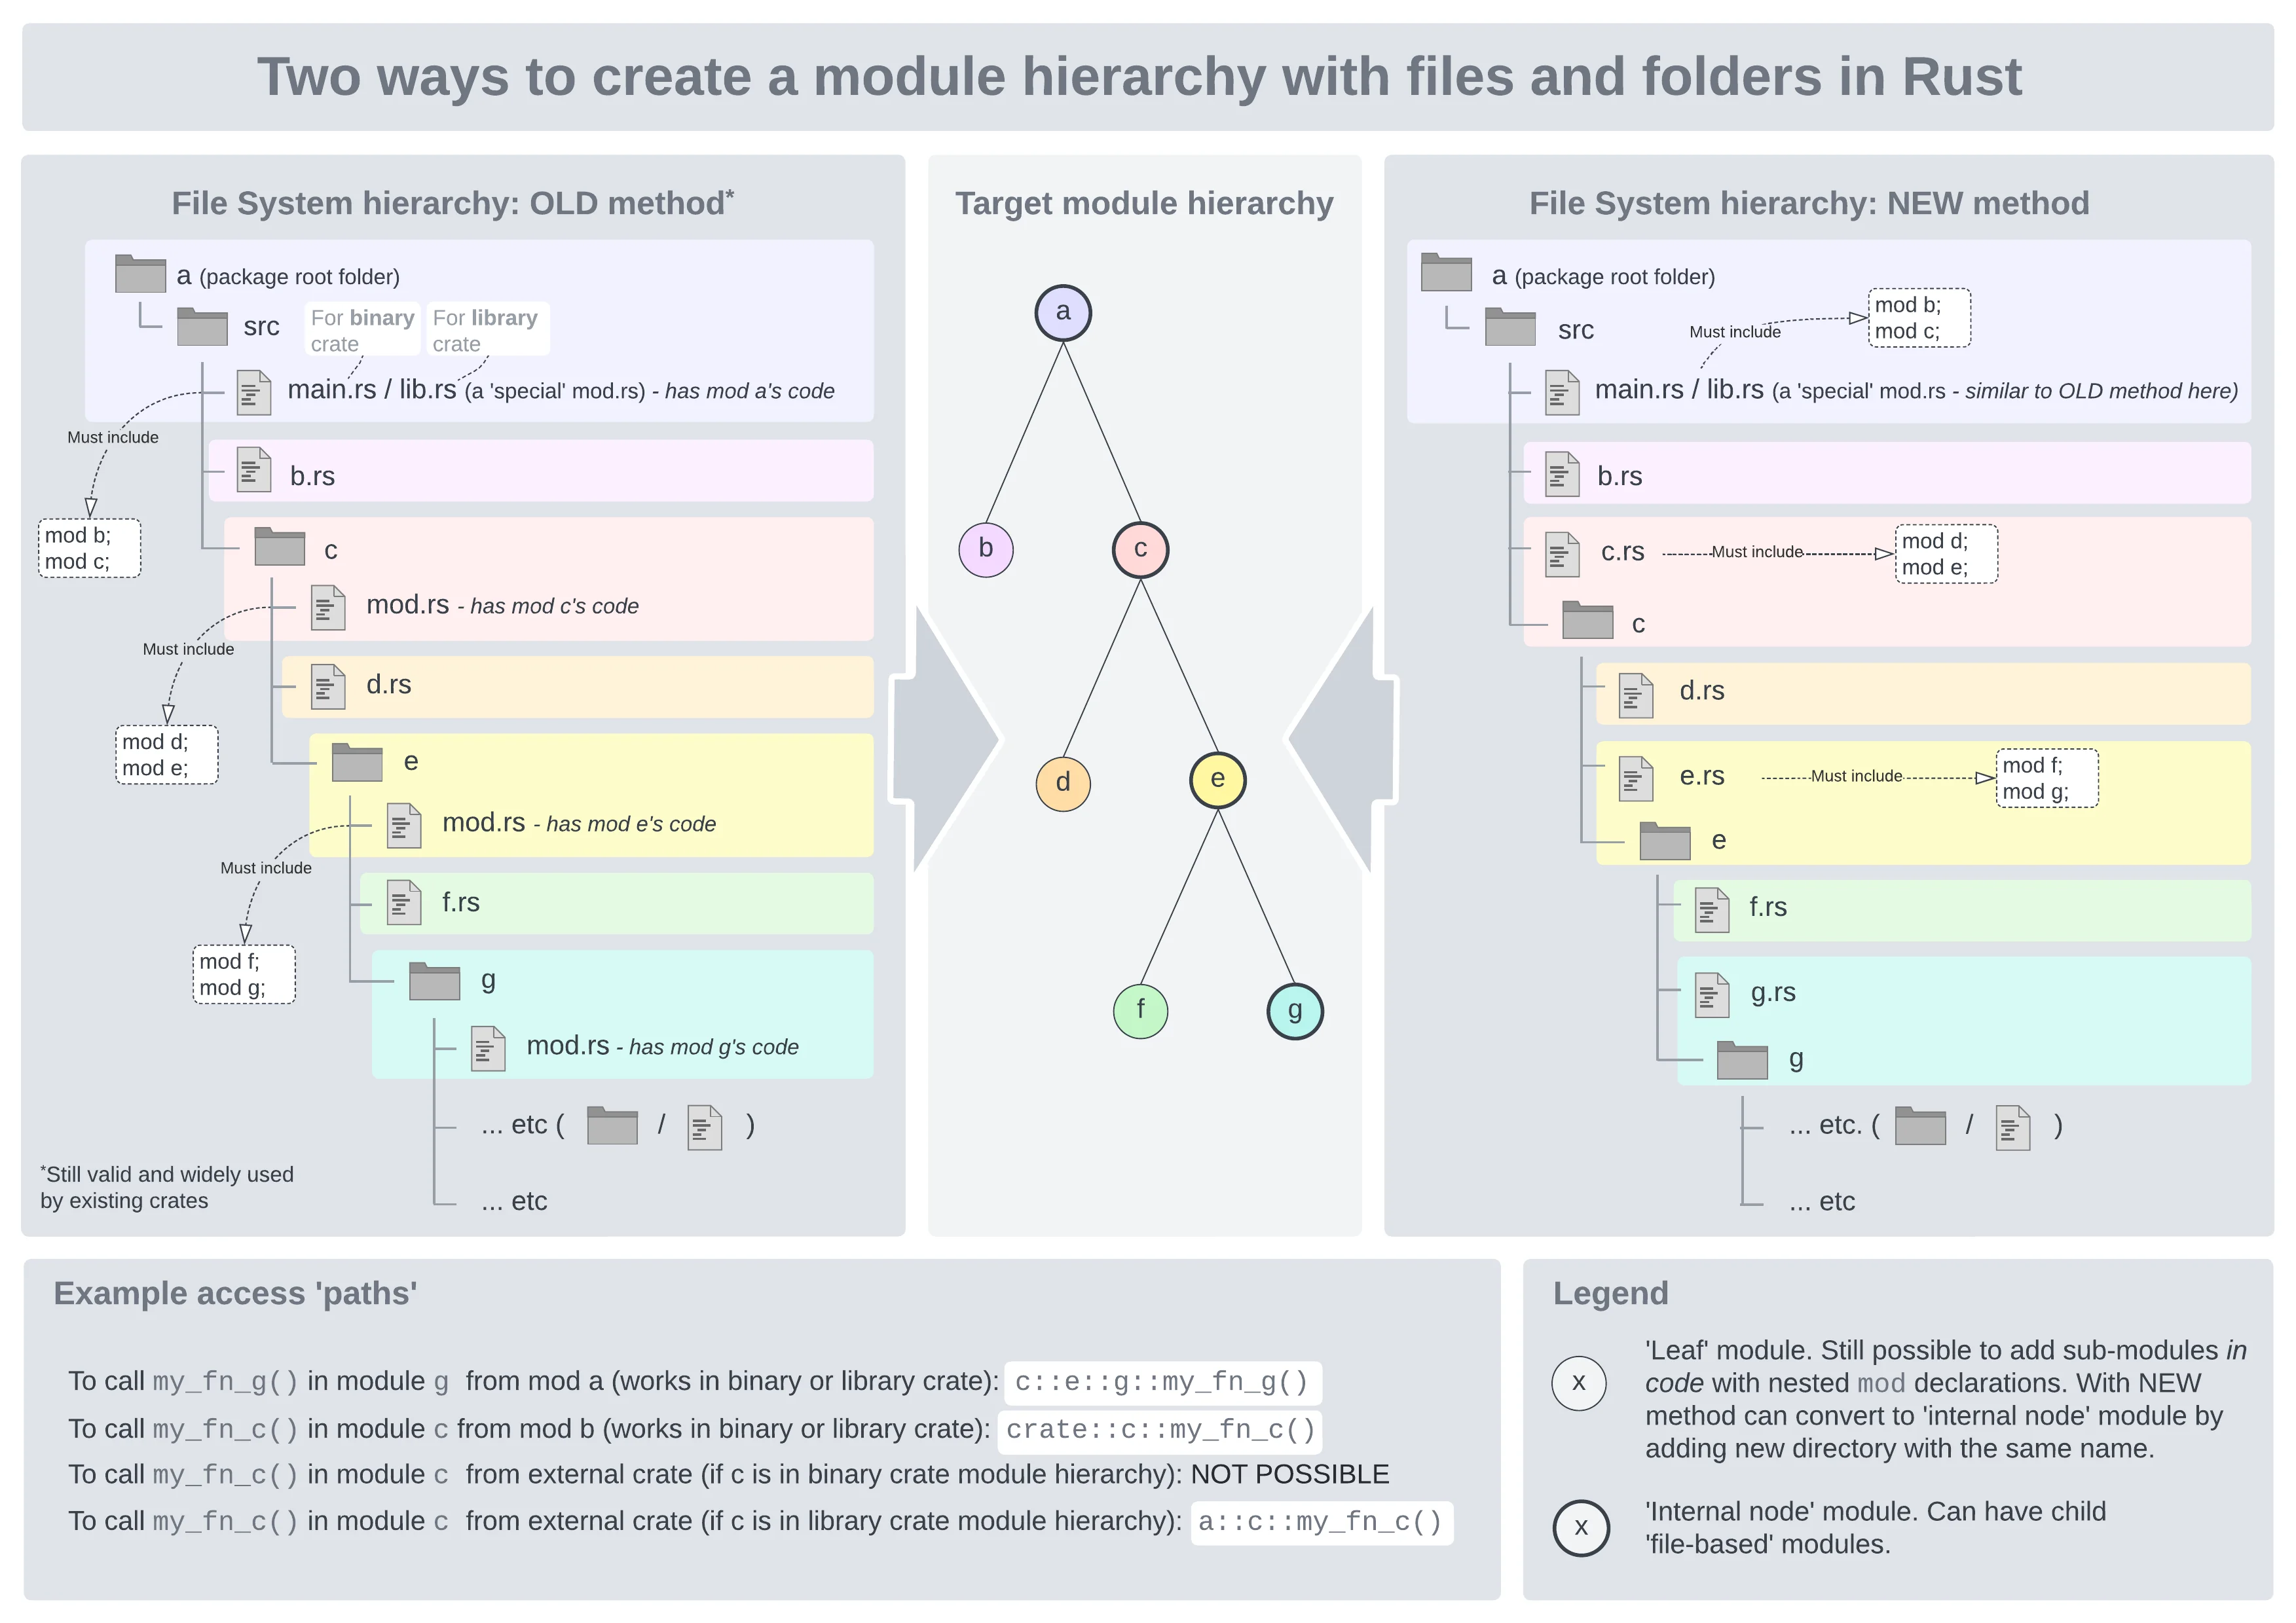
5. Hands-On: Organizing Our Chess Code
It's time to apply what you've learned. Let's take the code from our previous lesson and refactor it into a well-organized, multi-file project.
-
Create a new project:
cargo new chess_game -
Inside the
srcfolder, create the following file structure. You'll need to create apiecesdirectory and a few new files.src/ ├── main.rs ├── board.rs └── pieces/ ├── mod.rs ├── knight.rs └── rook.rs -
Now, populate these files with the following code. Read the comments carefully to see how
mod,pub, anduseare working together.File:
src/board.rs
(This file will hold ourSquarestruct.)// We make the struct and its fields public so code outside this module // (like in main.rs) can create and use Square instances. #[derive(Debug, Clone, Copy, PartialEq)] pub struct Square { pub file: u8, pub rank: u8, }File:
src/pieces/mod.rs
(This is the "entry point" for ourpiecesmodule. It defines the sharedMovabletrait and brings the other piece modules into scope.)// First, we need access to the `Square` struct from the `board` module. // `super::` means "go up one level in the module tree" (from pieces to the crate root) // and then into `board`. use super::board::Square; // We declare the sub-modules `rook` and `knight`. // Rust will look for `rook.rs` and `knight.rs` in the same directory as this file. mod rook; mod knight; // Now we re-export the public items from our sub-modules using `pub use`. // This means someone using the `pieces` module can write `pieces::Rook` // instead of the much longer `pieces::rook::Rook`. It cleans up our public API. pub use self::rook::Rook; pub use self::knight::Knight; // The Movable trait is public because it needs to be implemented by pieces // and used by functions outside this module. pub trait Movable { fn generate_moves(&self, position: Square) -> Vec<Square>; }File:
src/pieces/rook.rs// We need the `Square` struct and the `Movable` trait, which are in the parent module. use super::{Movable, Square}; #[derive(Debug)] pub struct Rook; // Public so it can be used outside this file. impl Movable for Rook { fn generate_moves(&self, position: Square) -> Vec<Square> { println!("Calculating moves for a Rook at ({}, {})...", position.file, position.rank); vec![] // Logic to be added later } }File:
src/pieces/knight.rs// Same as the rook file, we import what we need from the parent. use super::{Movable, Square}; #[derive(Debug)] pub struct Knight; // Public as well. impl Movable for Knight { fn generate_moves(&self, position: Square) -> Vec<Square> { println!("Calculating moves for a Knight at ({}, {})...", position.file, position.rank); vec![] // Logic to be added later } }File:
src/main.rs
(Finally, our main file is now clean and focused on high-level logic.)// Declare the modules `board` and `pieces`. Rust will find `board.rs` and `pieces/mod.rs`. mod board; mod pieces; // Bring the types we need into the main scope so we don't have to write `board::Square`, etc. use board::Square; use pieces::{Knight, Movable, Rook}; // Thanks to `pub use`, we get Knight and Rook directly from `pieces`. // This generic function works just like before! fn print_moves<T: Movable>(piece: T, position: Square) { println!("--- Finding moves for {:?} ---", piece); let moves = piece.generate_moves(position); println!("Possible moves: {:?}", moves); println!("--------------------------\n"); } fn main() { let rook = Rook; let knight = Knight; let start_square = Square { file: 3, rank: 3 }; // d4 print_moves(rook, start_square); print_moves(knight, start_square); } -
Run the project with
cargo run. The output should be identical to the previous lesson's, but now our code is beautifully organized and ready to scale up!
Conclusion
Fantastic work! You have just acquired a critical skill for managing any real-world Rust project. By organizing our code into modules, we've made our future work on the chess game much easier. We can now add new pieces or logic in their own dedicated files without cluttering up main.rs.
Key Takeaways:
- Code is organized into a tree of modules, starting from the
crateroot (src/main.rs). - The
modkeyword declares a module, either inline or in a separate file/directory. - Items are private by default. The
pubkeyword makes an item (struct, function, module) visible to code outside its module. - The
usekeyword brings items into the current scope to shorten paths. pub useis a powerful pattern for creating a clean public API for a module while hiding its internal structure.
In our next lesson, we will leverage this new structure to formally model the entire chess board. We'll create enums for all the piece types and colors and build the data structure that will represent the 8x8 game board itself.