Hello! Welcome back.
In our last lesson, we focused on using value and contrast to create a clear focal point. You learned that where you place your darkest darks and lightest lights is a powerful way to command the viewer's attention.
Today, we'll build on that. Now that you know how to create a point of interest, we need to ensure the viewer's eye gets there. This lesson is all about creating a journey for the eye. Our learning outcome is to build a scene that guides the eye using leading lines and visual flow. We will explore how to use elements within your scene—like paths, rivers, architecture, and even light itself—to create clear pathways that direct attention and make your compositions feel intentional and dynamic.
1. From Focal Point to Visual Flow
A focal point is a destination, but a great composition also provides a map. The concept of guiding the viewer through your image is often called visual flow. Think of it as creating a current that gently pulls the viewer's eye from the edge of the frame, through the scene, and toward your main subject.
To introduce this idea, let's hear from professional photographer Ian Plant. He has a great way of describing this concept.
Visual Flow: Mastering the Art of Composition with Ian Plant
In this clip from his talk 'Visual Flow: Mastering the Art of Composition,' Ian Plant introduces the core idea of visual flow and the importance of thinking about compositional elements as 'tools' rather than 'rules'.
Please watch the segment from 01:29 to 03:14. Pay attention to his analogy of standing in a river and how that relates to guiding a viewer through an image.
The tools that create this "flow" are often called leading lines. These are lines within your image that our eyes are naturally inclined to follow. They can be explicit, like a road or a fence, or implicit, like the edge of a shadow or a row of trees that form a line.
Let's watch another segment from Ian Plant where he demonstrates several ways to lead the viewer's eye.
Visual Flow: Mastering the Art of Composition with Ian Plant
This longer section provides excellent examples of how to use various techniques to guide the eye.
Watch the segment from 15:35 to 21:06. Focus on how he uses: Explicit lines in the abandoned building. Progression from dark to light to pull the eye deeper. Perspective lines (implied and explicit) to create depth and direction. A 'Russian doll' effect of layered frames to guide the eye.
This idea of using perspective lines is something you can directly leverage in 3D. By choosing your camera's position and focal length, you can control the convergence of lines in your scene to point directly at your subject.
2. A Toolkit of Compositional Lines
Just like there are design patterns in software development, there are recurring compositional patterns in art. Many of these are built on the very idea of leading lines. Recognizing these patterns can help you structure your own scenes more effectively.
Artist Neil Blevins provides a great catalog of these common structures. We'll look at a few of the most relevant line-based patterns.
In his video 'Composition Types,' Neil Blevins breaks down many classic compositional structures. Think of this as a library of useful patterns you can apply to your work.
Watch the following short segments to see a few key patterns in action: The Slide (Diagonal) (05:56 - 06:36): Creates dynamism and speed. The X Arrangement (09:50 - 11:26): Creates a natural focal point at the intersection. The Compound Curve (S-Curve) (11:26 - 11:59): A graceful way to lead the eye through a scene. The Radial Composition (11:59 - 13:03): Lines exploding from a central point, directing focus with high energy.
This 3D render is a perfect example of a compound curve, or S-curve, being used as a leading line.

Test your understanding!
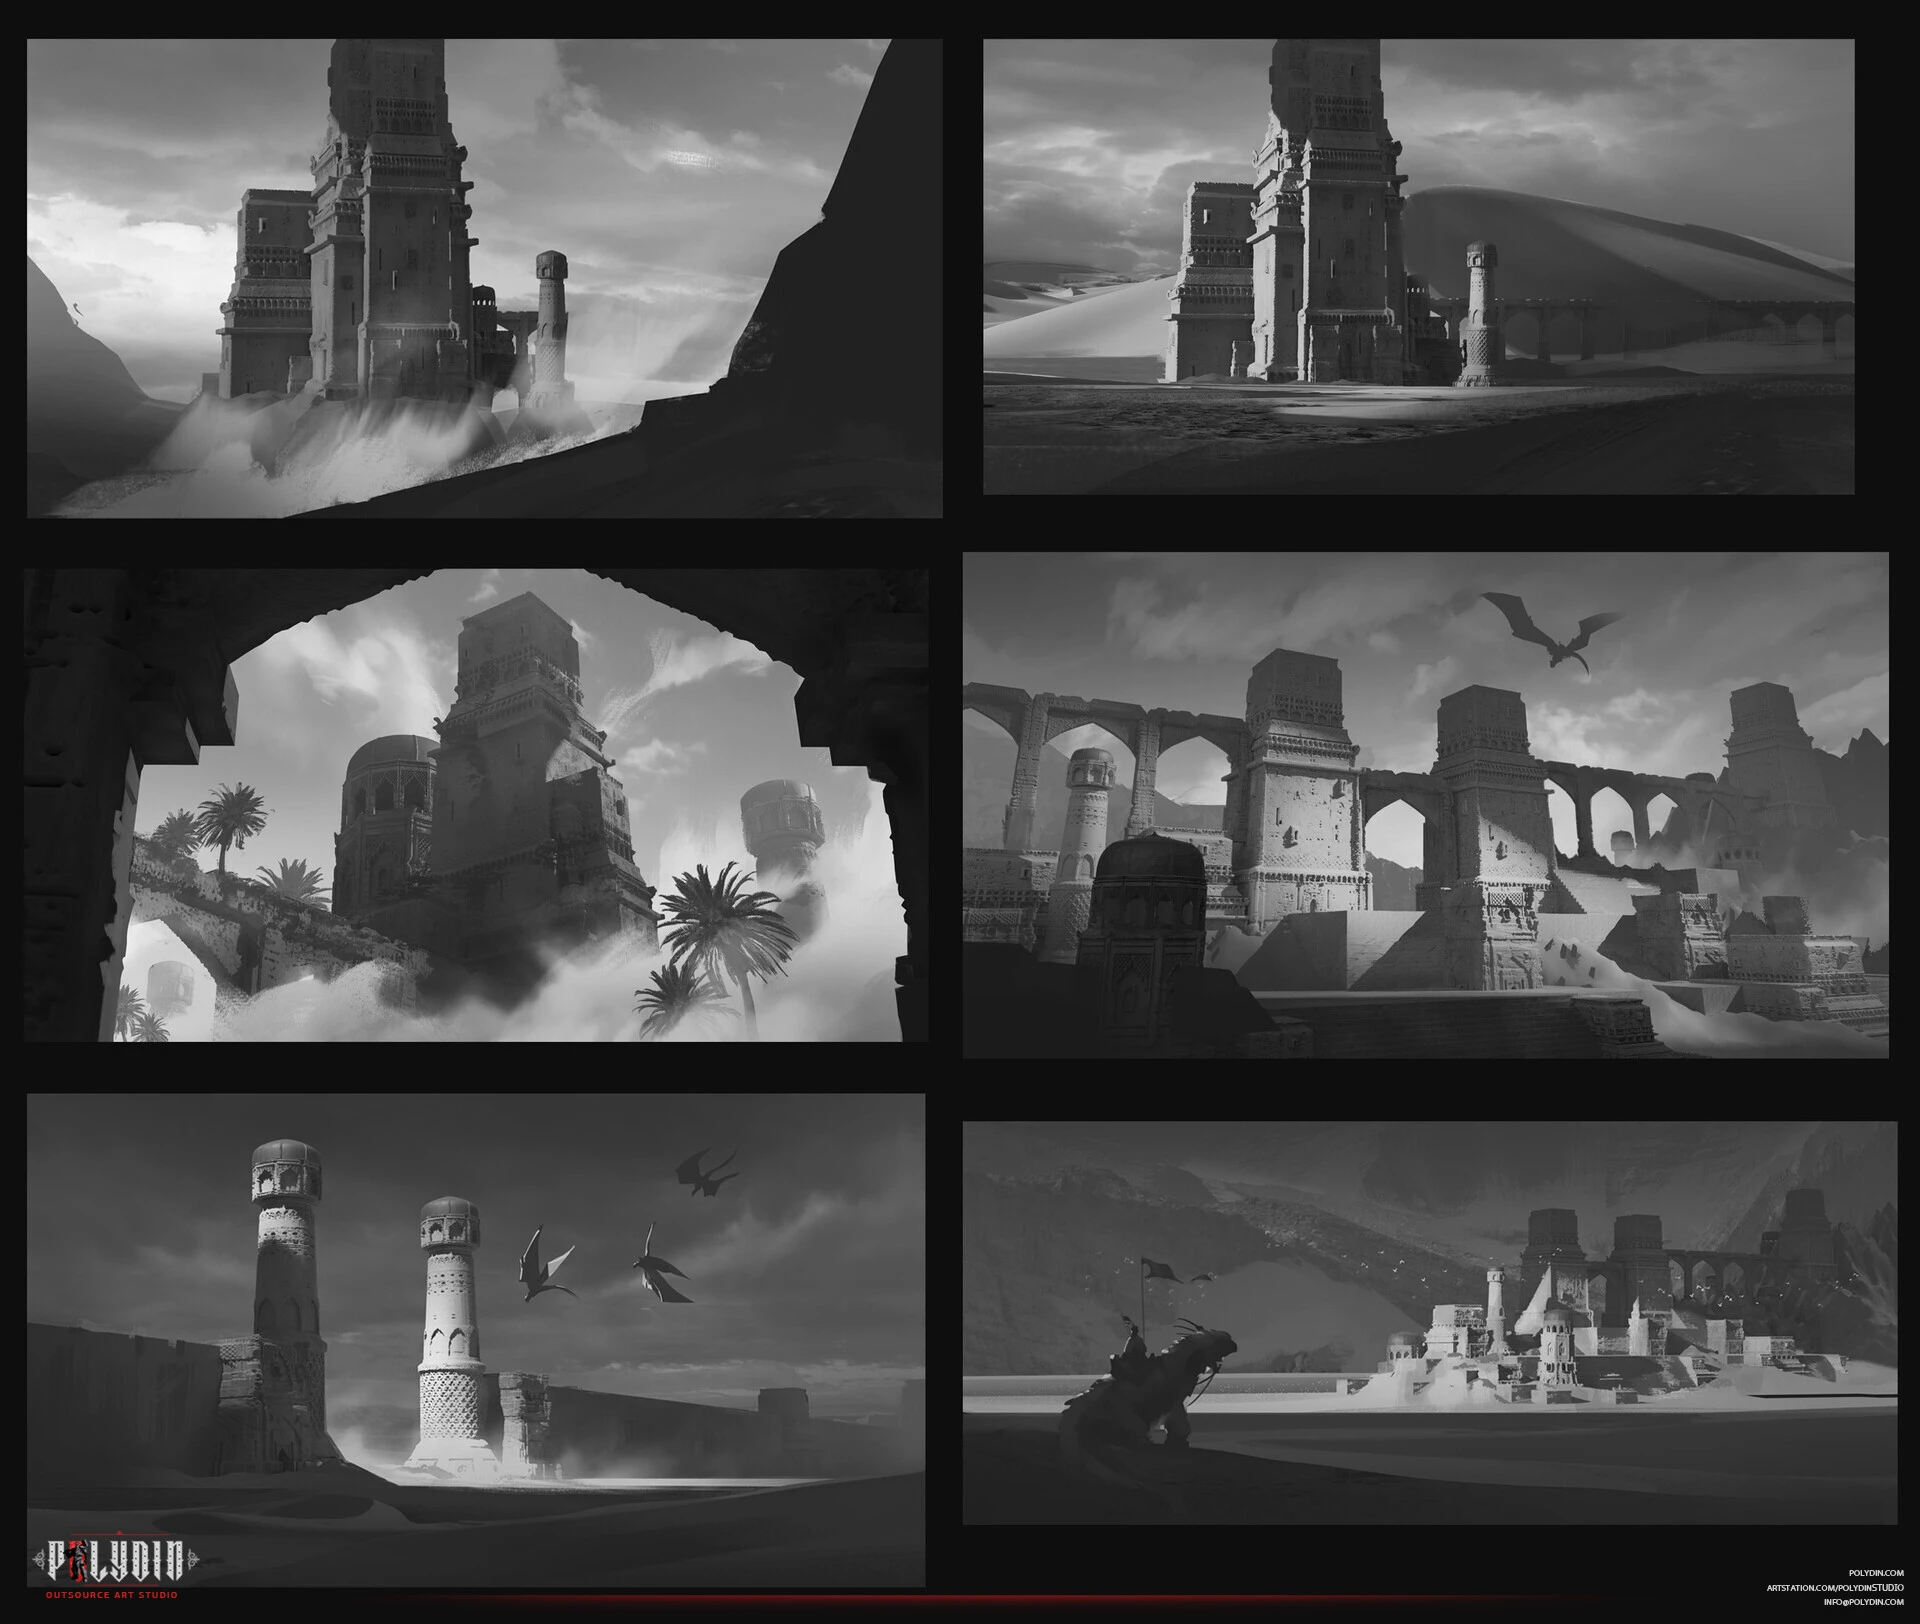
Take a look at the six concept sketches in the image below. In which sketch do you most clearly see a radial composition, and in which do you see a strong diagonal (slide) composition?
Show answer
- Radial Composition: The sketch in the top-middle is a strong example. The architectural elements and the light from the sky all seem to radiate outwards from the central structure, pulling your eye directly to it.
- Diagonal Composition: The sketch in the bottom-right uses a powerful diagonal. The bridge or aqueduct creates a strong line leading from the bottom-left towards the upper-right, giving the image a sense of movement and guiding your eye across the scene.
3. Building Flow in a 3D Scene
Theory is useful, but let's see how this is applied directly in a 3D environment workflow.
In the previous lesson, we looked at the breakdown for the environment "Those Who Mourn." The artist explicitly discusses how he constructed leading lines.
3D Environment Design of Those Who Mourn
Let's revisit the breakdown of 'Those Who Mourn' to see how the artist deliberately built leading lines into his 3D scene.
Please read the following sections: Under Getting to the (focal) point, find the subsection about The Unusual. Notice how he used the golden ratio to define the path and placed his key assets along that curve to create a 'smooth leading line'. Read the subsection on Convergence, where he explains that implied lines informed everything from the landscape shape to the angle of the light. Finally, under the Technical Breakdown, read the paragraph about the Landscape. He literally 'carved a path' in the engine to guide the player (and the viewer).
Another powerful technique is to use lighting as a leading line. A path of light can be just as effective as a physical path on the ground.
Environment Artist Fundamentals
This article on 'Environment Artist Fundamentals' provides a great example of using light to guide the eye.
First, read the paragraph under the Hand Placing subheading. It reinforces that composition starts with a focal point and the need to always guide the viewer's attention. Then, skip down to the image of the fig tree material (a blueish scene with a yellow light). Read the paragraph directly below it, where the artist states his goal: 'to guide the viewer's eye along the main strands and towards the yellow light.' This is a perfect demonstration of using light and form together to create flow.
4. Your Turn: Create a Path (Approx. 25 minutes)
It's time to put this into practice. Your task is to create a simple 3D scene that uses a clear leading line to guide the eye to a focal point.
The Prompt:
In Blender, block out a simple scene that tells a micro-story. Here are some ideas:
- A desert path leading to a mysterious glowing artifact.
- A futuristic sci-fi corridor leading to a high-security door.
- A row of ancient pillars guiding the eye toward a throne.
- A river flowing through a canyon towards a distant, sunlit waterfall.
The Steps:
- Blockout with Primitives: As in our previous exercises, use simple shapes (planes, cubes, cylinders) to build your scene. Don't worry about details. Focus on the big forms.
- Define Focal Point & Path: First, decide on your focal point (the artifact, the door, the throne). Then, arrange your other primitives to create a clear line—straight, S-curved, or diagonal—that leads directly to it.
- Position Your Camera: Place your camera in a way that emphasizes the leading line. Experiment with a slightly wider focal length (e.g., 28mm-35mm) to exaggerate the sense of perspective and make the lines feel more dramatic as they converge.
- Light the Way (Optional but Recommended): Create a simple lighting setup that reinforces your composition. You could place a key light to cast shadows that align with your leading line, or create a literal "path of light" by placing a series of lights that illuminate the path to your focal point.
- Check Your Work: Do a quick render. Does your eye naturally follow the line to the focal point? As we did in the last lesson, view your render in grayscale to make sure the value structure isn't fighting your compositional flow.
The goal here is not a finished piece, but a clear demonstration of intent. It should be obvious to anyone looking at your render what they are supposed to follow with their eyes.
Conclusion
Today we connected your focal point to the rest of your image by building a path for the viewer's eye. You've learned how to create direction and movement in a static image, a key skill for elevating your artwork from a simple depiction to an intentional composition.
Key Takeaways:
- Visual flow is the intentional guidance of the viewer's eye through a scene.
- Leading lines are the primary tool for creating this flow. They can be explicit (paths, fences) or implicit (edges of shadows, arrangement of objects).
- Common line-based compositional patterns (diagonals, S-curves, radials) are a useful toolkit for structuring your images.
- In 3D, you can create leading lines through geometry, asset placement, camera perspective, and lighting.
In our next lesson, we will synthesize the concepts of focal points, value, and flow. The learning outcome is to "Create two versions of the same scene, one with clear visual hierarchy and one without, to analyze the difference." This will challenge you to consciously control the order in which a viewer absorbs the information in your image, a crucial step toward mastering composition.