Hello! Let's dive into our next lesson on network analysis.
In our last session, we learned how to use ping and traceroute. ping tells us if a host is reachable, and traceroute shows us the network path to get there. But when you type ping google.com, your computer has to perform a crucial first step: it must translate the name google.com into a machine-readable IP address like 142.250.187.238. This process is handled by the Domain Name System (DNS).
Today, our learning outcome is to perform DNS lookups using dig and nslookup. We will peel back the curtain on DNS resolution and learn how to manually query this system. Understanding DNS is not just for troubleshooting; it's a fundamental part of the reconnaissance phase in any penetration test, where you gather information about a target.
1. What is DNS? The Internet's Phonebook
At its core, DNS is a globally distributed database that maps human-friendly domain names to the IP addresses that network equipment needs to locate services. It's a hierarchical and decentralized system.
Before we use the tools, it's essential to understand a few key concepts: DNS server types and record types. This will help you make sense of the information you get back from your queries.
DNS Resolution Troubleshooting Using nslookup and dig
The article 'DNS Resolution Troubleshooting Using nslookup and dig' on Medium provides an excellent and concise overview of the different types of DNS servers and the most common DNS records. Understanding this theory is the 'why' behind the commands we're about to learn.
Please read the sections titled 'Types of DNS Servers' and 'Types of DNS Records'. Focus on understanding the roles of the different servers (Recursive, Root, TLD, Authoritative) and the purpose of each record type (A, AAAA, MX, CNAME, TXT, NS).
To summarize the most critical record types from that reading:
- A: Maps a hostname to an IPv4 address.
- AAAA: Maps a hostname to an IPv6 address.
- MX: Mail Exchanger; specifies the mail servers for a domain.
- CNAME: Canonical Name; an alias that points one name to another.
- NS: Name Server; lists the authoritative DNS servers for a domain.
- TXT: Text record; used for various purposes, including domain ownership verification and email security policies.
2. nslookup: The Quick-Check Tool
nslookup (Name Server Lookup) is a classic command-line tool available on nearly all operating systems. It's great for quick, simple DNS queries.
Basic Usage
To find the IP address for a domain, simply provide the domain name as an argument:
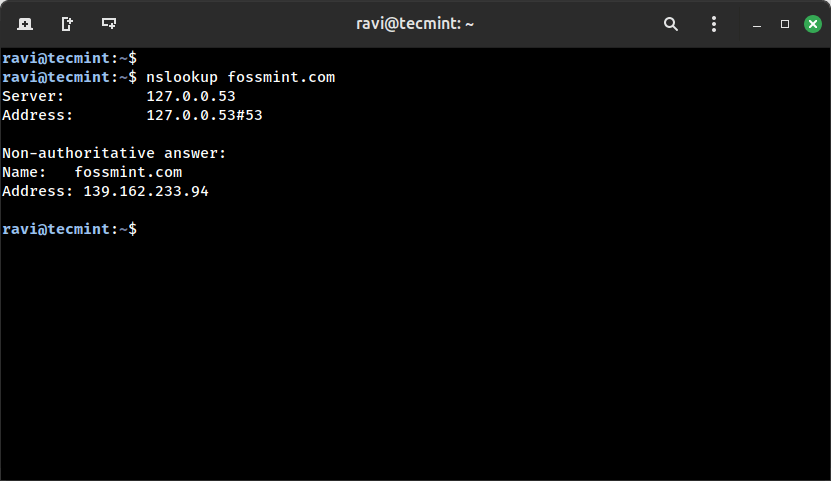
nslookup google.com
The output shows you which DNS server answered your request and then provides the "Non-authoritative answer," which includes the IP address(es) for the domain. A "non-authoritative" answer means your resolver got the information from its cache, not by asking the domain's authoritative server directly.
Interactive Mode & Specific Records
nslookup can also be used in an interactive mode, which is useful for making multiple queries. Just type nslookup and hit enter. From there, you can set the query type to look for specific records.
Let's see this in action. The following video demonstrates basic nslookup usage and how to query for MX (mail server) and NS (name server) records.
DNS Enumeration Tutorial - Dig, Nslookup & Host
This clip from HackerSploit's 'DNS Enumeration Tutorial' quickly demonstrates how to use nslookup to find not just the IP address, but also mail and name servers.
Watch the segment from 06:44 to 09:10. Pay attention to how the set type= command is used in interactive mode to query for different record types.
While nslookup is handy, most system administrators and security professionals prefer a more powerful tool: dig.
3. dig: The Power User's Tool
dig (Domain Information Groper) is the preferred tool for DNS queries because its output is more detailed, better structured, and more easily scriptable. As an Arch user, you'll appreciate the level of detail and control it provides.
First, ensure you have it installed. It's part of the dnsutils package on Arch Linux (and Debian/Ubuntu).
sudo pacman -S dnsutils
Basic Usage and Understanding the Output
Let's run the same basic query as before:
dig google.com
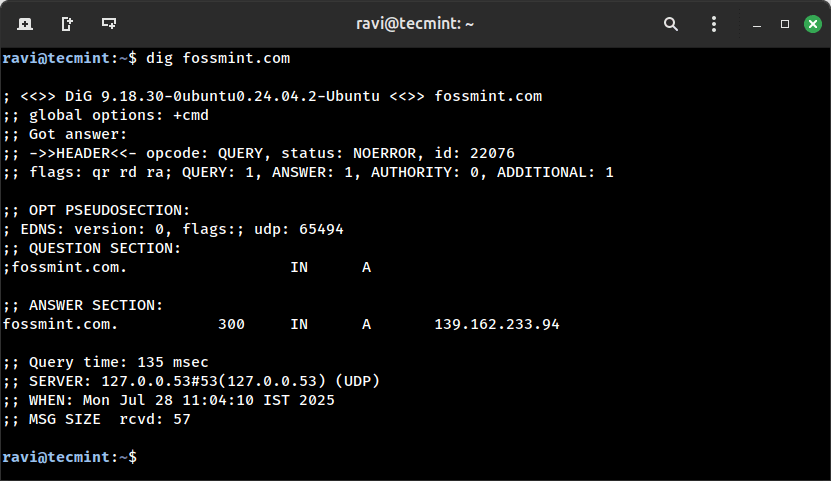
The output is verbose but very informative. Let's break it down:
QUESTION SECTION: Shows exactly what you asked for (in this case, anArecord forgoogle.com).ANSWER SECTION: This is the result. It gives you the domain, the record's TTL (Time-To-Live) in seconds, the record class (INfor Internet), the record type (A), and the IP address.AUTHORITY SECTION: Shows the authoritative Name Servers (NS) for the domain.ADDITIONAL SECTION: Provides extra information, often the IP addresses of the name servers listed in the authority section.- Statistics: At the bottom, you get metadata about the query, including how long it took and which server answered it.
Querying for Specific Record Types
With dig, you specify the record type at the end of the command. This is more direct than the interactive mode of nslookup.
dig google.com MX(Mail servers)dig archlinux.org NS(Name servers)dig google.com AAAA(IPv6 addresses)
This video provides a great walkthrough of using dig for these common record types.
DNS Enumeration Tutorial - Dig, Nslookup & Host
Let's return to the HackerSploit tutorial to see a demonstration of dig. This segment covers basic lookups and querying for specific record types like MX, NS, and AAAA.
Watch the demonstration from 11:35 to 15:25. Notice the clear syntax for querying different records and how the output is structured.
Advanced dig Usage for Efficiency and Troubleshooting
Two options make dig incredibly powerful for practical work.
-
+short: Trimming the Fat
The fulldigoutput is great for analysis but terrible for scripting. The+shortoption gives you only the answer, which is perfect for command pipelines.# Get just the IP addresses for archlinux.org dig archlinux.org +short # Get just the mail server hostnames dig gmail.com MX +short -
@server: Choosing Your Resolver
Sometimes, you need to check what a specific DNS server thinks. This is essential for troubleshooting issues where your local ISP's DNS might be slow or returning incorrect results. You can telldigwhich server to ask by using the@symbol. Common public resolvers are Google's8.8.8.8and Cloudflare's1.1.1.1.# Ask Google's DNS server for the IP of cloudflare.com dig @8.8.8.8 cloudflare.com
The next video gives excellent demonstrations of these practical options.
How to Use the dig Command in Linux | DNS Lookup Tutorial
The 'How to Use the dig Command in Linux' video from Learn Linux TV provides a clear, practical look at the +short and @server options.
Watch these two segments: 09:02 - 10:14: This part shows how to use the @ symbol to query a specific DNS server, like Google's Public DNS. 10:14 - 11:07: This demonstrates the +short option and explains why it's so useful for scripting.
4. Hands-On Investigation
Time to put this theory into practice in your terminal.
Activity 1: nslookup vs. dig
- Run
nslookup archlinux.org. - Run
dig archlinux.org. - Compare the outputs. Note the extra detail
digprovides, like the TTL and the Authority section.
Activity 2: DNS Record Hunting
Use dig to answer the following questions.
- What are the IPv4 addresses for
github.com? (Arecord) - What are the name servers for
debian.org? (NSrecord) - What are the mail servers for
protonmail.com? (MXrecord) Note the numbers before the hostnames—these are priorities. The lower the number, the higher the priority. - Does
www.gnu.orghave an IPv6 address? (AAAArecord)
Activity 3: Reconnaissance Practice
In ethical hacking, finding subdomains is a common task. Sometimes, a CNAME record can point to an interesting service.
- Run
dig CNAME www.archlinux.org. What do you see? - Now try
dig CNAME mail.google.com. Notice it points togooglemail.l.google.com.. This is a canonical name, the "true" name behind the alias.
Activity 4: Troubleshooting and Scripting Prep
- Query your default resolver for
wikipedia.org:dig wikipedia.org +short - Now, query Cloudflare's resolver for the same domain:
dig @1.1.1.1 wikipedia.org +short
Are the IP addresses the same? Usually they will be, but during a DNS change, you might see different results from different servers. - Try this command pipeline:
ping -c 3 $(dig +short google.com A | head -n 1)
This command usesdig +shortto get the list of IPs forgoogle.com,head -n 1to grab only the first one, and then passes it directly toping. This shows how+shortenables automation.
Conclusion
You've now added two fundamental DNS query tools to your toolkit. You can not only translate names to IP addresses but also interrogate the DNS system for a wealth of information about a domain's infrastructure.
Key Takeaways:
- DNS is the internet's directory service, mapping names to IP addresses.
- DNS records like A, AAAA, MX, NS, CNAME, and TXT store different types of information about a domain.
nslookupis a simple, universal tool for quick lookups.digis the more powerful tool, providing detailed, structured output that is preferred for serious analysis.- The
dig +shortoption provides clean output for scripting, whiledig @serveris essential for troubleshooting by querying specific DNS servers.
Next Lesson Preview:
So far, we've found a host's IP address and verified it's online. From a security perspective, the next question is: what is running on that host? In our next lesson, we will learn how to identify which processes are listening on network ports using ss and netstat. This is how you discover open doors—the running services—on a target machine.