Hello! Welcome to the final lesson in our module on Linux storage and filesystem management.
In our last lesson, we demystified /etc/fstab and learned how to use it to make our filesystems mount automatically at boot. You may have noticed that some fstab examples included an entry for something called swap. This isn't a regular filesystem with files and directories, but it's just as critical for a healthy system.
Today, we will dive into this topic. Our learning outcome is to explain what swap space is and create/enable a swap file using mkswap and swapon.
Understanding how a system manages memory is fundamental for both administration and security. For a penetration tester, a system that is heavily swapping can indicate it's under-resourced, which might present opportunities. Conversely, understanding how to configure swap properly is a key part of system hardening.
Let's begin.
1. What is Swap Space?
At its core, swap space is an area on a storage drive (like an SSD or HDD) that the operating system uses as an extension of your physical RAM. When your system's RAM is full, the kernel can move less-used blocks of memory (called "pages") to the swap space on the disk. This frees up RAM for more active applications. This process is called "swapping."
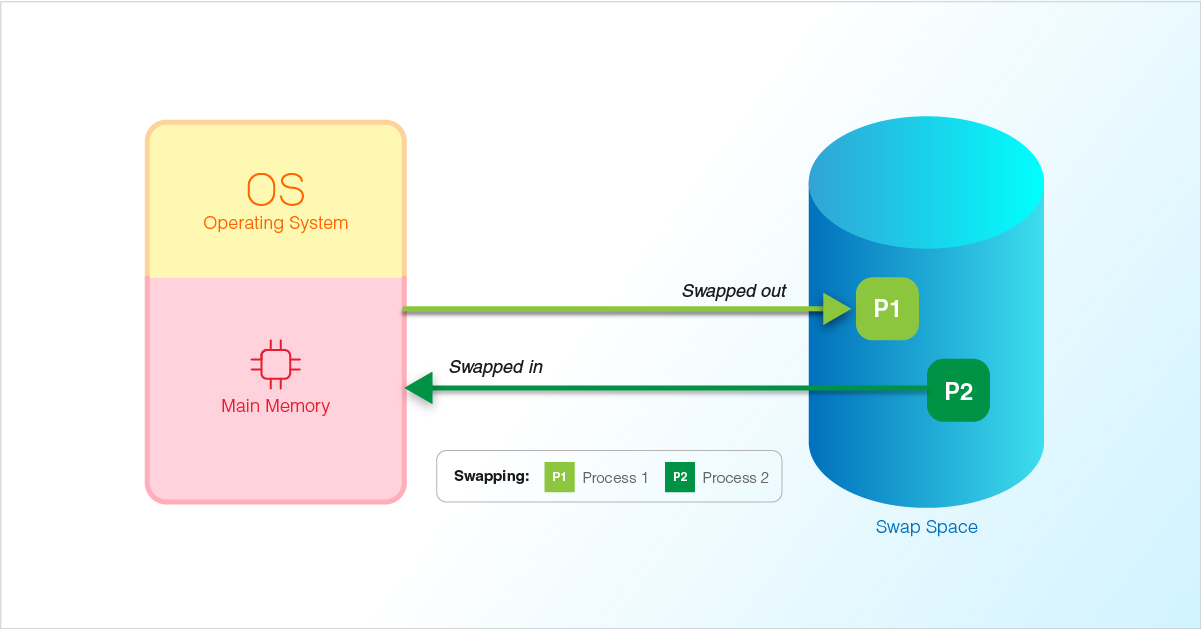
There are two forms of swap space:
- Swap Partition: A dedicated partition on your disk exclusively for swapping. This is a more traditional approach.
- Swap File: A special file that resides within your existing filesystem (e.g., in your root
/directory) which is designated for swapping.
Swap files are generally more flexible because you can easily create, resize, or remove them without re-partitioning your drive. For this reason, we will focus on creating a swap file, which is a common practice on modern systems, including Arch Linux.
To get a solid grasp of what swap is and why it's important, let's start with a short article.
How to Configure and Enable Swap Space on Arch Linux
The article "How to Configure and Enable Swap Space on Arch Linux" from Siberoloji provides an excellent introduction tailored for Arch users.
Read the first three sections: "What is Swap Space?", "Why Use Swap on Arch Linux?", and the brief introduction to the article. Focus on understanding the purpose of swap and the difference between a swap file and a swap partition.
As the article mentions, even on a system with plenty of RAM, swap is useful for:
- Stability: It acts as a safety net to prevent your system from crashing if an application has a memory leak or you experience an unexpected spike in memory usage (the dreaded "Out Of Memory" or OOM killer).
- Hibernation: To hibernate (suspend-to-disk), the entire contents of your RAM are written to the swap space. To do this, your swap space must be at least as large as your physical RAM.
2. The Practical Workflow: Creating a Swap File
Now for the hands-on portion. We'll follow a clear, five-step process to create, enable, and configure a swap file. The process is:
- Check for existing swap.
- Create an empty file of a specific size.
- Secure the file by setting the correct permissions.
- Format the file as a swap area.
- Enable the swap file and make it persistent.
The following video from Joe Collins provides a very clear, command-by-command walkthrough of this entire process. We will watch it in segments as we go through each step.
Linux Tip | How To Create A Swap File
This video, "Linux Tip | How To Create A Swap File," will be our practical guide. The presenter does a great job of explaining each command's purpose.
First, watch the introduction from 00:00 to 02:43. The presenter discusses the difference between swap partitions and files and mentions that the method shown works on Arch Linux.
Step 1: Check for Existing Swap
Before creating new swap space, you should always check if any is already active. You can do this with two simple commands.
swapon --show: This command specifically lists active swap devices. If it returns no output, you have no active swap.free -h: This gives a human-readable summary of memory and swap usage.
Linux Tip | How To Create A Swap File
Let's see these commands in action.
Watch the segment from 03:32 to 05:03, where the presenter uses swapon --show and free -h to check the current swap status of his system.
Step 2: Create and Prepare the Swap File
Now, let's create the file itself. You can't just use touch because the system needs to allocate the disk space immediately. The best command for this is fallocate.
Next, you must set the correct permissions. This is a critical security step. Since RAM contents (which could include passwords, private keys, or other sensitive data) can be written to the swap file, it must not be readable by any normal user. The correct permission is 600, which gives read/write access only to the root user.
Linux Tip | How To Create A Swap File
The next segment of the video covers creating the file with fallocate and securing it with chmod.
Watch from 05:52 to 08:35. Pay close attention to: The sudo fallocate -l 2G /swapfile command to create a 2GB file. The sudo chmod 600 /swapfile command to set permissions. The presenter's explanation of why securing this file is important.
Step 3: Format and Enable the Swap File
With a secure file in place, we now need to format it as swap and then turn it on.
sudo mkswap /swapfile: This command sets up the file with the necessary swap headers, much likemkfs.ext4formats a partition.sudo swapon /swapfile: This command activates the swap file, making it available to the kernel.
Linux Tip | How To Create A Swap File
Let's watch the final steps of formatting and enabling the swap file.
Watch from 08:35 to 11:12. You'll see the mkswap command being run, followed by the swapon command. The presenter then uses swapon --show and free -h again to verify that the new 2GB swap file is active.
Step 4: Make the Swap File Persistent
Just like with our mount commands from the last lesson, swapon is temporary. To make our swap file available automatically on every boot, we must add it to /etc/fstab. This should feel very familiar!
The entry for a swap file is slightly different from a regular filesystem:/swapfile none swap defaults 0 0
Let's break this down:
- File System:
/swapfile(the path to our file). - Mount Point:
none(swap is not mounted on a directory). - Type:
swap. - Options:
defaultsis fine here. - Dump:
0(not to be backed up). - Pass:
0(not to be checked byfsckat boot).
Linux Tip | How To Create A Swap File
The final video segment covers adding the swap file to /etc/fstab to make it permanent.
Watch from 11:12 to the end. The presenter adds the correct line to /etc/fstab, reboots the machine, and then verifies that the swap file was automatically enabled.
Hands-On Practice
You are working in your Arch Linux virtual machine, which has 2GB of RAM. You're about to start a memory-intensive task (like compiling a large program or running multiple VMs) and you've noticed you have no swap space enabled. You decide to create a 4GB swap file to be safe.
List the exact sequence of commands you would run to accomplish this, from start to finish. Include the commands for:
- Creating a 4GB file named
/swapfile. - Setting the correct, secure permissions.
- Formatting the file for swap.
- Enabling the swap file for the current session.
- Verifying that the swap file is active.
- Finally, write down the exact line you would add to
/etc/fstabto make this change permanent.
Take your time and think through each step we've covered.
Conclusion
Congratulations on completing the module on Linux storage! You now have a solid understanding of how Linux handles disks, partitions, and memory management.
Key Takeaways:
- Swap space acts as virtual memory, allowing the system to use disk space as a slow extension of RAM to prevent crashes from memory exhaustion.
- A swap file is a flexible alternative to a dedicated swap partition and is easy to manage.
- The process for creating a swap file is:
fallocateto create the file.chmod 600to secure it.mkswapto format it.swaponto activate it.- Add an entry to
/etc/fstabto make it permanent.
- Securing the swap file is crucial because it can temporarily hold sensitive data from RAM.
Next Lesson Preview:
We've now built a strong foundation in system and storage administration. In the next module, we'll pivot to a skill set that is indispensable for both hacking and administration: command-line data manipulation. Our first lesson will introduce you to grep, a powerful tool for searching for text patterns in files and command output. You'll also get your first taste of regular expressions, a fundamental concept for pattern matching in all areas of computing.