Hello! Let's dive back into our security training.
In the last lesson, we established the theoretical foundation of firewalls, exploring the crucial difference between stateless and stateful inspection. You learned that a stateful firewall intelligently tracks connections, and that on Linux, this is achieved using iptables combined with the conntrack kernel module.
Today, we transition from theory to practice. We will take direct control of the firewall on your Linux system. This lesson is designed to get you comfortable with the command-line interface for iptables, a skill that is fundamental for both system hardening (defense) and for understanding how network-level attacks are blocked or might succeed (offense).
Our learning outcome is to: Create basic iptables rules to allow and block traffic based on IP, protocol, and port.
1. The iptables Framework: Tables, Chains, and Rules
Before we start typing commands, it's essential to understand the structure of iptables. Every packet is processed according to a clear hierarchy:
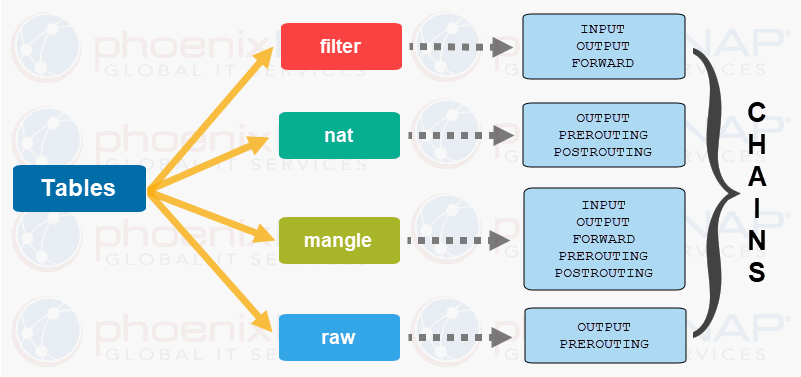
- Tables: These are collections of rules for a specific purpose. For our goal of basic firewalling, we will focus exclusively on the
filtertable, which is the default. Other tables likenat(for network address translation) andmangle(for packet modification) exist for more advanced scenarios. - Chains: Within each table are chains, which are sequences of rules. A packet is checked against each rule in a chain, in order. The three essential chains in the
filtertable are:INPUT: For packets destined for your local machine.OUTPUT: For packets generated by your local machine.FORWARD: For packets that are just passing through your machine to another destination (i.e., routing).
- Rules: These are the specific conditions that a packet is matched against (e.g., source IP, destination port).
- Targets: If a packet matches a rule, a target action is performed. Common targets are
ACCEPT(let the packet through),DROP(silently discard the packet), andREJECT(discard the packet and send an error message back).
This diagram gives a good overview of the tables and the chains within them. We'll be working in the filter table.
The following video provides a clear and concise explanation of these core concepts.
iptables Complete Guide | HackerSploit Linux Security
The video 'iptables Complete Guide' by HackerSploit provides an excellent overview of the iptables framework. We will start by understanding the relationship between tables and chains.
Watch from 00:42 to 10:51. The first part (until 06:50) explains the tables (filter, nat, mangle) and chains (INPUT, OUTPUT, FORWARD). The second part (from 07:01) explains how rules are processed sequentially within a chain and the different targets (ACCEPT, DROP, REJECT).
For a detailed textual reference, especially since you are on Arch Linux, the ArchWiki is an invaluable resource. I recommend reading the introduction to solidify your understanding.
The 'iptables' page on the ArchWiki provides the definitive guide for your system. This section covers the same core concepts we just saw in the video.
Read the 'Basic concepts' section, including the subsections on 'Tables,' 'Chains,' and 'Rules.' This will reinforce the hierarchy and terminology.
2. Getting Started: Viewing and Resetting Rules
Let's move to the command line. The first step in managing a firewall is to see what rules are already in place. It's also critical to know how to start with a clean slate.
You will need root privileges for all iptables commands, so either switch to the root user with su - or prefix each command with sudo.
Common Commands:
- List all rules:
iptables -L - List all rules with verbose output and numeric IPs/ports:
iptables -nvL(This is usually the most useful version). - Flush (delete) all rules in all chains:
iptables -F - Set the default policy for a chain:
iptables -P <CHAIN_NAME> <TARGET>(e.g.,iptables -P INPUT DROP)
The default policy is the action taken if a packet doesn't match any of the rules in a chain. A common security practice is to set the default policy for INPUT and FORWARD to DROP and then explicitly ACCEPT only the traffic you want.
Warning: If you are connected to your machine via SSH, running iptables -P INPUT DROP without first adding a rule to allow SSH traffic will immediately lock you out.
Let's watch how to perform these initial setup steps.
iptables Complete Guide | HackerSploit Linux Security
Continuing with the HackerSploit video, this next segment demonstrates the essential first steps: clearing old rules and setting default policies.
Watch from 12:00 to 18:11. Pay close attention to the commands for flushing rules (-F) and setting policies (-P). The presenter demonstrates exactly what happens when you set the INPUT policy to DROP without an exception for SSH—a valuable lesson!
3. Creating Your First Firewall Rules
Now for the main event. A rule is constructed by specifying matching criteria and a target. Here is the general syntax:
iptables -A <CHAIN> <MATCHING_CRITERIA> -j <TARGET>
-A <CHAIN>: Append the rule to the end of the specified chain (e.g.,INPUT).<MATCHING_CRITERIA>: Conditions the packet must meet.-s <IP_ADDRESS>: Matches a source IP or subnet.-d <IP_ADDRESS>: Matches a destination IP or subnet.-p <PROTOCOL>: Matches a protocol (e.g.,tcp,udp,icmp).--dport <PORT>: Matches a destination port (requires-p).--sport <PORT>: Matches a source port (requires-p).
-j <TARGET>: Jump to this target if the packet matches (e.g.,ACCEPT,DROP).
Rule 1: Blocking Traffic from a Specific IP
Let's say you've identified a malicious IP address, 198.51.100.5, trying to access your server. You can block all incoming traffic from it.
# Block all incoming packets from the source IP 198.51.100.5
iptables -A INPUT -s 198.51.100.5 -j DROP
Rule 2: Allowing SSH only from Your Admin Workstation
A powerful security measure is to only allow SSH access from a trusted IP. Let's assume your trusted IP is 203.0.113.25.
# Allow incoming TCP traffic on port 22 from source IP 203.0.113.25
iptables -A INPUT -p tcp --dport 22 -s 203.0.113.25 -j ACCEPT


# Then, to block all other SSH attempts, you could add a rule to drop them
# This rule is most effective if your default INPUT policy is ACCEPT.
# If your default policy is DROP, this rule is redundant.
iptables -A INPUT -p tcp --dport 22 -j DROP
Rule Order Matters! iptables processes rules from top to bottom. The ACCEPT rule for your specific IP must come before the general DROP rule for port 22.
Rule 3: Allowing Public Access to a Web Server
If you're running a public web server, you need to allow incoming traffic on the standard web ports (80 for HTTP, 443 for HTTPS) from any IP address.
# Allow all incoming TCP traffic on destination port 80
iptables -A INPUT -p tcp --dport 80 -j ACCEPT


# Allow all incoming TCP traffic on destination port 443
iptables -A INPUT -p tcp --dport 443 -j ACCEPT
This next video segment provides excellent, practical demonstrations of creating these types of rules.
iptables Complete Guide | HackerSploit Linux Security
This is the most practical part of the HackerSploit video. It shows how to block traffic by IP, then by port, and demonstrates the powerful technique of creating specific exceptions.
Watch from 18:15 to 25:28. The first part covers filtering by IP address. The second part is a perfect demonstration: first, it blocks all access to a web server (port 80), and then it adds a rule to allow access only from a specific IP, illustrating the importance of rule order.
The "Practical Guide to Iptables" tutorial also provides many clear examples of these commands for your reference.
Practical Guide to Iptables | A Beginner's Tutorial to the Linux Firewall
This tutorial offers concise, command-focused examples for common firewall tasks.
Scan through the sections 'Blocking IP Addresses,' 'Blocking Ports,' 'Allowing an IP Address,' and 'Opening Ports.' These provide a quick written reference for the syntax we are using.
4. Making Your Rules Persistent
By default, rules you create with the iptables command are stored in memory and will be lost when the system reboots. To make them permanent, you must save them to a file and configure a service to load them at boot.
On Arch Linux, the process is straightforward:
- Save your current IPv4 rules:
iptables-save > /etc/iptables/iptables.rules - Save your current IPv6 rules (if you have any):
ip6tables-save > /etc/iptables/ip6tables.rules - Enable the systemd services to load these rules at boot:
systemctl enable iptables.service
systemctl enable ip6tables.service
The ArchWiki provides the definitive instructions for this.
This section of the ArchWiki explains exactly how to save and automatically load your rules on an Arch-based system.
Read the 'Configuration and usage' section. It details how to use iptables-save and enable the iptables.service unit.
5. Hands-On Practice: Building a Stateful Firewall
Let's synthesize everything we've learned, including the stateful concepts from the last lesson. Here is a common, secure firewall configuration. Try to construct the commands for each step yourself before checking the solution.
Scenario: Secure a server with a default-deny policy.
- Flush all existing rules and chains.
iptables -Fiptables -X
- Set the default policies: drop everything by default.
iptables -P INPUT DROPiptables -P FORWARD DROPiptables -P OUTPUT ACCEPT(We'll trust outgoing traffic for now)
- Allow traffic on the loopback interface (essential for many services).
iptables -A INPUT -i lo -j ACCEPT
- Allow all return traffic for established connections. This is the key to a stateful firewall and makes everything work!
iptables -A INPUT -m conntrack --ctstate RELATED,ESTABLISHED -j ACCEPT
- Allow new incoming SSH connections (port 22).
iptables -A INPUT -p tcp --dport 22 -j ACCEPT
- Allow new incoming HTTP connections (port 80).
iptables -A INPUT -p tcp --dport 80 -j ACCEPT
- List your new ruleset to verify it.
iptables -nvL
- Save your rules so they persist after a reboot.
iptables-save > /etc/iptables/iptables.rulessystemctl enable iptables.service
This ruleset is a solid starting point for any server. It blocks all unsolicited incoming traffic by default, but allows traffic related to connections initiated by the server, and explicitly opens ports for the services you want to expose.
Conclusion
Congratulations! You've moved from firewall theory to practical implementation. You now possess the fundamental skill of manipulating network traffic on a Linux system using iptables. This is a cornerstone of defensive security and a prerequisite for understanding network reconnaissance and exploitation.
Key Takeaways:
iptablesis structured into tables, chains, and rules. Thefiltertable'sINPUTandOUTPUTchains are used for basic firewalling.- Rules are processed in order. The first rule that matches a packet determines its fate.
- The syntax for creating a rule involves specifying a chain (
-A), matching criteria (like-s,-p,--dport), and a target (-j). - A secure practice is to set the default
INPUTpolicy toDROPand explicitlyACCEPTonly necessary traffic. - The rule
iptables -A INPUT -m conntrack --ctstate RELATED,ESTABLISHED -j ACCEPTis the heart of a stateful firewall, automatically allowing return traffic. - Rules must be saved using
iptables-saveand loaded via a service (iptables.serviceon Arch) to be persistent.
Next Lesson Preview:
Now that you know how to control and filter network traffic, our next step will be to learn how to observe and analyze it in granular detail. In the next lesson, we will introduce Wireshark, the world's foremost network protocol analyzer. You'll learn how to navigate its interface and apply filters to isolate specific conversations, turning a flood of raw data into actionable intelligence.