Hello! In our last lesson, we took our first steps into Python's rich data science ecosystem by learning how to import packages. We focused on NumPy and Pandas, understanding why they are essential for performance and structured data handling.
Today, we will build directly on that foundation by diving deep into the core of NumPy: the n-dimensional array. This lesson is all about the practical mechanics of working with these arrays. You will learn how to create arrays from scratch, how to access and select specific pieces of data using indexing and slicing, and how to change an array's structure with reshaping. Mastering these skills is the first and most crucial step in preparing numerical data for any machine learning algorithm.
Creating NumPy Arrays
In the last lesson, you saw that a NumPy array can be created from a Python list. This is the most direct method, and it will feel familiar to creating an array in JavaScript. However, NumPy also provides several convenient functions to create arrays with specific initial content, which is extremely useful in numerical computing.
For instance, you might need to create an array of a certain size filled with zeros as a placeholder, or a sequence of numbers in a specific range.
To get a comprehensive overview of the most common array creation functions, the following guide from Codecademy is an excellent resource. It clearly explains functions like np.array(), np.zeros(), np.ones(), and np.arange().
Creating and Using NumPy Arrays - A Complete Guide
This article provides a solid introduction to creating different types of NumPy arrays. Please start by reading the sections that define different array dimensions and then the section detailing the creation functions.
Begin by reading the section Types of NumPy arrays to understand the concept of 0D, 1D, 2D, and 3D arrays. Then, read the next section, How to create NumPy arrays?, which covers the key functions for array creation. Pay close attention to the table comparing the functions and the code examples for each.
As you can see, creating a 2D array (a matrix) is as simple as passing a list of lists. This structure is the primary way we'll represent datasets, where rows can be samples and columns can be features.
The following video from freeCodeCamp.org provides a live-coded demonstration of these concepts. Watching someone else code this can help solidify your understanding. It also introduces important array attributes like ndim (number of dimensions) and shape.
Python NumPy Tutorial for Beginners
This video offers a practical walkthrough of initializing arrays and exploring their properties.
First, watch the segment on initializing arrays from lists and checking their dimensions and shape. Then, skip ahead and watch the section on creating arrays with default values, which covers np.zeros, np.ones, and np.full.
Accessing Data: Indexing and Slicing
Once you have an array, the next task is to access its elements. For a 1D array, this works exactly like it does for a Python list or a JavaScript array: you use square brackets with an index, like my_array[0].
The real power of NumPy becomes apparent with multi-dimensional arrays. You can select elements, rows, columns, and even entire sub-regions of the array with clean and efficient syntax. This is called indexing and slicing.
The basic syntax for a 2D array is array[row, column]. To select ranges, you use the colon :, much like Python's list slicing.
The image below shows four clear examples of slicing a 2D array. Try to match the code with the highlighted cells to build your intuition.
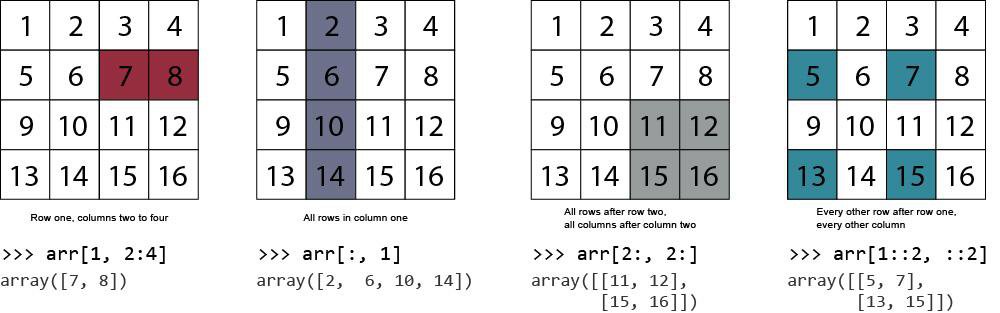
To see these techniques in action, the next segment of the freeCodeCamp.org video provides a very clear, step-by-step guide to indexing and slicing 1D, 2D, and even 3D arrays.
Python NumPy Tutorial for Beginners
This part of the video is an excellent guide to the core syntax for accessing data within NumPy arrays.
Watch the entire segment on accessing and changing elements. The instructor clearly explains how to get specific elements, rows, columns, and more complex slices. Pay close attention to the [row, col] notation and the use of the colon : for slicing.
To give you a bit of a challenge, this video also introduces two more advanced indexing techniques. You don't need to master them now, but it's good to be aware of them:
- Boolean masking: Using a condition (e.g.,
array > 50) to select only the elements that satisfy it. - Fancy indexing: Using a list of indices to select specific, non-contiguous elements.
Python NumPy Tutorial for Beginners
This is a brief look at more advanced, but very powerful, ways to select data.
Watch the first part of the section on boolean masking and advanced indexing. This will give you a glimpse of how you can select data based on conditions, a technique you will use frequently in data analysis.
Changing the Structure: Reshaping Arrays
In machine learning, you will often find that your data isn't in the right "shape" for a model. For example, you might have a long 1D array of pixel values from an image, but the model expects a 2D matrix representing the image's height and width.
NumPy's reshape() method allows you to change the dimensions of an array without changing the data it contains. The only rule is that the total number of elements must remain the same (e.g., a 12-element array can be reshaped to 3x4, 4x3, 2x6, etc.).
This is a simple but powerful operation. The image below shows a 1D array of 6 elements being reshaped into 2x3 and 3x2 matrices.
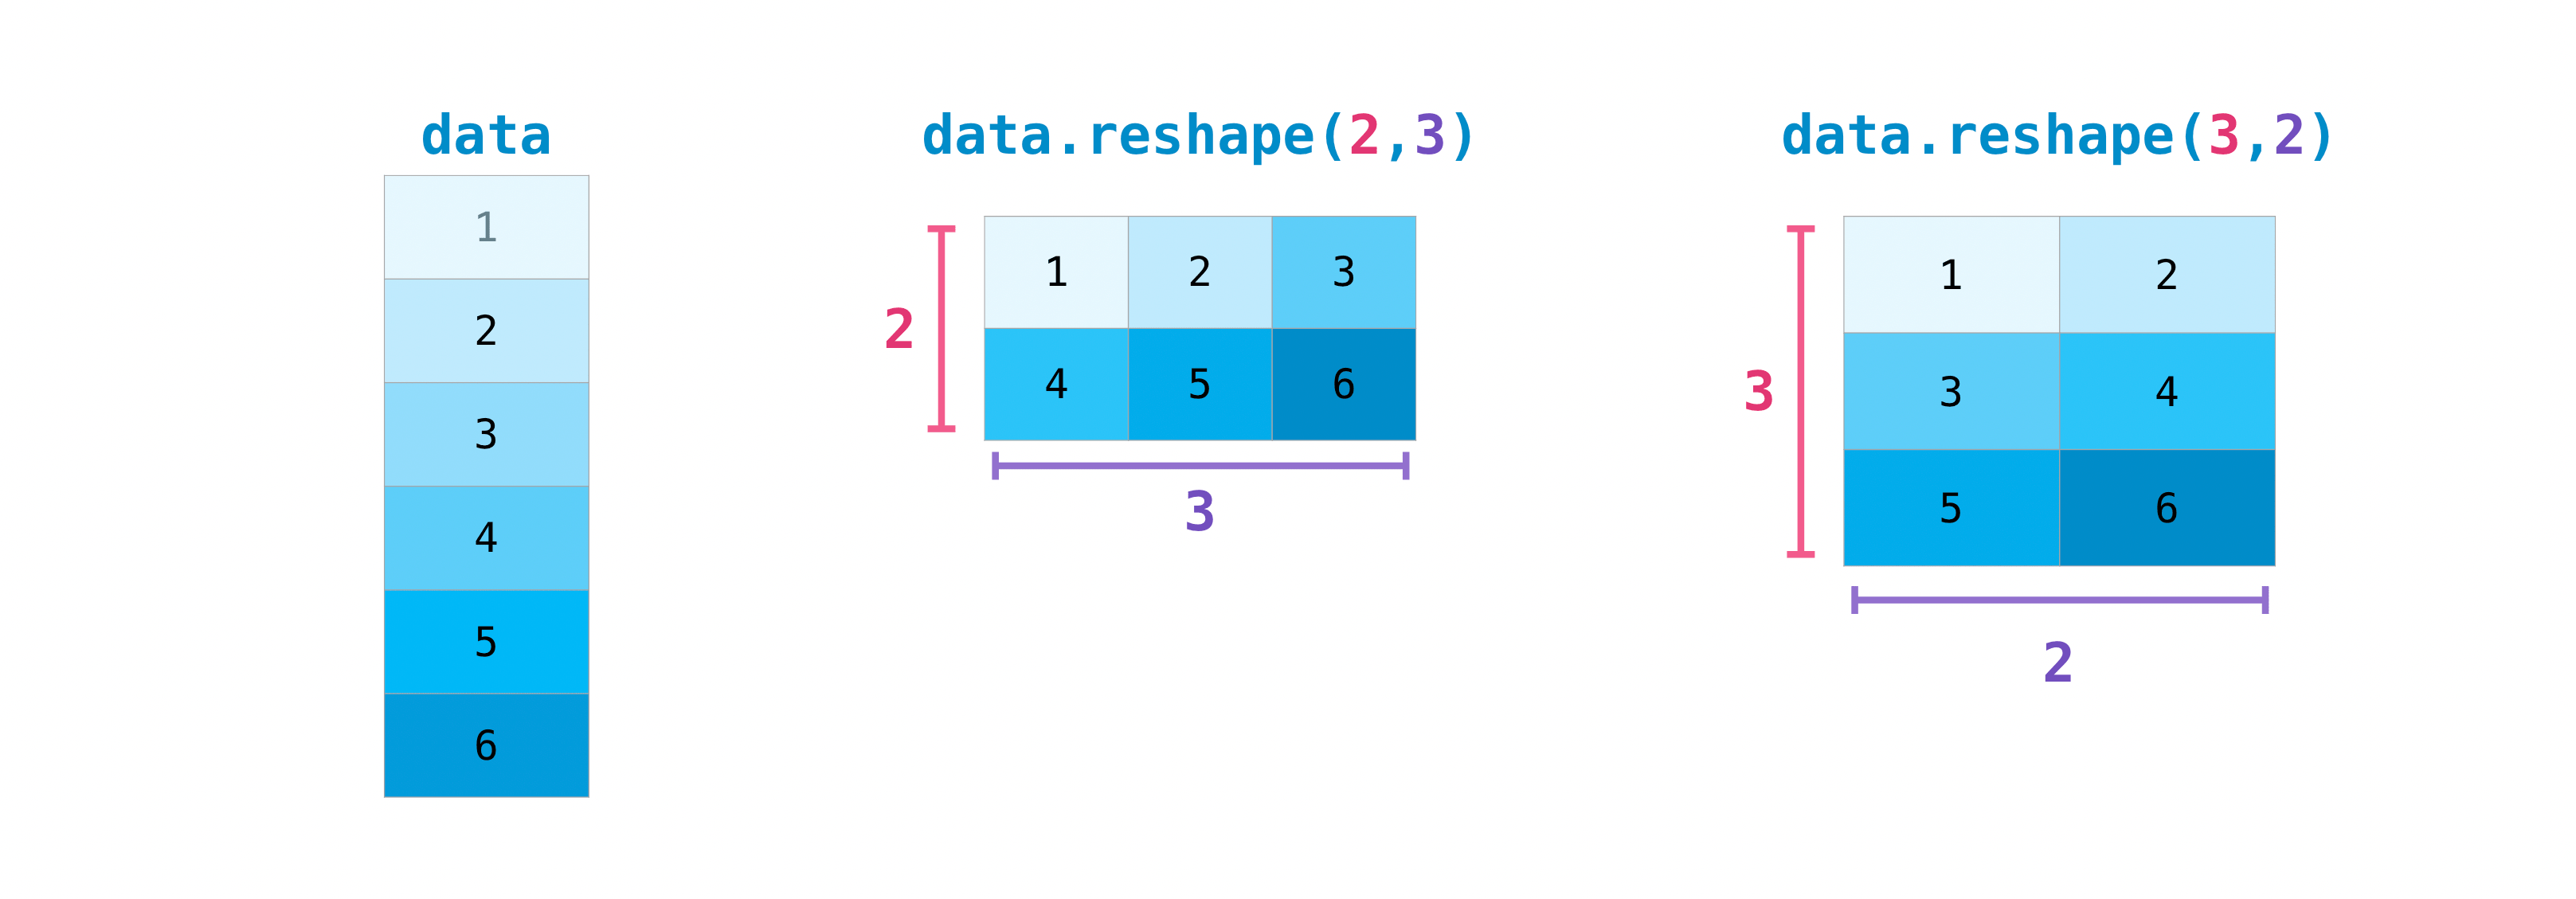
For a more detailed explanation, Jay Alammar's visual guide to NumPy provides an intuitive walkthrough of reshaping, as well as a recap of many concepts we've covered.
This article uses excellent visualizations to build intuition. We'll focus on the part about reshaping.
Please scroll down to the section Transposing and Reshaping. The visual explanation of the reshape() method is particularly helpful.
Conclusion
In this lesson, you've moved from the "why" of NumPy to the "how." You now have the essential toolkit for creating and manipulating NumPy arrays, which are the fundamental data structure for nearly all numerical work in Python.
Here are the key takeaways:
- Creating Arrays: You can create arrays from Python lists with
np.array()or use helper functions likenp.arange(),np.zeros(), andnp.ones()to generate them. - Indexing: You access elements in a 2D array using the
array[row, col]syntax. Negative indices count from the end, just like in Python lists. - Slicing: You can select entire rows, columns, or sub-matrices using the colon operator (
:), with the syntaxstart:stop:step. This is your primary tool for extracting data. - Reshaping: The
reshape()method allows you to change the dimensions of an array (e.g., from 1D to 2D) as long as the total number of elements is conserved. This is critical for preparing data for machine learning models.
You are now equipped to handle the structure of numerical data. In our next lesson, we will build on this by learning how to perform element-wise and matrix operations with NumPy, allowing you to apply mathematical functions and calculations across entire arrays with incredible speed.