In our last session, you successfully installed Docker Engine and ran your first container with the docker run hello-world command. This was a crucial milestone, confirming your setup is correct. You saw a message that briefly outlined the steps Docker took, but now it's time for the "deep dive" you're looking for.
This lesson focuses on dissecting that single command. We will trace the journey from the moment you press Enter to the final message appearing in your terminal. By the end, you'll understand precisely how the Docker client, daemon, registry, and underlying runtimes collaborate to bring a container to life. This detailed understanding of the execution flow is fundamental for troubleshooting and grasping more advanced Docker concepts later on.
The Anatomy of docker run
The docker run command is the primary way you'll create and start containers, but a lot happens behind that simple command. Let's break down the sequence of events. The following flowchart provides a high-level overview of the entire process, which we will explore in detail.
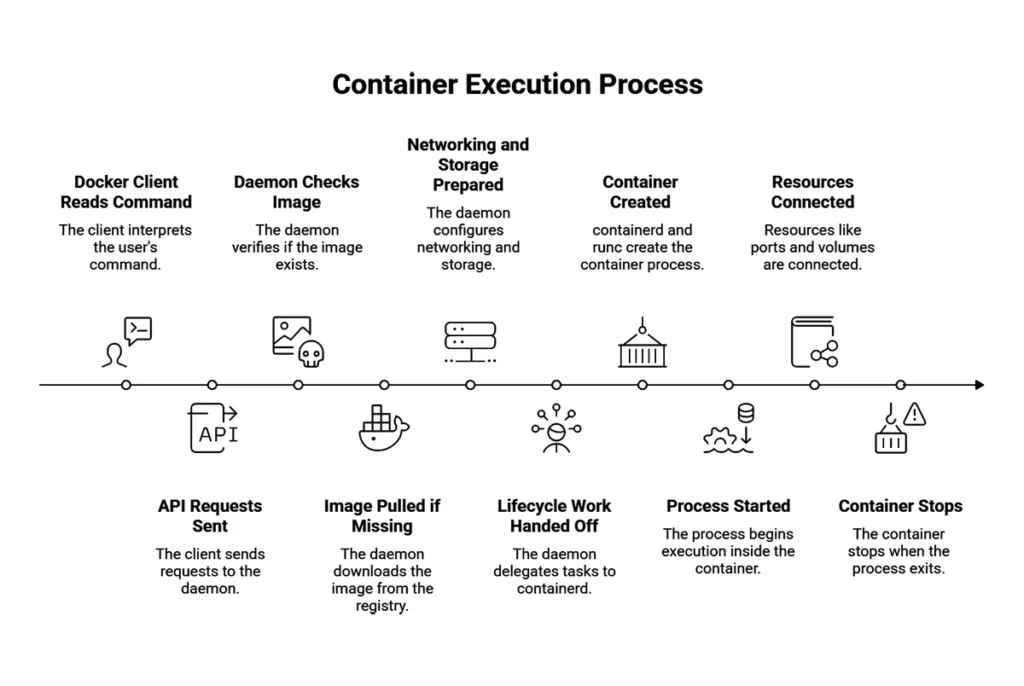
1. The Client Sends the Request
It all starts in your terminal. When you type docker run hello-world, you are using the Docker Client (docker), a command-line interface (CLI) tool.
- The client's first job is to parse your command. It understands
runis the action andhello-worldis the name of the image you want to use. - It then translates this command into a structured request formatted according to the Docker Engine's REST API.
- Finally, it sends this API request to the Docker Daemon (
dockerd), the background service that does all the heavy lifting. On Linux, this communication typically happens over a Unix socket located at/var/run/docker.sock, which you configured in the last lesson.
2. The Daemon Checks for the Image
The Docker Daemon receives the API request. Its first task is to find the specified image, hello-world.
- The daemon checks its local storage—the set of images already present on your host machine.
- Since this is the first time you've run this command, the daemon won't find the
hello-worldimage locally.
3. The Daemon Pulls the Image from a Registry
Because the image isn't available locally, the daemon's next step is to fetch it from a Docker Registry.
- By default, Docker is configured to use Docker Hub, the largest public registry of container images.
- The daemon contacts Docker Hub and requests the
hello-worldimage. You might notice the output sayshello-world:latest. The:latestpart is a tag, a label used to version images. If you don't specify a tag, Docker defaults tolatest. - Docker Hub sends back the image, which is composed of one or more read-only layers. The daemon downloads these layers and stores them on your host.
The article "Docker Architecture" from Blacksmith.sh provides an excellent internal breakdown of both the run and pull processes.
Docker Architecture: The components and processes - Part 1
This article offers a clear, step-by-step view of what happens inside Docker. We will focus on the detailed explanations for running a container and pulling an image.
First, in the section "Key components managed by Docker daemon," find the subsection "Containers." Read the detailed list under what exactly is happening internally? This breaks down the docker run command. Next, scroll down to the "Images" subsection and read the step-by-step list under the internal process. This explains the docker pull mechanism in similar detail. Pay attention to how the daemon interacts with the registry and manages image layers.
4. The Daemon Creates and Starts the Container
Once the image is on your local machine, the daemon can create the container. This is where the architectural components we discussed previously come into play.
- Hand-off to
containerd: The Docker daemon doesn't create the container directly. It hands the image and run-configuration over to a lower-level component calledcontainerd. This separation of concerns allows the Docker daemon to focus on the user-facing API whilecontainerdmanages the container lifecycle (start, stop, etc.). - Execution with
runc:containerdthen uses another tool,runc, to actually create and run the container.runcis a lightweight, universal container runtime that interfaces directly with your Linux kernel. It uses kernel features like namespaces (to give the container its own isolated view of the system, like its own process tree and network stack) and cgroups (to limit the resources it can use, like CPU and memory). - Process Execution:
runcstarts the process defined in thehello-worldimage's configuration. For this specific image, that process is a small executable that prints the "Hello from Docker!" message and some explanatory text. - Output Streaming: The daemon captures the standard output from this process and streams it back to your Docker client, which then displays it in your terminal.
- Container Stops: The
hello-worldexecutable is designed to run, print its message, and then exit immediately. When the main process inside a container exits, the container stops.
For a more comprehensive look at this entire sequence, the following article provides another excellent trace of a docker run command.
Architecture of Docker - GeeksforGeeks
This article gives a clear, illustrated walkthrough of the command execution flow.
Please read the section titled Step-by-Step Execution. It traces a slightly different command (docker run ... nginx), but the underlying sequence involving the client, daemon, registry, containerd, and runc is exactly the same. This will reinforce your understanding of the component interactions.
Finally, to see this all in action again with a narrator explaining each step, this video provides a great visual recap.
The intro to Docker I wish I had when I started
This video, "The intro to Docker I wish I had when I started," walks through the hello-world example and breaks down the output, which perfectly aligns with what we've just discussed.
Watch the segment from the installation of Docker through the detailed breakdown of the hello-world output. The narrator does an excellent job of explaining the client-daemon communication and the image pull from Docker Hub, reinforcing the concepts we've covered.
Conclusion
You've now moved from simply running a command to understanding the intricate dance of components that make it work. What seems like a single action is actually a well-orchestrated sequence involving a client, a daemon, a registry, and low-level runtimes.
Here are the key takeaways from our trace of docker run hello-world:
- The Docker Client acts as the user interface, translating commands into API requests for the daemon.
- The Docker Daemon is the engine that receives requests. It first checks for images locally before pulling them from a Registry like Docker Hub.
- Image pulls involve downloading a manifest and a series of read-only layers.
- The actual container execution is delegated to specialized tools:
containerdmanages the container's lifecycle, andruncinterfaces with the Linux kernel to create the isolated environment using namespaces and cgroups. - The container lives only as long as its main process is running.
In our next lesson, we will formalize our understanding of the three core concepts you've just seen in action: images, containers, and registries. We'll clarify exactly what they are, how they differ, and how they form the foundational pillars of the entire Docker ecosystem.