Hello!
In our last lesson, you mastered the art of pattern debugging, learning how to diagnose flaws in a physical swatch and translate those corrections back to your master chart. Your hand-drawn chart is now a refined, accurate, and tested visual blueprint for your doily design.
This lesson takes you to the final stage of pattern creation: translating that visual blueprint into a universal language that any crocheter can understand. Our goal is to translate a complete, hand-drawn circular chart into a set of standard written instructions, round by round.
Think of this process in terms of your web design experience. Your detailed, corrected chart is like a polished visual mockup or wireframe. The written pattern is the clean, well-commented, and accessible code (like HTML and CSS) that makes the design functional for the end-user. Just as good code is clear and easy to follow, a good pattern is unambiguous and a pleasure to work from.
1. The Methodical Process of Translation
The first step is to recognize that translating a chart isn't about summarizing; it's a direct, methodical transcription. You will read your chart symbol by symbol, round by round, and write down the corresponding instruction.
Given your preference for a tactile, pen-and-paper process, here’s a workflow that builds on that strength:
- Print a clean copy of your chart: Keep your master chart safe. Work from a copy you can mark up.
- Use a guide: Place a ruler or a long crochet hook under the round you are currently translating. This helps you focus and not lose your place.
- Trace your path: As you write the instruction for each stitch or stitch group, lightly trace over it on the chart with a pencil. This acts as a 'linter' for your work, ensuring you don't miss or double-count any stitches.
This systematic approach is the core of accurately reading a chart for transcription. For a refresher on navigating circular charts systematically, from the center outwards, the principles in the following article are excellent.
How to read any crochet pattern chart or diagram
The article 'How to read any crochet pattern chart or diagram' from Haak Maar Raak provides a great refresher on systematically working through a chart. While you already know how to read charts, reviewing its step-by-step logic for finding the start and progressing through rounds is perfect preparation for transcription.
First, quickly review the main section, 'How do you read a crochet chart?', focusing on the step-by-step process of identifying the start and working round by round. Then, look at the 'Tips & Tricks for reading a stitch chart' section, which reinforces the practical approach of printing and tracing that suits your hands-on style.
2. The Language of Crochet: Abbreviations and Conventions
To write a pattern, you need to speak the language. This means using standard abbreviations and formatting conventions that crocheters everywhere recognize. We will use US standard terms.
This image provides a comprehensive list of the most common abbreviations you will use. It's an indispensable reference.
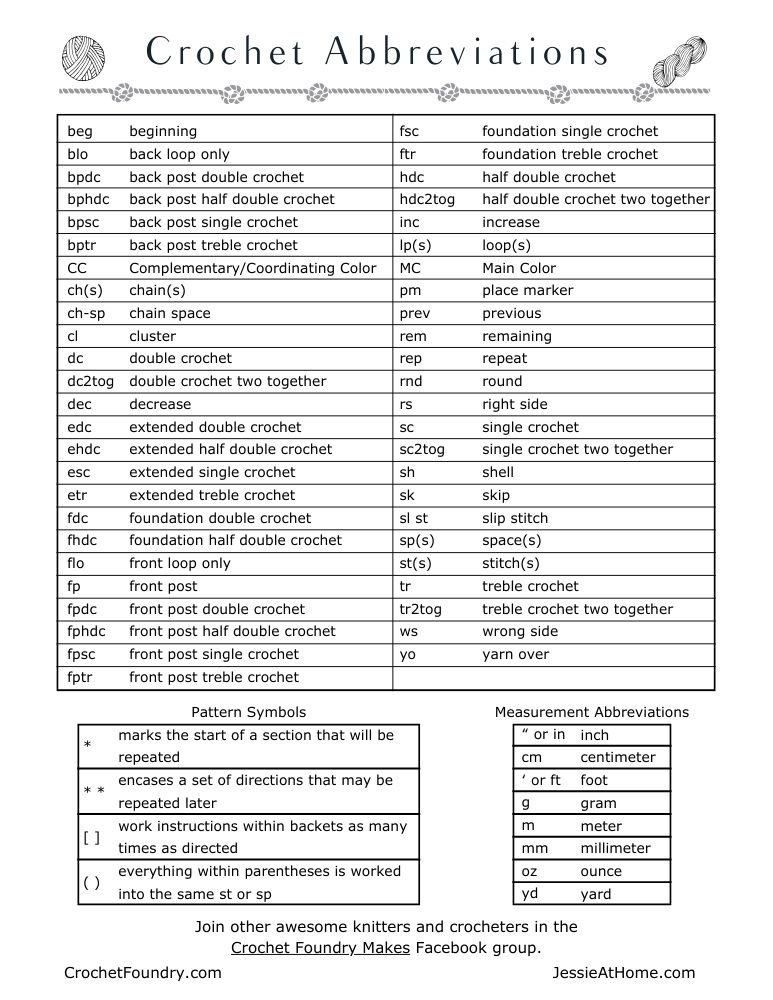
Key Conventions to Master:
- Round Headings: Start each round's instructions on a new line, clearly labeled (e.g., Rnd 1:, Rnd 2:).
- Stitch Counts: End each round's instruction with a final stitch count in parentheses, e.g.,
(12 dc). This is a critical checkpoint for the user. For more complex rounds, you can be more descriptive, e.g.,(12 sc, 12 ch-3 sps). - Repeats: Doilies are built on repeats. Use asterisks
*and brackets[ ]or parentheses( )to denote repeating sections.*...; rep from * aroundmeans to repeat the instructions following the asterisk to the end of the round.[...] 6 timesmeans to work the instructions inside the brackets the specified number of times.(2 dc, ch 2, 2 dc) in next stmeans to work all those stitches into the single stitch indicated.
3. Translation in Action: A Walkthrough
Let's translate a few hypothetical rounds from a chart to see how this works.
Imagine your chart shows the following:
- Round 1: A magic ring with 12 double crochet stitches inside. It's closed with a slip stitch. The round starts with a chain-3 that functions as the first double crochet.
- Round 2: Each stitch from Round 1 has two double crochets worked into it. The round starts similarly with a chain-3 (as the first dc) and another dc in the same stitch.
- Round 3: Alternating single crochets and chain-3 spaces. A single crochet is worked into one stitch, the next stitch is skipped, and a chain-3 is made over it.
Here is how you would write the instructions:
Rnd 1: Start with a magic ring. Ch 3 (counts as first dc here and throughout), 11 dc in ring. Join with a sl st to top of beginning ch-3. (12 sts)
Notice the notes about the starting chain and the final stitch count.
Rnd 2: Ch 3, dc in same st as join. Work 2 dc in each remaining st around. Join with a sl st to top of beginning ch-3. (24 sts)
Here, "dc in same st as join" is clearer than "2 dc in first st".
Rnd 3: Ch 1, sc in same st as join. *Ch 3, sk next st, sc in next st. Rep from * 10 more times. Ch 3, sk last st, join with a sl st to first sc. (12 sc, 12 ch-3 spaces)
Using the asterisk for the repeat makes the instruction clean and concise.
Test your understanding!
Your chart for a border round shows the following repeating pattern:
- Skip the next two stitches.
- In the following stitch, work: (2 double crochet, chain 2, 2 double crochet) — this is a shell.
- Skip the next two stitches.
- Work a single crochet in the following stitch.
This sequence repeats all the way around the doily. How would you write the instruction for this repeating section using standard conventions?
Show answer
A standard way to write this would be: *Sk next 2 sts, (2 dc, ch 2, 2 dc) in next st, sk next 2 sts, sc in next st; rep from * around. You would then finish the instruction with how to join the round and the final stitch count.
4. Assembling the Full Pattern Document
The round-by-round instructions are the core of your pattern, but they don't stand alone. A complete, professional pattern includes essential front matter that gives the user all the information they need before they even pick up their hook.
The process of writing a commercial-quality pattern is very similar to preparing documentation for a software project: you provide the "technical specs" up front.
Designing a crochet pattern - my entire process
The article 'Designing a crochet pattern - my entire process' by Yarnandy provides an excellent overview of what goes into a final pattern document. It treats the process with the professionalism it deserves.
First, read the subsection 'Writing from charts' to see a real-world description of the manual transcription process. Then, pay close attention to the checklist under 'Extra parts of the pattern.' Finally, skim 'Organizing everything in a document' to see how these parts come together into a readable layout. This gives you the full scope of a finished pattern.
Based on that resource and standard industry practice, here is a checklist of sections to include in your final pattern document. Today, we're focused on the list itself; in our next lesson, we'll dive into the content of these notes.
Your Pattern Checklist:
- Title: A memorable name for your doily.
- Introduction: A short, engaging paragraph about the design.
- Skill Level: (e.g., Intermediate, Advanced)
- Materials:
- Yarn (brand, type, weight, and amount)
- Hook size
- Other tools (yarn needle, scissors, blocking pins)
- Gauge: The required measurements for a swatch (e.g., "First 4 rounds = 4 inches in diameter").
- Finished Size: The final dimensions after blocking.
- Abbreviations: A list of all abbreviations used in your pattern (use the reference image above!).
- Special Stitches: Written explanations for any complex stitches you designed (e.g., "Shell," "Pineapple Base").
- Pattern Notes: General rules that apply throughout (e.g., "This pattern is worked in continuous rounds," or "The ch-3 at the beginning of a round counts as a double crochet").
- Written Instructions: The round-by-round translation you just created.
- Finishing: Instructions for weaving in ends and blocking.
- Chart (Optional): Including your beautiful hand-drawn chart is a hallmark of high-quality patterns.
- Copyright: A statement about how others may use your pattern.
This structure ensures that anyone, anywhere, can successfully recreate your design.
Conclusion
You have now learned how to transform your visual design into a clear, standardized, and shareable format. This process of translation is the bridge between your creative vision and the broader community of crocheters. It turns your personal draft into a public legacy.
Key Takeaways:
- Translating a chart into written instructions is a systematic, stitch-by-stitch process.
- Using standard US crochet abbreviations and formatting conventions (like
*for repeats and stitch counts) is essential for clarity. - A complete pattern is a full document that includes crucial context like materials, gauge, and special stitch definitions, not just the round-by-round instructions.
- The structure of a pattern is analogous to technical documentation, designed for maximum user success.
Next Lesson:
You have the full checklist of what goes into a pattern document. In our final lesson, we will focus on the details of that checklist: Compile final pattern notes regarding materials, special stitches, and finishing instructions. We will ensure every piece of supporting information is clear, concise, and complete, preparing your pattern for its debut.