Hello! Welcome back to our study of thin lenses.
In our last lesson, we mastered the art of constructing ray diagrams to visually predict the characteristics of an image—its position, nature, and size. You now have a strong intuitive foundation for how convex and concave lenses work. As you requested, we're now moving from the visual to the mathematical, a crucial step for your NEET preparation.
Today's lesson will equip you with the tools to calculate these properties with precision. We will focus on how to apply the thin lens formula and the magnification equation. By the end of this lesson, you'll be able to solve numerical problems to find the exact location, size, and nature of an image formed by any thin lens.
1. The Foundation: Cartesian Sign Convention
Before we touch any formulas, we must master the sign convention. This is the single most important, and often trickiest, part of solving lens problems. An error in sign will lead to a completely wrong answer. We will use the standard Cartesian sign convention, which is the same one you used for spherical mirrors.
The NCERT textbook provides the official definition.
Chapter Nine - RAY OPTICS AND OPTICAL INSTRUMENTS
Let's start with the official rules. This section of the NCERT textbook lays out the Cartesian sign convention. These rules are universal for all spherical mirrors and lenses in your syllabus.
Read section 9.2.1, 'Sign convention'. Focus on the three main points: where distances are measured from, which direction is positive, and how heights are measured.
To see these rules applied in a very practical way, let's watch a video that breaks them down.
How To Use LENS MAKER FORMULA : Sign Convention and LENS NUMERICALS: Class X :ICSE /CBSE PHYSICS
This video from Physics Wallah is excellent for NEET aspirants. It explains the same sign convention rules with a focus on how to apply them when solving problems.
Watch from 01:31 to 06:08. Pay close attention to the four rules he outlines. Notice how the direction of incident light is key to determining positive and negative directions.
Summary of Sign Convention Rules
Let's consolidate those rules. For any problem, always start by applying these:
- Origin: All distances are measured from the optical center (O) of the lens.
- Direction:
- The direction of the incident light is taken as positive.
- Distances measured against the direction of incident light are negative.
- Heights:
- Heights measured upwards and perpendicular to the principal axis are positive.
- Heights measured downwards are negative.
- Focal Length ():
- For a convex (converging) lens, is positive.
- For a concave (diverging) lens, is negative.
- Object Distance (): For a real object placed in front of the lens, light travels from the object to the lens. Since we measure the distance from the optical center to the object (against the incident light), the object distance is almost always negative.
Test your understanding!
An object is placed 30 cm in front of a concave lens with a focal length of 20 cm. What are the signs of and that you would use in a calculation?
Show answer
- Object distance (): The object is real and placed in front of the lens, so we measure its distance from the optical center against the direction of light. Therefore, cm.
- Focal length (): It is a concave lens, so its focal length is negative. Therefore, cm.
2. The Thin Lens Formula
With the sign convention established, we can now introduce the central formula. The thin lens formula relates the object distance (), the image distance (), and the focal length ().
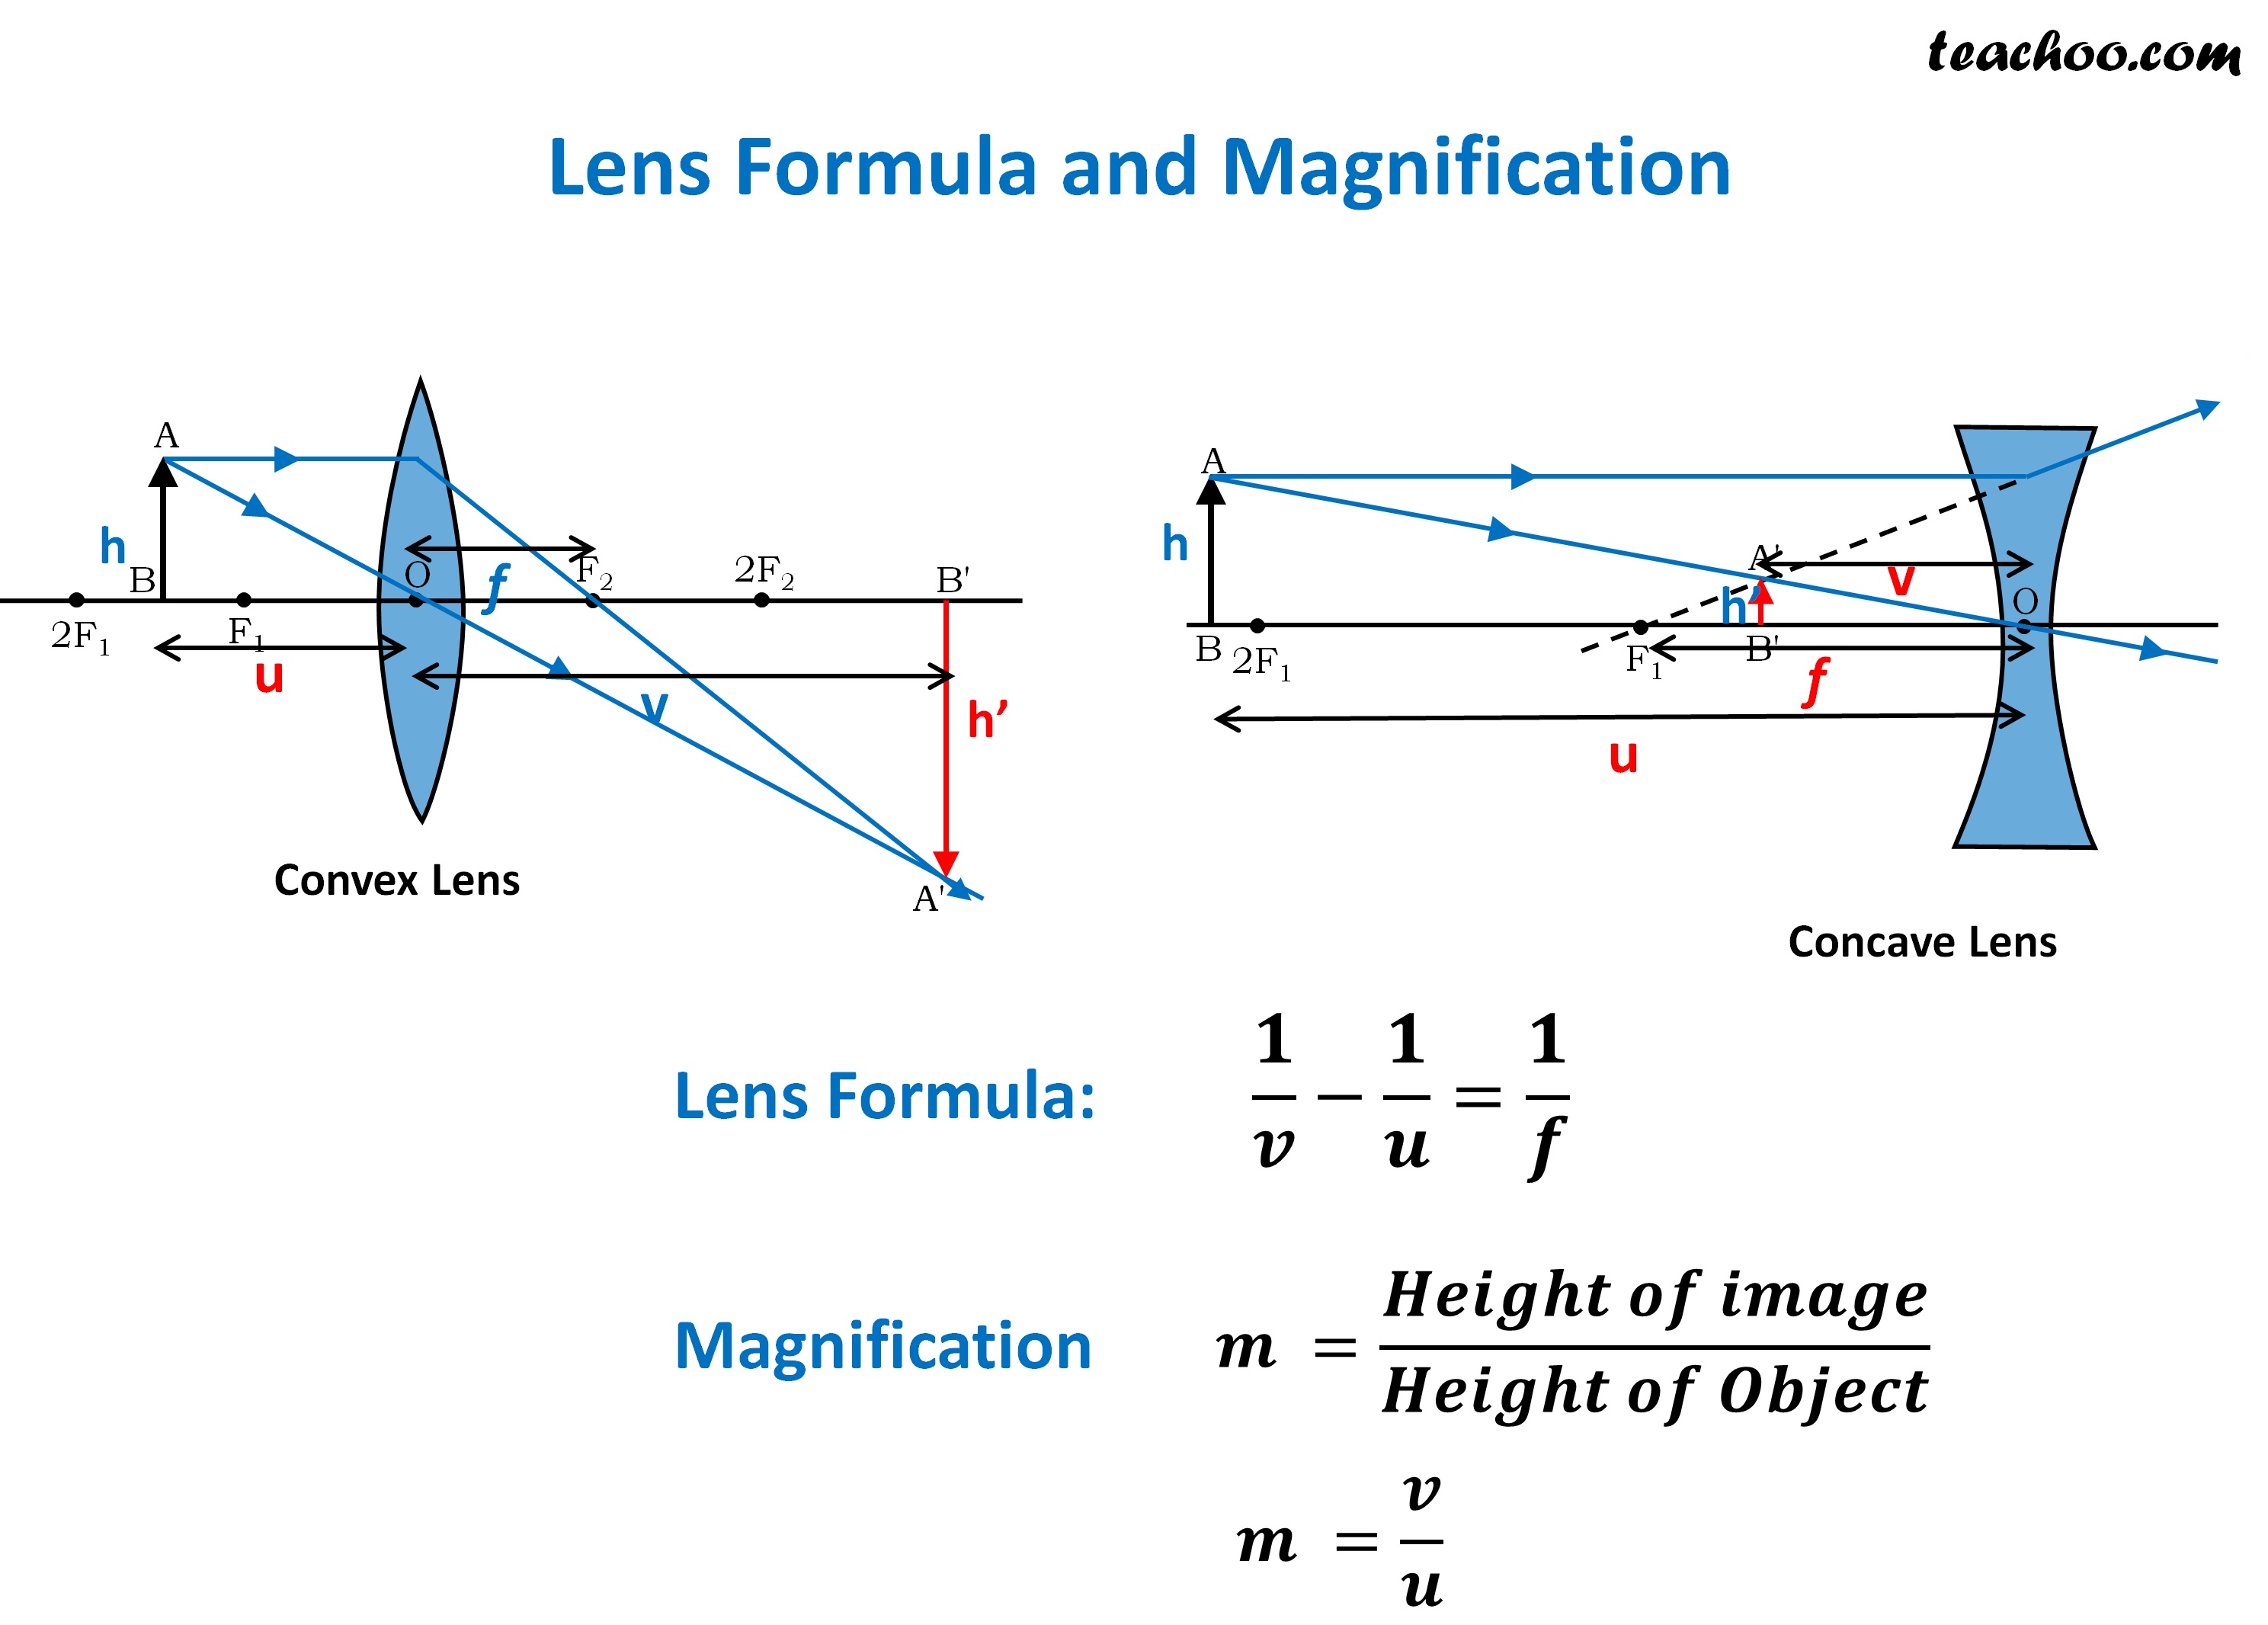
The formula is:
- = object distance from the optical center
- = image distance from the optical center
- = focal length of the lens
This elegant equation, when combined with the sign convention, allows you to calculate the position of the image for any scenario. For a deeper look at where this formula comes from, you can review its derivation in the NCERT textbook.
Chapter Nine - RAY OPTICS AND OPTICAL INSTRUMENTS
This section of the NCERT textbook not only presents the thin lens formula but also shows how it is derived. You are not required to reproduce the derivation for NEET, but seeing it can help solidify your understanding.
Focus on the final result, Equation 9.23, which is the thin lens formula. Skim through the derivation to appreciate how the formula arises from geometric principles.
A quick note on different formula versions: Some resources, particularly from American curricula (like Khan Academy), use the formula . This version uses a different sign convention. For all our work and for NEET, we will exclusively use the NCERT standard: . Sticking to one convention is key to avoiding confusion.
3. Magnification ()
The thin lens formula tells us where the image is, but not its size or orientation. For that, we need the linear magnification equation.
Magnification () is the ratio of the image height () to the object height (). It is also related to the image and object distances:
The value of tells us everything about the image's size and orientation:
- Sign of :
- If is negative, the image is real and inverted. (Since would be negative).
- If is positive, the image is virtual and erect. (Since would be positive).
- Magnitude of :
- If , the image is magnified (larger than the object).
- If , the image is diminished (smaller than the object).
- If , the image is the same size as the object.
This directly connects the math to the visual descriptions from our last lesson!
Test your understanding!
A calculation yields a magnification . Describe the image.
Show answer
- The sign is positive, so the image is virtual and erect.
- The magnitude is 0.5 (less than 1), so the image is diminished (half the size of the object).
4. Application and Problem Solving
Let's put this all together. Your goal for NEET is to solve problems quickly and accurately. We'll walk through an example.
Example Problem 1: Convex Lens
An object is placed 20 cm from a convex lens of focal length 10 cm. Find the position, nature, and magnification of the image.
This is the exact scenario demonstrated in the Physics Wallah video. Let's re-examine his solution with our rules in mind.
How To Use LENS MAKER FORMULA : Sign Convention and LENS NUMERICALS: Class X :ICSE /CBSE PHYSICS
Let's watch the solved example from the Physics Wallah video again. This time, actively follow each step of the calculation, confirming the application of the sign convention.
Watch the problem solved from 06:08 to 10:39. Track how he assigns signs to f and u, solves for v, and interprets the positive result.
Step-by-step Solution:
- List the knowns with signs:
- It's a convex lens, so cm.
- The real object is in front, so cm.
- Apply the lens formula to find :
- Interpret the result for :
The sign of is positive, which means the image is formed on the other side of the lens (in the direction of light). This corresponds to a real image. - Calculate the magnification :
- Interpret the result for :
- The sign is negative, confirming the image is real and inverted.
- The magnitude is 1, meaning the image is the same size as the object.
This matches exactly what we expect from our ray diagrams when the object is at 2F!
NEET Shortcuts: Magnification Formulas
For faster problem-solving, it's useful to express magnification directly in terms of and , or and . These are derived from combining the lens and magnification formulas.
Thin Lens Formula: Definition, Derivation and Solved ...
This resource from Allen, a coaching institute for competitive exams, provides these extremely useful shortcut formulas. Memorizing them can save valuable time during the NEET exam.
In Section 4.0, 'Linear Magnification', find and note down the formulas for 'Linear Magnification in terms of u and f' and 'Linear Magnification in terms of v and f'.
Here are the formulas for your notes:
- Magnification in terms of and :
- Magnification in terms of and :
Example Problem 2: Concave Lens
Let's now tackle a problem with a concave lens, like the one in the Khan Academy video, but using our standard formula.
An object is placed 24 cm in front of a concave lens of focal length 8 cm. Find the image distance and magnification.
- List the knowns with signs:
- Concave lens: cm.
- Real object: cm.
- Apply the lens formula:
- Interpret :
The sign is negative, so the image is formed on the same side as the object. This corresponds to a virtual image. - Calculate (using the shortcut formula this time):
- Interpret :
- The sign is positive: the image is virtual and erect.
- The magnitude is 0.25 (less than 1): the image is diminished (one-fourth the size).
Again, this is exactly what we predicted with ray diagrams for a concave lens.
5. Practice for NEET
Now it's your turn. Use the formulas and sign conventions to solve this problem.
An object 2 cm high is placed at a distance of 15 cm from a convex lens of focal length 10 cm. Find the position, nature, and size of the final image.
Show solution
-
Knowns: cm, cm, cm.
-
Find :
The positive sign indicates a real image formed 30 cm from the lens on the opposite side. -
Find and :
The negative sign indicates the image is inverted. Since , it is magnified.
The image is 4 cm high and the negative sign confirms it's inverted.
Final Answer: The image is real, inverted, and magnified. It is formed 30 cm from the lens and has a height of 4 cm.
Conclusion
Fantastic work today. You have bridged the gap from qualitative ray diagrams to quantitative calculations, a skill that is absolutely essential for the NEET exam.
Key Takeaways:
- The Cartesian sign convention is the non-negotiable first step in every problem.
- The Thin Lens Formula calculates the image position.
- The Magnification Equation tells you the nature (real/inverted vs. virtual/erect) and relative size of the image.
- The sign of your final answers ( and ) tells the complete story of the image, which should always match the intuition you built from ray diagrams.
Preview of the Next Lesson:
We've now mastered how to use the focal length, , to find image properties. But what determines the focal length itself? In our next lesson, we will explore the Lens Maker's Formula. This formula connects a lens's focal length to its physical properties: the curvature of its surfaces and the refractive index of its material. This will complete your foundational understanding of how lenses are designed and how they function.