Hello! Welcome to the first lesson in our new module, Ray Optics. We've successfully navigated the world of sound and mechanical waves, and now we're shifting our focus to light. For the NEET exam, Ray Optics is a high-yield topic, and building a strong foundation is crucial.
You mentioned that you prefer to master visual concepts like ray diagrams before diving into mathematical formulas. This lesson is designed exactly for that. We'll start at the very beginning, focusing on the fundamental rules that govern how light rays travel after hitting a mirror. Our learning outcome today is to apply the laws of reflection to trace light rays. By the end of this lesson, you will be equipped with the essential rules for drawing accurate ray paths for any type of mirror, a skill that is the bedrock of this entire chapter.
1. The Fundamental Law of Reflection
All of geometric optics is built upon a few simple principles. The most basic of these is the law of reflection, which describes how light bounces off a surface.
The law states:
- The incident ray, the reflected ray, and the normal to the surface at the point of incidence all lie in the same plane.
- The angle of incidence is equal to the angle of reflection.
Let's define these terms visually:
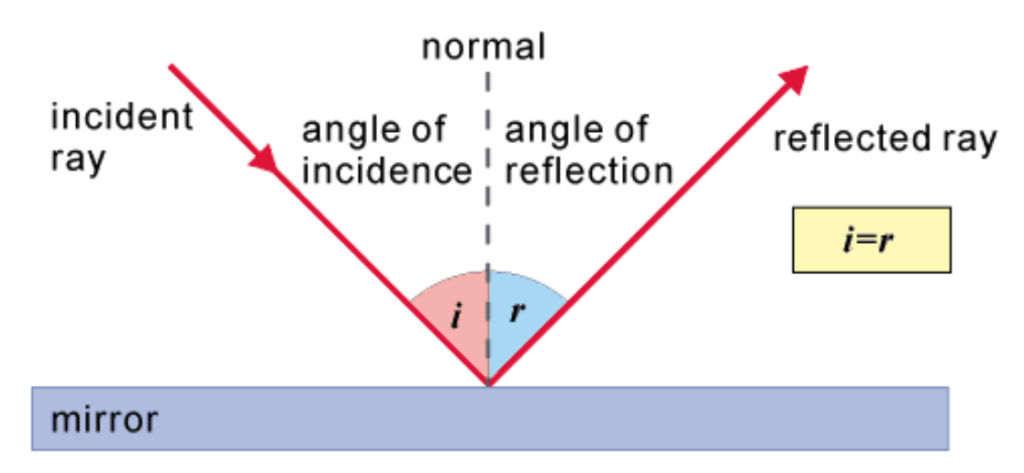
It is critical to remember that these angles are always measured relative to the normal, not the mirror surface.
To see this principle in action and how it's used to solve simple geometry problems, let's watch a short video.
Law of Reflection - Geometric Optics - Physics
This video from The Organic Chemistry Tutor provides a clear explanation of the law of reflection and demonstrates its application in a problem involving two mirrors.
Please watch the first 3 minutes and 25 seconds of the video. The first minute covers the basic law, and the following section applies it to a problem. Pay close attention to how the angles are calculated using the normal and basic triangle geometry.
As the video showed, even in a more complex setup with two mirrors, the solution comes from applying the same simple rule () at each reflection point and using your knowledge of geometry.
2. Ray Tracing for Spherical Mirrors
While the law of reflection is simple, applying it to every single point on a curved mirror would be tedious. Fortunately, for spherical mirrors (mirrors that are a section of a sphere), we can identify a few "principal rays" whose paths are very easy to predict. By tracing just two of these rays from an object, we can determine exactly where its image will be formed.
Before we learn the rules, let's define the key parts of a spherical mirror system:
- Pole (P): The geometric center of the mirror's surface.
- Center of Curvature (C): The center of the sphere from which the mirror was cut. Any line from C to the mirror is a radius and is normal to the mirror surface at that point.
- Principal Axis: The straight line passing through the Pole (P) and the Center of Curvature (C).
- Principal Focus (F): The point on the principal axis where rays initially parallel to the axis converge (concave mirror) or appear to diverge from (convex mirror) after reflection. It is located halfway between P and C, so the focal length is half the radius of curvature ().
To get a solid grasp of these rules, we'll use a combination of video and a concise summary document. The video will help you visualize the ray paths, and the document will serve as a quick reference.
Rules for Concave Mirrors (Converging Mirrors)
Let's start with concave mirrors.
This segment of the video from Manocha Academy will visually introduce the four principal rays used for tracing images in concave mirrors.
Watch the section from 02:04 to 05:04. Focus on learning the four distinct rules for how rays behave after reflecting from a concave mirror. Try to sketch them in your notebook as you watch.
Now, let's consolidate those rules with a clear, written summary.
Rules for obtaining images formed by spherical mirrors
This document from Aakash provides a clear, rule-by-rule summary with diagrams for both concave and convex mirrors. It's a perfect resource to review and reinforce what you just watched.
Read through the four rules presented for concave mirrors. Compare the diagrams with what you saw in the video to solidify your understanding.
Here is a summary of the four essential rules for tracing rays in a concave mirror:
- A ray parallel to the principal axis is reflected to pass through the focus (F).
- A ray passing through the focus (F) is reflected parallel to the principal axis. (This is the reverse of Rule 1).
- A ray passing through the center of curvature (C) reflects back along the same path. This is because it strikes the mirror along a radius, which is normal to the surface, making the angle of incidence 0°.
- A ray striking the pole (P) is reflected symmetrically, with the principal axis acting as the normal.
Test your understanding!
Why does a ray passing through the center of curvature of a spherical mirror retrace its path?
Show answer
A line from the center of curvature to any point on the spherical mirror is a radius of the sphere. A radius is always perpendicular (normal) to the surface at that point. When the incident ray travels along this line, it strikes the mirror at an angle of incidence of 0° with the normal. According to the law of reflection, the angle of reflection must also be 0°, so the ray is reflected directly back along the incident path.
Rules for Convex Mirrors (Diverging Mirrors)
The rules for convex mirrors are very similar, but because the focus and center of curvature are behind the mirror, the rays only appear to come from or go to these points.
Let's watch the next segment of the video.
Now, let's look at the rules for convex mirrors. Notice the strong parallel between these rules and the ones for concave mirrors.
Watch the section from 12:22 to 16:10. Pay close attention to how the reflected rays diverge and are traced back with dashed lines to the focal point or center of curvature.
To reinforce this, please refer back to the Rules for obtaining images formed by spherical mirrors document (LINK) and review the diagrams for the convex mirror rules. They are presented alongside the concave mirror rules.
Here is a summary of the four rules for a convex mirror:
- A ray parallel to the principal axis is reflected so that it appears to have come from the focus (F).
- A ray directed towards the focus (F) is reflected parallel to the principal axis.
- A ray directed towards the center of curvature (C) reflects back along the same path.
- A ray striking the pole (P) is reflected symmetrically.
Mastering these eight rules (four for each mirror type) is the key to all ray diagrams.
3. A Glimpse into Image Formation
So, what is the point of tracing these rays? By taking any two of these principal rays from a single point on an object (e.g., the tip of an arrow), their intersection point after reflection will show you the location of that point on the image.
The video Spherical Mirrors goes on to show how this is done for various object positions (starting at 05:04 for concave and 16:10 for convex). You don't need to study these in detail right now, as that is the focus of our next lesson. However, watching one example will show you how the rules you've just learned are put into practice. The first case in the video (object beyond C for a concave mirror, from 06:17 to 07:30) is a perfect example of using Rule 1 and Rule 2 to locate an image.
Conclusion
In this lesson, we laid the essential groundwork for our study of mirrors. You've learned the fundamental law of reflection and, more importantly, the four principal ray-tracing rules for both concave and convex mirrors. These rules are simply convenient applications of the law of reflection that make drawing diagrams manageable.
Key Takeaways:
- The law of reflection states that the angle of incidence equals the angle of reflection (), with angles measured from the normal.
- For spherical mirrors, we use four principal rays to simplify ray tracing.
- Rule 1 (Parallel Ray): A ray parallel to the principal axis reflects through (or appears from) the focus.
- Rule 2 (Focal Ray): A ray through (or towards) the focus reflects parallel to the principal axis.
- Rule 3 (Central Ray): A ray through (or towards) the center of curvature reflects back on itself.
- Rule 4 (Polar Ray): A ray hitting the pole reflects symmetrically.
Preview of the Next Lesson:
Now that you have the tools, our next lesson, "Construct ray diagrams to locate images formed by plane and spherical mirrors," will be all about using them. We will systematically place an object at different positions in front of concave and convex mirrors and use the rules you learned today to draw complete ray diagrams and determine the properties of the resulting image (its location, size, orientation, and whether it is real or virtual).