Hello! Welcome to the final lesson in our module on building standard and batch macros.
In our previous lessons, we've done the creative work of designing and building both standard and batch macros to automate repetitive tasks. You've learned how to make workflows dynamic using Interface tools and how to process multiple files or sheets in a single run. Now, we need to cover the essential skills for managing these powerful tools.
Today, we'll focus on how to save, import, and debug macros within the Alteryx environment. Mastering these "housekeeping" tasks is what makes macros truly reusable, shareable, and robust. It's the difference between a one-off trick and a reliable, scalable solution.
1. Saving and Organizing Your Macros
Once you've built a macro, you need to save it correctly so it can be used in other workflows.
A macro is saved as a special Alteryx file with a .yxmc extension. You do this the same way you save any workflow: File > Save As.
Let's watch a quick demonstration of saving a standard macro.
The video 'Alteryx Standard Macros' by The Information Lab shows the saving process clearly.
Watch from 09:51 to 10:30. Notice that when the presenter saves the macro, Alteryx automatically assigns the .yxmc file type.
While you can save your .yxmc files anywhere, the best practice is to create a dedicated macro repository. A repository is simply a folder on your computer that you tell Alteryx to check for macros. Any macro saved in this folder will then appear directly in your Alteryx tool palette, just like a native tool.
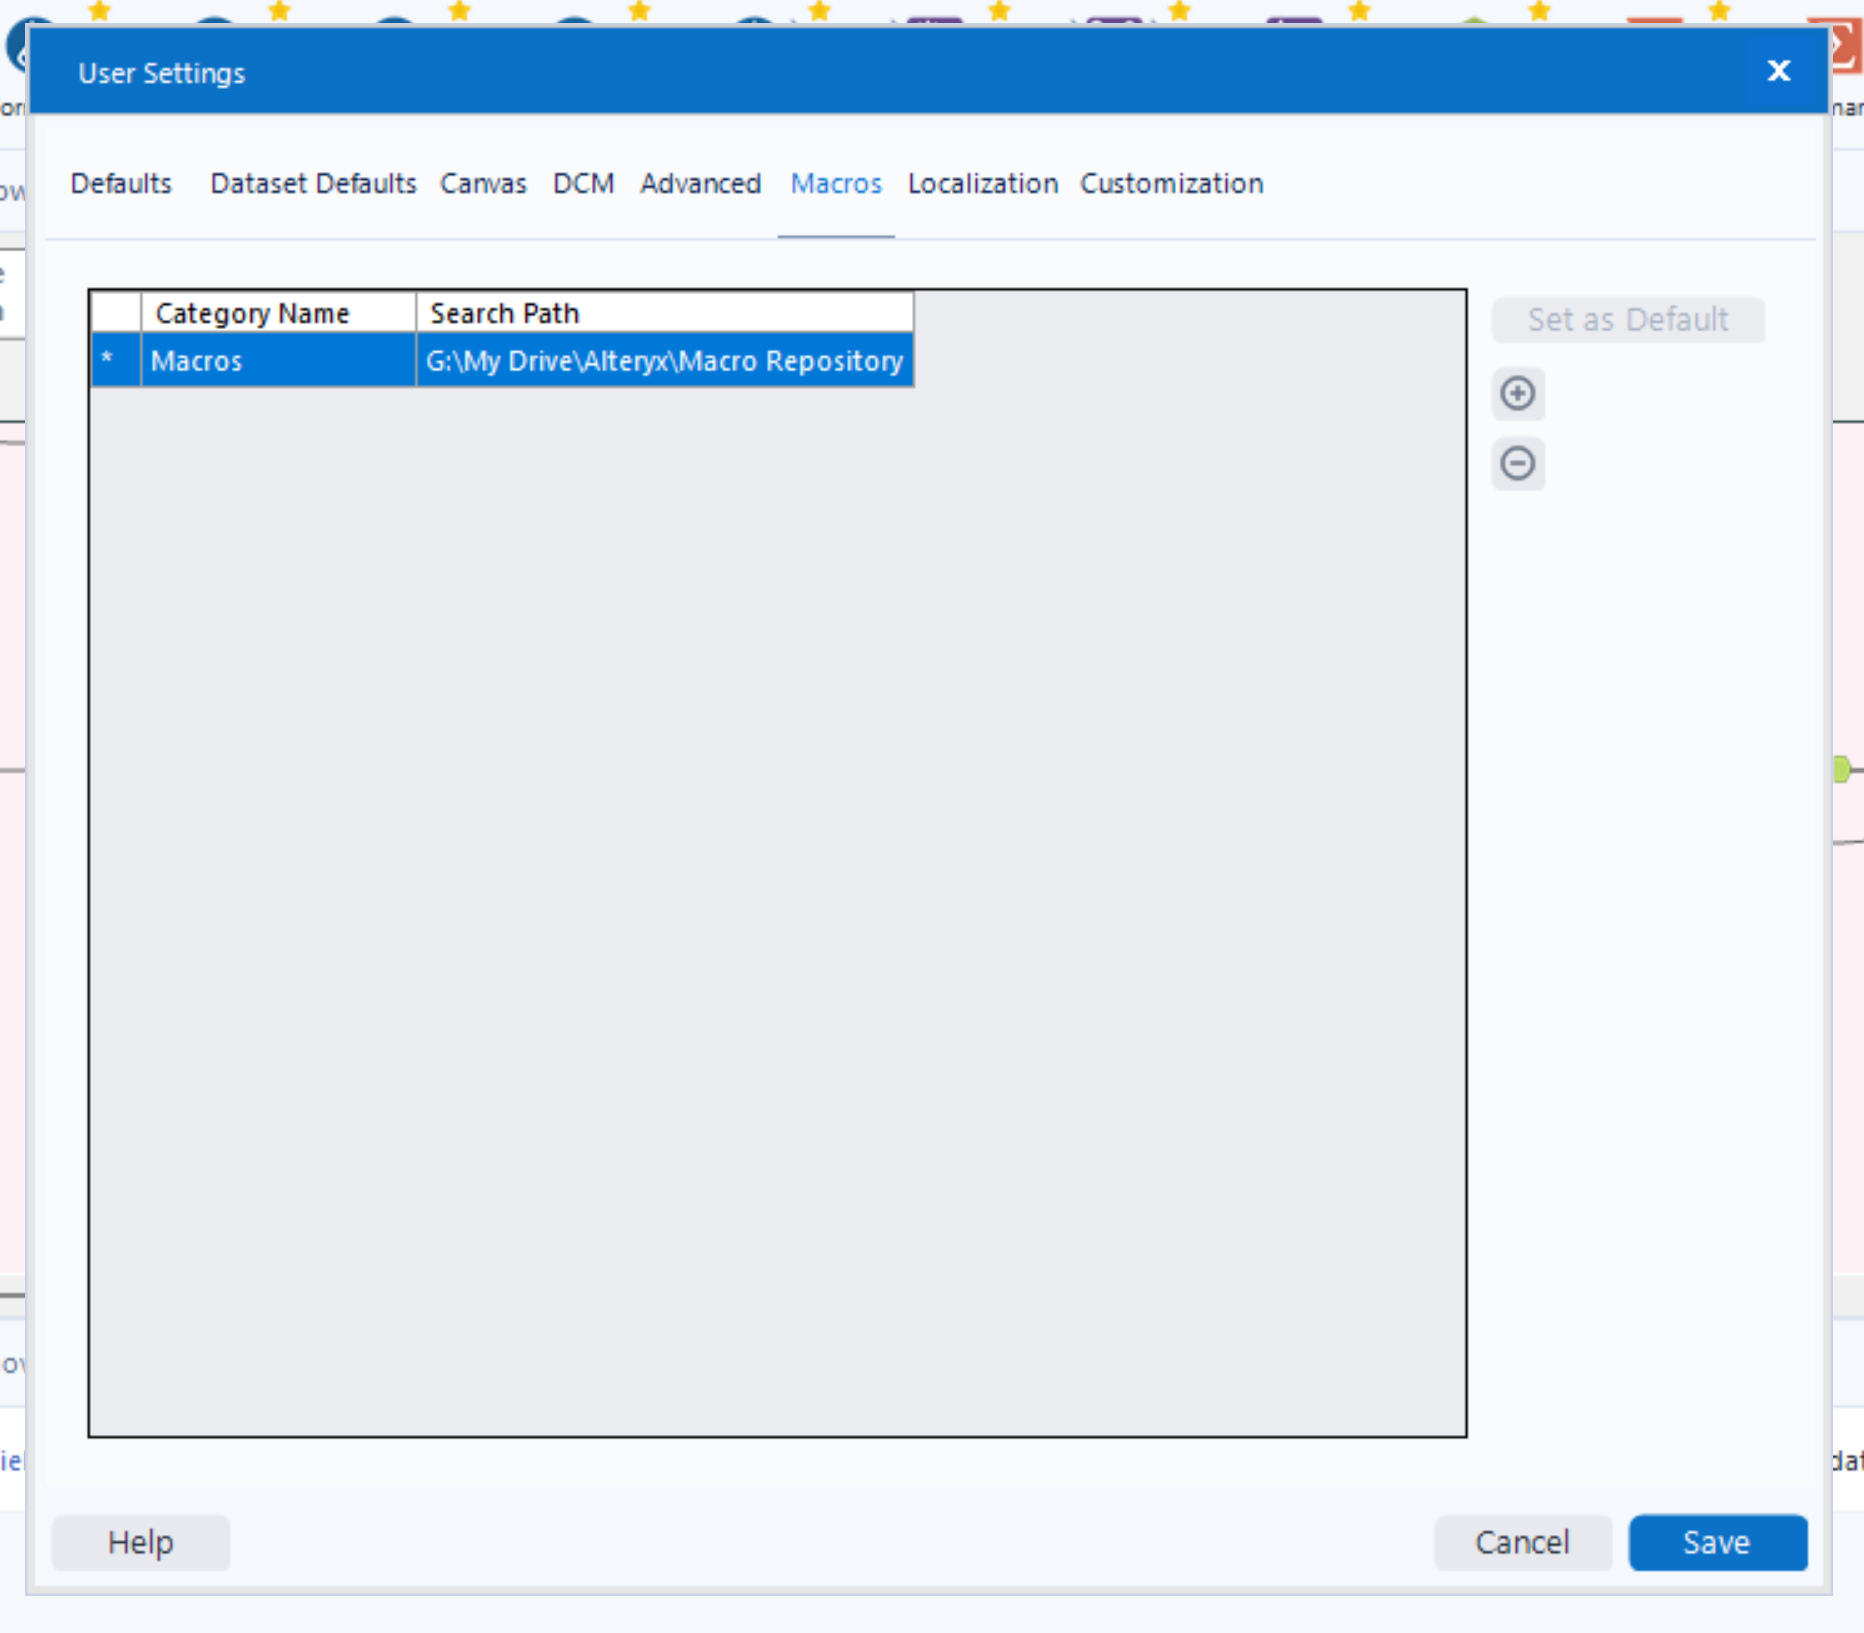
To learn how to set this up and other important details about saving, please read the official Alteryx documentation.
The 'Macros - Alteryx Help' article covers the essential procedures for saving and organizing macros. We'll focus on the sections for saving and creating a repository.
Please read the following two sections from the article: Save Macro: This section provides the simple steps for saving. Create Macro Repository: This explains how to add your macro folder to the Alteryx User Settings so your macros appear on the tool palette. Pay attention to the steps involved in navigating to Options > User Settings > Edit User Settings > Tools.
2. Importing and Using Macros in Workflows
Now that your macro is saved, how do you use it?
There are two primary methods:
- Insert from File: Right-click on the workflow canvas, select Insert > Macro, and browse to your
.yxmcfile. This works for any macro file, whether it's in your repository or not. - Drag from Tool Palette: If you've set up a macro repository, a new tool category will appear on your palette. You can simply find your macro there and drag it onto the canvas.
Let's see the first method in action.
Continuing with the 'Alteryx Standard Macros' video, let's see how a saved macro is brought into a different workflow.
Watch from 10:30 to 11:03. The presenter uses the right-click method to insert the macro they just saved.
What happens if Alteryx can't find your macro?
This is a common issue, especially when you share a workflow with a colleague or move files around. If you open a workflow that uses a macro but Alteryx can't find the .yxmc file at its original path, you'll be prompted to locate it.
The following reading explains this "Update Missing Macros" feature, which is a crucial part of managing workflows with macro dependencies.
The Alteryx Help documentation provides a detailed guide on how to handle missing macros.
Read the section titled Update Missing Macro. Focus on understanding the options in the pop-up window: 'Update' lets you browse for the missing file, while 'Close' will open the workflow with a broken tool icon.
3. Debugging Your Macros
Macros don't always work perfectly on the first try. Debugging is the process of finding and fixing issues. These issues generally fall into two categories:
- Configuration Errors: The macro fails to run because of a setup issue, like mismatched field names.
- Logical Errors: The macro runs successfully but produces an incorrect or unexpected result.
Debugging a Configuration Error
A common error occurs when the data you feed into your macro doesn't have the field names the macro was built to expect. The Macro Input tool has a handy option to help solve this.
Let's return one last time to the 'Alteryx Standard Macros' video for a practical example of a configuration error.
Watch from 11:03 to 12:42. The macro fails because the input data has a field named 'Quantity' instead of 'Units'. See how the presenter fixes this by enabling 'Show Field Map' in the Macro Input tool, saving the change, and then mapping the fields in the main workflow.
Debugging a Logical Error
Sometimes, your macro runs without error, but the output isn't what you wanted. This requires you to rethink the logic inside the macro. In our previous lessons on batch macros, you saw how the Group By configuration is critical for getting the correct output.
In the 'Alteryx Batch Macros' video from The Information Lab, a logical error occurs where the macro produces too many records.
Watch from 07:13 to 09:08. Notice that the macro runs successfully, but the output is wrong. The debugging process involves analyzing the output, understanding the cause (the macro was processing every country for every box size), and fixing it by using the Group By option on the macro's configuration.
Using the Debug Workflow
For more complex problems, Alteryx provides a powerful feature: the Debug Workflow. This opens a temporary workflow that represents a single iteration of your macro. It allows you to see exactly what data is flowing through the tools inside the macro for a specific set of inputs.

Here's how you use it:
- Right-click your macro tool on the canvas and select Open Macro.
- In the macro workflow, open the Interface Designer (View > Interface Designer or Ctrl+Alt+D).
- Click the Test tab (the wrench icon).
- Enter the values you want to test with in the "App Values" section.
- Click Open Debug.
A new workflow tab will open, containing all the tools from your macro. The inputs will be populated with the test values you entered. You can now run this workflow and inspect the data at every step to pinpoint where things are going wrong.
The Alteryx Community guide provides an excellent overview of this feature.
Apps and Macros Guide - Alteryx Community
The 'Apps and Macros Guide' on the Alteryx Community site has a great section on troubleshooting.
Please read the Troubleshooting section. It introduces the debug workflow feature and links to other helpful resources. This is your primary tool for investigating complex macro behavior.
Conclusion
This lesson concludes our module on Standard and Batch macros. You are now equipped not only to build them but also to manage them effectively throughout their lifecycle.
Key Takeaways:
- Macros are saved as
.yxmcfiles. For easy access, organize them in a macro repository folder linked in your User Settings. - You can import macros by right-clicking the canvas or by dragging them from the tool palette.
- When a macro is missing, Alteryx provides an "Update Missing Macros" utility to help you relink the file.
- Debugging involves checking for both configuration errors (like field mismatches) and logical errors (like incorrect Group By settings).
- The Debug Workflow is your most powerful tool for investigating complex issues by letting you inspect a single iteration of your macro.
In our next module, we will explore another powerful macro type: the iterative macro. Unlike a batch macro that runs for a fixed set of records, an iterative macro runs in a loop until a specific condition is met, allowing you to solve for goals or handle complex pagination.