Hello! Welcome to your fourth lesson in the Alteryx Advanced Certification course.
In our last session, we built the theoretical foundation for this module by defining core REST API concepts like endpoints, methods, and authentication. We discussed the "language" of the web; today, we'll start speaking it using Alteryx.
This lesson directly addresses the learning outcome: Make authenticated GET requests to an API using the Download tool. We will move from theory to practice, using Alteryx to connect to a live web service, prove our identity with an authentication key, and retrieve data.
This is a critical, hands-on skill for the Advanced Certification, and mastering it will unlock a vast new source of data for your workflows.
1. Introduction to the Download Tool
The primary tool in Alteryx for interacting with the web is the Download Tool. While its name suggests it only downloads, it's more of a universal web client capable of both sending and receiving data using various HTTP methods.
Let's begin by reviewing the tool's core configuration options.
a practitioner's guide to - alteryx - USEReady
This document provides a detailed reference for the Download tool. We'll focus on the sections that explain its main configuration tabs.
Please read section 12.2, 'Download' (starting on page 623). Focus your attention on the descriptions of the 'Basic', 'Headers', and 'Payload' tabs. This will give you a solid overview before we apply these settings.
As you read, you'll see a direct mapping to the concepts from our last lesson:
- Basic Tab: This is where you specify the URL for the API endpoint you want to contact.
- Payload Tab: Here, you choose the HTTP Action (or method), such as GET, POST, PUT, etc. For this lesson, we will only use GET.
- Headers Tab: This allows you to add information to the request headers, which is a common way to provide authentication keys.
- Connection Tab: This is used for another authentication method involving a username and password.
When the Download tool runs successfully, it typically adds two fields to your data stream: DownloadData, which contains the content returned by the server (e.g., the JSON or HTML), and DownloadHeaders, which contains the server's response headers (useful for checking status codes like 200 OK).
2. Method 1: Authentication via URL Parameter
One of the simplest ways to authenticate is by including your API key directly in the URL as a query parameter. The endpoint will look something like this:https://api.example.com/data?api_key=YOUR_SECRET_KEY
Let's walk through a practical example of building an Alteryx workflow to handle this.
Alteryx - Download Tool - API Data Example
This video by Nathan Patrick Taylor provides a clear, step-by-step demonstration of making a GET request where the API key is part of the URL.
Watch from 01:12 to 06:09. The video shows you how to: Find the API URL and key from a data provider's website. Configure the Download tool with the URL from a Text Input tool. Run the workflow and use a Browse tool to verify that data was successfully returned.
To summarize the process shown in the video:
- Input the URL: A Text Input tool is used to store the full API endpoint URL, including the API key. This keeps your workflow organized.
- Configure the Download Tool:
- On the Basic tab, the tool is pointed to the field containing the URL.
- On the Payload tab, the HTTP Action is left as the default, GET.
- The output is set to a string field, which will create the
DownloadDatacolumn.
- Verify the Output: A Browse tool is attached to the output of the Download tool. After running the workflow, you can click the Browse tool and inspect the
DownloadDatafield to see the raw data retrieved from the API. You can also inspectDownloadHeadersto see the HTTP status code (e.g.,HTTP/1.1 200 OK) confirming success.

3. Method 2: Authentication via Request Header
A more common and secure practice is to send the API key in the request headers instead of the URL. This prevents the key from being stored in server logs or browser histories. The Authorization header is frequently used for this purpose, often with a "Bearer token" format: Authorization: Bearer YOUR_SECRET_KEY.
Let's see how to configure this in Alteryx.
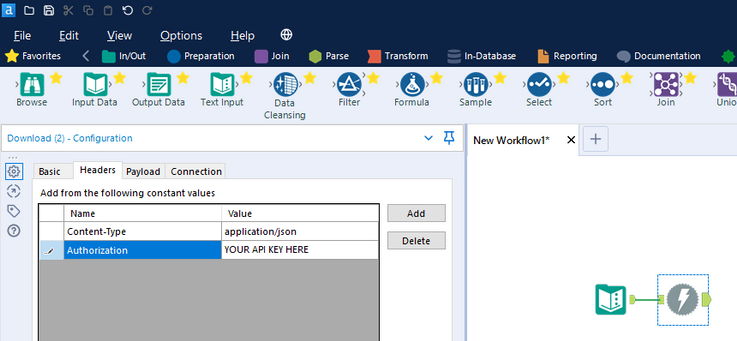
This approach is just as easy to set up. While the URL no longer contains the key, you simply add the key to the Headers tab.
This video from The Information Lab demonstrates how to modify request headers. While the example is about changing the Accept header to get a different data format, the process for adding an Authorization header is identical.
Watch from 02:54 to 04:07. Focus on the mechanics of adding a header with a specific name and value in the Download tool's configuration pane. Imagine you are adding an 'Authorization' header instead of an 'Accept' header.
The workflow for header authentication is almost identical to the previous method:
- Input the URL: Use a Text Input tool for the base URL (this time, without the API key).
- Configure the Download Tool:
- Basic Tab: Connect to the URL field.
- Payload Tab: Ensure the action is GET.
- Headers Tab: Click 'Add' and enter the required header name (e.g.,
Authorization) and value (e.g.,Bearer YOUR_API_KEY).
- Verify the Output: Use a Browse tool to check the
DownloadDataandDownloadHeadersfields for a successful response.
4. A Note on Basic Authentication
Finally, some APIs use "Basic Authentication," which relies on a simple username and password. The Download tool has a dedicated tab for this.
If you refer back to the practitioner's guide to - alteryx PDF (resource LINK), you'll see the Connection tab (page 629-630). This tab has fields for Username and Password. When you need to connect to an API using this method, you simply enter your credentials here. Alteryx handles the work of encoding them and adding the appropriate Authorization header behind the scenes.
Conclusion
You have now successfully bridged the gap between API theory and practical application in Alteryx. You are equipped to retrieve data from a huge variety of web services, a cornerstone of advanced analytics.
Key Takeaways:
- The Download tool is your primary interface for making web requests in Alteryx.
- A GET request is configured on the Payload tab and requires a URL specified on the Basic tab.
- Authentication is most commonly handled in one of three ways:
- As a parameter in the URL itself.
- As a key-value pair (e.g.,
Authorization: Bearer ...) on the Headers tab. - As a username and password on the Connection tab for Basic Authentication.
- Always use a Browse tool to inspect the
DownloadDataandDownloadHeadersfields to confirm your request was successful.
In our next lesson, we'll tackle the next logical step. Now that we've downloaded data from an API, we'll find it's often in a nested JSON format. We will learn to use the JSON Parse tool to transform this raw data into a clean, tabular structure ready for analysis.