Hello and welcome to your first lesson! I'm excited to guide you on your journey to becoming a backend developer.
This course is designed to take you from the very beginning of programming to building and deploying your own web API. We'll start with the fundamentals and build up your skills step by step.
In this first lesson, we will focus on a crucial first step: installing Python on your computer. Python is the programming language we will use throughout this course. It's known for being powerful, versatile, and relatively easy to learn, making it an excellent choice for new developers and a popular language in the backend development world.
By the end of this lesson, you will have the latest version of Python installed and will know how to verify that it's ready for you to use.
Let's get started!
Choosing Your Operating System
First, please identify which operating system you are using (Windows or macOS) and follow the specific instructions for it in the sections below. If you are using Linux, you'll find a brief note at the end of the installation section.
Step 1: Checking if Python is Already Installed
Before installing, it's good practice to check if you already have a version of Python. Don't worry if this seems a bit technical; it's a simple check.
You'll need to open your system's command-line tool:
- On Windows: Press the
Winkey, typecmdorPowerShell, and pressEnter. - On macOS: Press
Cmd + Space, typeTerminal, and pressEnter.
Once the command line is open, type the following command and press Enter:
python --version
You might also need to try this command:
python3 --version
If you see a version number (e.g., Python 3.12.4), then you have Python installed. If it's an older version (e.g., Python 2.x, or a version older than 3.10), I still recommend installing the latest version to follow along with this course. If you get an error message like "command not found," it means Python is not installed or not configured correctly, and you can proceed with the installation steps.
Step 2: Installing Python
We will use the official installer from the Python website, which is the most common and recommended method for developers.
For Windows Users
For a detailed video walkthrough of the installation on Windows, please watch the following video. It is recent and provides clear, step-by-step instructions.
How to install Python 3.13.0 on Windows 11
This video from Amit Thinks will guide you through downloading the latest version of Python and installing it on Windows. Pay close attention to the installation options.
Watch the video from the beginning to 02:44. Focus on where to download the installer, the custom installation options, and how to verify the installation at the end.
As you follow the video or the steps below, please pay special attention to one crucial step.
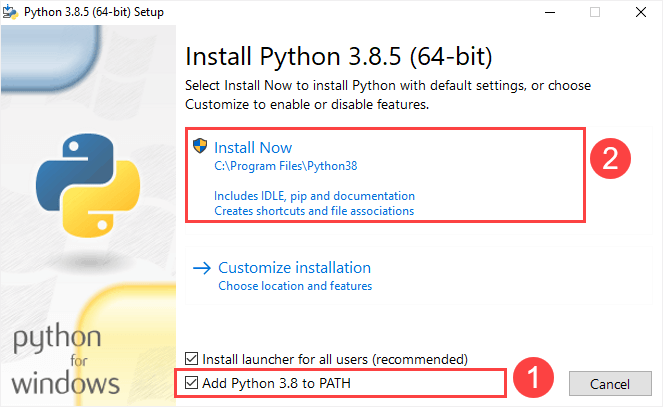
Critical Step: Add Python to PATH
During installation, you will see a window like the one below. It is very important that you check the box that says "Add python.exe to PATH". This allows you to run Python from your command line in any directory, which will be essential for our work.
For a detailed text guide that you can refer to, the following article from DigitalOcean is an excellent resource. It covers the same steps and explains the "why" behind them.
How to Install Python on Windows
This guide, 'How to Install Python on Windows', provides a comprehensive overview of the installation process.
Read 'Method 1: Using the Official Python Installer (Recommended)', focusing on Step 1 through Step 3. This reinforces the steps shown in the video.
For macOS Users
On macOS, the process is also straightforward. Some older versions of macOS came with Python 2 pre-installed, but we will be installing the latest version of Python 3.
This video provides a clear walkthrough for the installation on a Mac.
Python Tutorial for Beginners 1: Install and Setup for Mac and Windows
This video from Corey Schafer covers the Python installation process for both Mac and Windows. You only need to watch the Mac-specific section.
Please watch the section for Mac installation from 01:22 to 03:40. The video will guide you from the download page through the installation and verification.
For a written guide that you can follow along with, the article below from Real Python provides detailed, step-by-step instructions.
How to Install Python on Your System: A Guide
This guide from Real Python covers all aspects of Python installation. We'll focus on the section for installing on macOS using the official installer.
Read the section titled 'macOS: How to Install Python Using the Official Installer'. This will guide you through downloading and running the installer package.
After the installation, the installer might open a folder containing some files. You can safely close this window.
For Linux Users
Most Linux distributions come with a version of Python pre-installed. You can install or update to the latest version using your distribution's package manager. For example:
- On Debian/Ubuntu:
sudo apt update && sudo apt install python3 - On Fedora:
sudo dnf install python3
The Real Python article mentioned above also provides detailed instructions for Linux if you need them.
Step 3: Verifying Your Installation
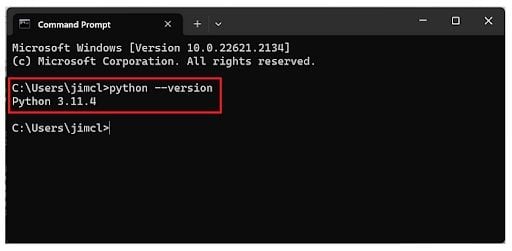
Once the installation is complete, it's time to confirm that everything is working correctly. This is the same process we performed in Step 1, but this time you should see the new version number you just installed.
-
Open a new command-line window (Command Prompt/PowerShell on Windows, or Terminal on macOS). It's important to open a new one so it recognizes the new installation.
-
Type one of the following commands and press
Enter:python --versionor, especially on macOS/Linux:
python3 --version
You should see the version you just installed, like Python 3.12.4.
A Note on python vs. python3
On some systems, particularly macOS and Linux, python might refer to an older, pre-installed version of Python (like Python 2), while python3 refers to the new version you just installed. For consistency, it's a good habit to use the python3 command if you find that python points to an old version. On Windows, python will almost always refer to the version you just installed.
Conclusion
Congratulations on completing your first lesson! You have successfully installed Python, the primary tool we'll be using to build backend applications. This is a fundamental and essential step for any programmer.
Key Takeaways:
- You learned how to install Python using the official installer for your operating system.
- You understood the critical importance of adding Python to the
PATHon Windows to make it accessible from the command line. - You can now verify your Python installation by opening a command-line tool and running
python --versionorpython3 --version.
Next Up:
In our next lesson, we will set up your development environment by installing Visual Studio Code, a popular and powerful code editor. We will then write and run your very first line of Python code