Hello! Welcome back to our series on advanced C concepts for your interview preparation.
In our last lesson, we dove into unions and the complexities of type-punning, focusing on how to reinterpret data at the byte level while avoiding the pitfalls of strict aliasing. This was part of our broader look at low-level data representation.
Today, we'll continue this theme by focusing on another fundamental skill for any embedded software engineer: bit manipulation. Your work with AUTOSAR, communication stacks like CAN, and low-level drivers means you're constantly interacting with hardware registers where individual bits control critical functionality. This lesson will sharpen your ability to precisely set, clear, toggle, and check those bits using bitmasks—a skill that is almost guaranteed to come up in technical interviews for roles like yours.
1. The Building Blocks: Bitwise Operators and Masks
To manipulate individual bits, we rely on C's bitwise operators. While these are likely familiar to you, a quick review is always a good starting point. The core operators are:
&(Bitwise AND)|(Bitwise OR)^(Bitwise XOR)~(Bitwise NOT)<<(Left Shift)>>(Right Shift)
These operators are the tools we use to build bitmasks. A mask is simply an integer value, carefully crafted with a specific bit pattern, that allows us to isolate and modify specific bits within another value (like a hardware register) when combined with a bitwise operator.
Let's begin with a quick refresher on these operators and the concept of masking.
Demystifying bitwise operations, a gentle C tutorial - andreinc
The article "Demystifying bitwise operations" by Andreinc provides a clear and concise review of the fundamental bitwise operators and introduces the concept of masking.
Please read the sections "Bitwise operations" and "Masking". This will serve as a quick warm-up on the six basic operators and how masks are used to select or discard information.
The key idea to internalize is that creating the right mask is the first step in any bit manipulation task. The most common way to create a mask for a single bit at a specific position is using the left shift operator: 1U << bit_position. We use 1U (for unsigned int) to avoid potential undefined behavior associated with shifting signed integers, a crucial detail for robust, portable code.
2. The Four Fundamental Operations
With the concepts of operators and masks in place, we can now define the four essential operations for single-bit manipulation. These patterns are fundamental and should be at your fingertips during an interview.
Demystifying bitwise operations, a gentle C tutorial - andreinc
Let's continue with the same article, which now details the exact patterns for each of the core operations.
Read the section titled "Getting, Setting, Clearing, Toggling the nth bit". Focus on understanding the C code and the visual explanation for each of the four operations.
Let's summarize and formalize these patterns. Assume we have a variable reg (representing a register) and we want to manipulate the bit at pos.
1. Checking a Bit (is_bit_set)
To check if a bit is set to 1, we use the bitwise AND operator. We mask the register with a 1 at the desired position. If the result is non-zero, the bit was set.
- Pattern:
(reg & (1U << pos)) != 0 - Example: To check bit 5:
(reg & (1U << 5)). The result will be32(which is non-zero) if bit 5 is set, and0otherwise.
2. Setting a Bit (to 1)
To force a bit to 1, we use the bitwise OR operator. ORing with a 1 will set the bit to 1 regardless of its original state, while ORing with 0 leaves all other bits unchanged.
- Pattern:
reg |= (1U << pos); - Example: To set bit 5:
reg |= (1U << 5);.
3. Clearing a Bit (to 0)
To force a bit to 0, we use the bitwise AND operator with an inverted mask. This is the most complex of the four patterns.
- Create the mask:
1U << pos(a1at the target bit,0s elsewhere). - Invert the mask:
~(1U << pos)(a0at the target bit,1s elsewhere). - Apply the mask:
reg &= ~(1U << pos);. ANDing with0clears the target bit, while ANDing with1leaves all other bits unchanged.

4. Toggling a Bit (Flipping)
To flip a bit from 0 to 1 or 1 to 0, we use the bitwise XOR operator. XORing with 1 flips a bit, while XORing with 0 leaves it unchanged.
- Pattern:
reg ^= (1U << pos); - Example: To toggle bit 5:
reg ^= (1U << 5);.
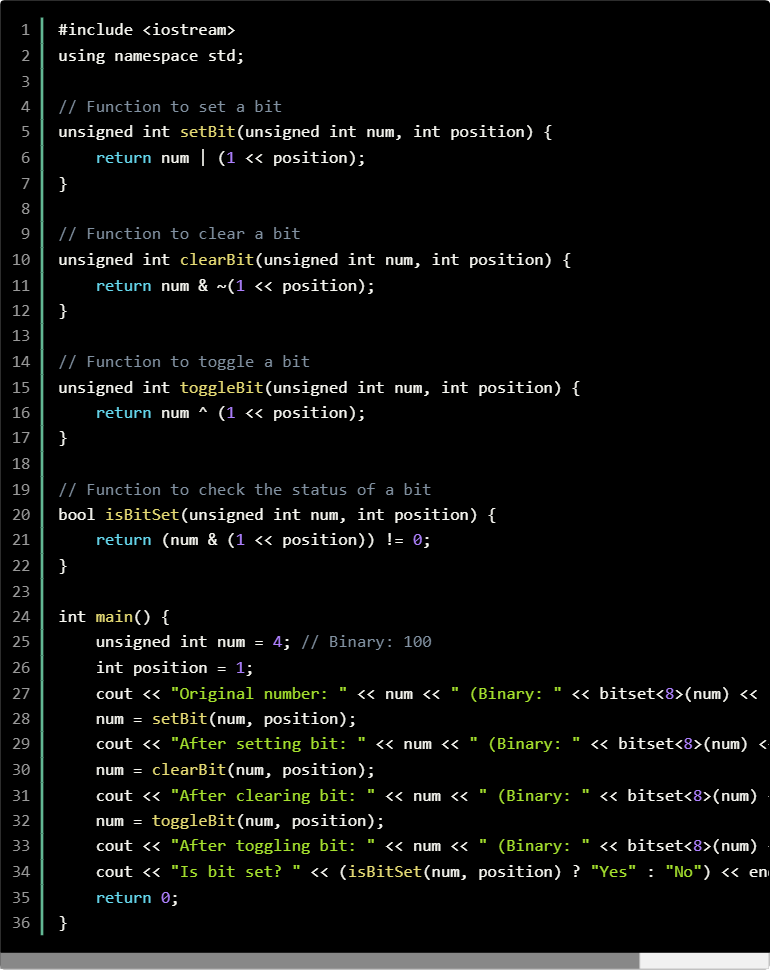
This image provides a clean summary of these four operations in code. Although it uses C++ syntax, the bitwise logic is identical to C.
3. A Practical Example: The CAN Status Register
Let's ground this in a scenario you are very familiar with: configuring an automotive peripheral. Imagine you are working with a CAN controller's status register.
#include <stdint.h>
#include <stdio.h>

// Hypothetical CAN Controller Status Register bits


#define TX_BUSY   0 // Bit 0: Transmission in progress
#define RX_FULL   1 // Bit 1: Receive buffer is full
#define BUS_OFF   4 // Bit 4: Bus-off error state
#define INT_EN    7 // Bit 7: Interrupt enable

// Function to check if a bit is set
int is_bit_set(uint8_t reg, int pos) {
    // Note: The expression itself evaluates to 0 or non-zero.
    // The `!= 0` makes the function's return value a clean 0 or 1.
    return (reg & (1U << pos)) != 0;
}

int main(void) {
    uint8_t can_status_reg = 0; // Start with a clean slate
    printf("Initial register state: 0x%02X\n\n", can_status_reg);

    // 1. Set the Interrupt Enable bit to activate interrupts
    printf("Setting INT_EN (bit 7)...\n");
    can_status_reg |= (1U << INT_EN);
    printf("Register state: 0x%02X\n\n", can_status_reg); // Expect 0x80

    // 2. Simulate receive buffer becoming full (hardware would do this)
    printf("Hardware sets RX_FULL (bit 1)...\n");
    can_status_reg |= (1U << RX_FULL);
    printf("Register state: 0x%02X\n\n", can_status_reg); // Expect 0x82

    // 3. Check if the bus is in an error state (it shouldn't be)
    printf("Checking BUS_OFF (bit 4)...\n");
    if (!is_bit_set(can_status_reg, BUS_OFF)) {
        printf("Bus is not in off-state. All good.\n\n");
    }

    // 4. We processed the received data, so we must clear the RX_FULL flag
    printf("Clearing RX_FULL (bit 1)...\n");
    can_status_reg &= ~(1U << RX_FULL);
    printf("Register state: 0x%02X\n\n", can_status_reg); // Expect 0x80

    // 5. Toggle the interrupt enable bit to disable it
    printf("Toggling INT_EN (bit 7) to disable it...\n");
    can_status_reg ^= (1U << INT_EN);
    printf("Final register state: 0x%02X\n", can_status_reg); // Expect 0x00

    return 0;
}
This example mirrors exactly what happens in driver code: defining bit positions with macros and using the four fundamental operations to interact with the hardware's state.
4. Interfacing with Real Hardware
In a real embedded system, you wouldn't just manipulate a local variable. You would access a hardware register located at a specific memory address. This is where your knowledge of pointers and the volatile keyword becomes critical.
Representing and Manipulating Hardware in Standard C and C++
This paper, from one of the authors of the C++ standard, explains the standard way to represent and manipulate hardware in C. It directly shows our bit manipulation patterns in a real-world context.
Please read the first page of this document. It demonstrates how to define a pointer to a specific memory address and then use bitmasks (like ENABLE and READY) to clear and test bits, exactly as we've discussed.
The example in the paper, *pcr &= ~ENABLE;, is a real-world application of our "clear a bit" pattern. The polling loop, while ((*pcr & READY) == 0), is our "check a bit" pattern used repeatedly. As you may recall from a previous lesson, declaring that pointer as volatile (control volatile *const pcr) is essential to prevent the compiler from optimizing away these crucial hardware accesses, assuming the register's value never changes.
Conclusion
In this lesson, we've solidified your understanding of the four fundamental bit manipulation operations. Being able to write these patterns from memory and explain their logic is a key competency for any low-level C programmer.
Key Takeaways for Your Interview:
- Four Core Patterns: You should be able to instantly recall and implement the patterns for setting, clearing, toggling, and checking a bit.
- Set:
reg |= (1U << pos); - Clear:
reg &= ~(1U << pos); - Toggle:
reg ^= (1U << pos); - Check:
(reg & (1U << pos)) != 0
- Set:
- Mask Creation: The expression
(1U << pos)is the standard way to create a mask for a single bit. UsingUforunsignedis a best practice. - Real-World Context: These operations are the bread and butter of device driver development, used for configuring registers, acknowledging interrupts, and polling status flags.
- The
volatileConnection: When applying these patterns to memory-mapped hardware registers,volatileis mandatory to ensure the compiler does not perform incorrect optimizations.
In our next lesson, we will build directly on this foundation. We will move from manipulating single bits to extracting and inserting multi-bit fields from a register, a technique essential for handling values that span several bits, such as ADC results or configuration enumerations.