Hello! Welcome back.
In our last lesson, we successfully located your car's owner's manual, spare tyre, jack, and lug wrench. Finding your equipment is a crucial first step, but a spare tyre is only useful if it's in a condition to be used safely. Imagine going through all the effort of changing a tyre only to find your spare is flat or damaged—it would be frustrating and leave you stranded.
Today's lesson focuses on a critical pre-flight check: inspecting the spare tyre for usability, including checking its pressure and overall condition. This step is vital because it helps you decide whether you can proceed with the change yourself or if you need to call for professional help. By the end of this lesson, you'll know how to confidently assess your spare tyre and make a safe decision in a roadside emergency.
Step 1: Identify Your Spare Tyre Type
Before you inspect the spare, you need to know what kind you have, as this determines its capabilities. There are two main types:
- Full-Size Spare: This is a regular tyre that is identical in size to the ones on your car. It might be on a matching alloy wheel or a plain steel one. The main advantage is that once fitted, you can typically drive on it normally without immediate speed or distance restrictions.
- Temporary Spare (or "Donut"/"Space-Saver"): This is the more common type in modern cars. It is smaller and narrower than your standard tyres to save weight and space. These have strict limitations on how fast and how far you can drive on them.
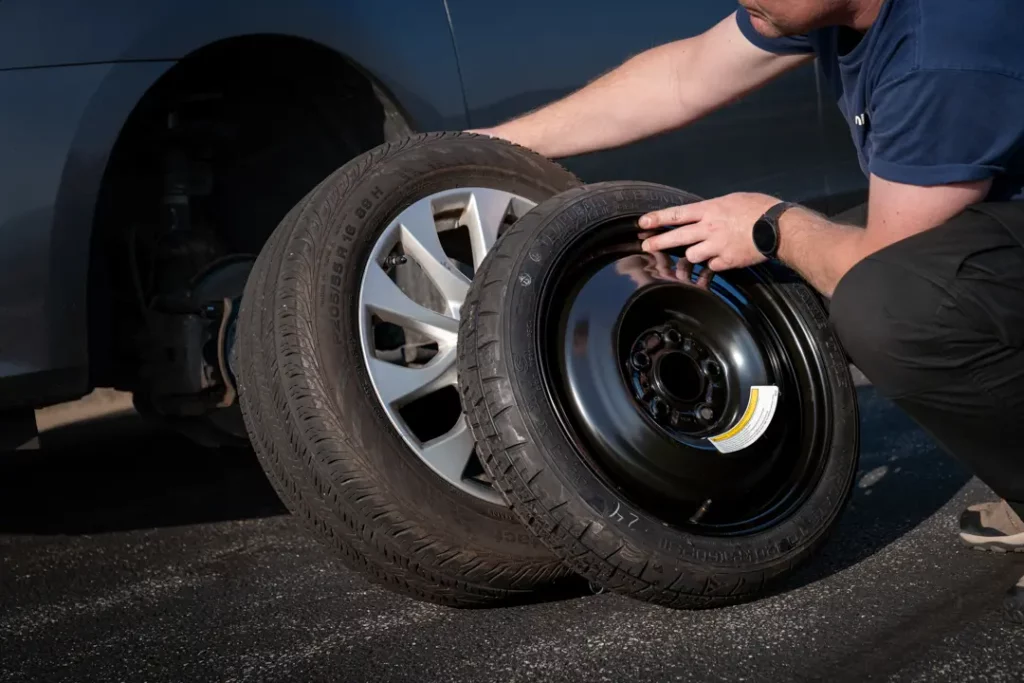
Your owner's manual will confirm which type you have, but you can usually tell just by looking at it. Knowing the type is essential because it informs the final steps of this process, which we will cover in a later lesson.
Step 2: The Three-Point Inspection
A thorough inspection of your spare tyre can be broken down into three key checks: Air Pressure, Physical Condition, and Age. Think of this as a quick but essential quality assurance check. Let's go through each one.
1. Air Pressure
A spare tyre that is not properly inflated is unsafe and cannot properly support the weight of your vehicle. Spare tyres lose air over time, just like any other tyre, so checking the pressure is non-negotiable.
Why it matters: An under-inflated spare can overheat and fail when driven on, and it won't provide the stability needed for safe handling.
How to check it:
- Find the recommended pressure: For temporary spares, the required pressure is often higher than for your regular tyres—typically 60 psi (pounds per square inch). This specification is almost always printed directly on the tyre's sidewall. For a full-size spare, the correct pressure is usually the same as your front tyres, which is listed on the sticker inside your driver's side door jamb.
- Use a tyre pressure gauge: You'll need a simple tool called a tyre pressure gauge. Remove the plastic cap from the tyre's valve stem, press the gauge firmly onto the valve, and read the measurement.

If the pressure is low, you will need a pump or air compressor to inflate it to the correct level. If the tyre is completely flat, it may have a puncture and is unusable.
Tire Safety Checklist: What to Do Before Your Next Road Trip
For a detailed explanation on why checking tyre pressure is so important, let's turn to an article from Consumer Reports.
Please read the section titled 'Step 1: Check Tire Pressure'. Focus on the paragraphs explaining why under-inflation is dangerous and the advice to check your spare tyre's pressure regularly.
2. Physical Condition (Tread and Sidewall)
Next, you need to perform a careful visual and tactile inspection of the tyre itself. Look for any signs of damage that could compromise its integrity.
Why it matters: Cracks, bulges, or a lack of tread can lead to a sudden blowout, which is extremely dangerous, especially at speed.
How to check it:
- Inspect the Tread: The tread is the part of the tyre that contacts the road. Since most spares are never used, the tread should look brand new and deep. Run your hand over it to feel for any embedded objects like nails or screws.
- Inspect the Sidewalls: Look closely at the inner and outer sides of the tyre. You are searching for:
- Cracks or "Dry Rot": Over time, rubber degrades, leading to a web of fine cracks. This weakens the tyre structure significantly.
- Bulges or Bubbles: These indicate that the internal structure of the tyre has failed, and it is on the verge of blowing out.
- Cuts or Punctures: Any visible hole or deep cut means the tyre is not safe to use.
3 Things to Inspect on the Spare Tire of your Vehicle
The article '3 Things to Inspect on the Spare Tire of your Vehicle' by Parents Autocare gives a great summary of what to look for.
Please read the sections 'Inspect the Tread of the Spare Tire' and 'Make sure the Spare Tire is in good condition'. These sections clearly explain what to look for regarding tread depth and physical damage like dry rot and cracks.
3. Age
Even a tyre that has never been used and looks perfect can be unsafe if it's too old. The rubber compounds degrade over time due to exposure to heat, oxygen, and ozone, making the tyre brittle and prone to failure.
Why it matters: An old spare can fail suddenly and without warning, even if it has full tread and correct air pressure.
How to check it:
Every tyre has a "birth date" stamped on its sidewall as part of the Department of Transportation (DOT) code.
- Find the DOT Code: Look for the letters "DOT" on the sidewall, followed by a series of numbers and letters.
- Read the Date: The last four digits of the code tell you the week and year the tyre was made. For example, a code ending in 3014 means the tyre was manufactured in the 30th week of 2014.
As a general rule, many car manufacturers recommend replacing tyres after six years, and most tyre experts agree that you should never use a tyre that is more than 10 years old, regardless of its appearance.
Tire Safety Checklist: What to Do Before Your Next Road Trip
The Consumer Reports article provides an excellent guide, with a clear image, on how to find and read a tyre's manufacturing date.
Read the sections 'Step 4: Check the Tire's Age' and 'Step 5: Inspect the Spare Tire'. Pay close attention to the instructions for reading the DOT code and the recommendation for replacing old tyres. The image in this section is particularly helpful.
The Decision: Is Your Spare Usable?
After completing your three-point inspection, you can make an informed decision.
You should call for professional assistance and NOT use the spare if you find:
- Low Pressure: The tyre is visibly flat, and you do not have a portable pump to inflate it.
- Physical Damage: You see any cracks, cuts, bulges, or punctures on the sidewall or tread.
- Extreme Age: The tyre is more than 10 years old.
If the pressure is just a little low and you have a pump, or if the tyre passes all three checks, you can proceed with confidence. This inspection is your most important safety check before you ever pick up a tool.
Conclusion
Great work. You now know not just how to find your spare tyre, but how to critically evaluate whether it's safe to use in an emergency. This knowledge is fundamental to roadside preparedness.
Key Takeaways:
- There are two main types of spares: full-size and temporary "donuts," each with different capabilities.
- A complete inspection involves three points: checking air pressure, assessing the physical condition (tread and sidewalls for damage), and verifying the tyre's age via the DOT code.
- Never use a spare tyre that is damaged, has very low pressure (without a pump), or is more than 10 years old. It is always safer to call for help.
In our previous lesson, we located our tools. In this lesson, we confirmed we have a usable spare. Now, before we use those tools, it's important to understand what they do. In the next lesson, we will explain the function of each tool required for a tyre change, ensuring you know exactly what the jack and lug wrench are for before you put them to work.