Hello! Welcome back to our course on Finite State Machines.
In our last lesson, we put on our game designer hats and created a blueprint for an NPC's AI. We identified the core states like Wander, Chase, and Attack, and defined the transitions that connect them. This design is our roadmap for building the NPC's "brain."
Today, we move from design to implementation. Our goal is to implement the 'Idle' state and create a timed transition to the 'Patrol' state. This is the first practical coding step in bringing our NPC to life. We'll start simple, establishing the foundational behavior of an NPC waiting for a moment before it begins its duties.
Let's get started with our first piece of NPC behavior.
What is the 'Idle' State?
In game development, the 'Idle' state is more than just "doing nothing." It's an active state where an NPC appears passive. This is the perfect time to play subtle animations that make the character feel alive, such as breathing, looking around, or shifting their weight.

While we won't be implementing the animations themselves today, remember that the logic we build for the Idle state is precisely where you would call animation:Play(). For our purposes, we'll use print() statements to confirm that our state is active and working correctly.
Implementing a Timed Transition
A common requirement for an Idle state is to transition to another state after a set amount of time. For example, a guard might idle for 10 seconds before starting their patrol route. This is called a timed transition.
So, how do we make the FSM wait for a specific duration before changing state? The key is to track elapsed time. The update callback of your state, which you'll likely run on every frame or every few frames using RunService.Heartbeat, is the perfect place to do this.
The logic is straightforward:
- When the FSM enters the
Idlestate, we record the starting time. - In the update loop for the
Idlestate, we continuously check if the elapsed time (currentTime - startTime) has exceeded our desired duration. - Once the time is up, we trigger a transition to the next state (e.g.,
Patrol). - When we exit the
Idlestate, we clean up any variables we used, like resetting our start time.
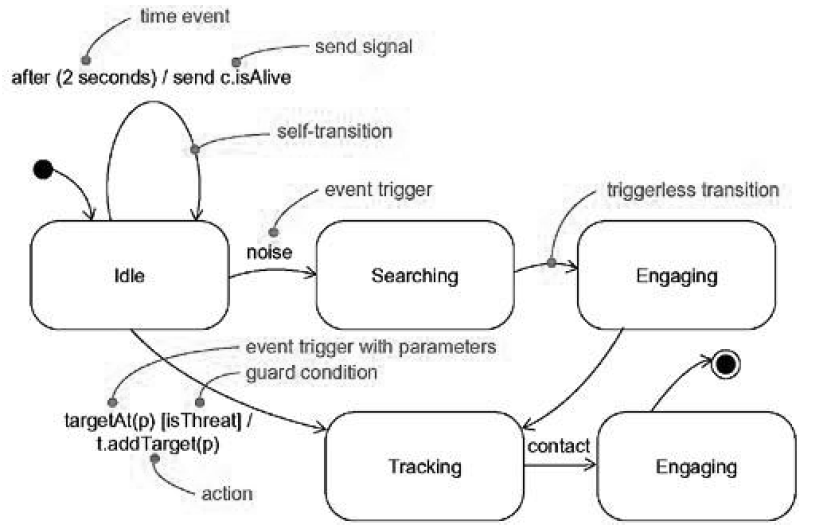
This diagram illustrates a similar concept, where a time event triggers an action. In our case, the event will trigger a transition to a new state.
A Practical Code Example
Let's look at a concrete example from a Roblox Developer Forum post. This article demonstrates how to implement a timed transition for a simple pet AI. The logic is identical to what we need for our NPC.
AI Development: Finite State Machines - Developer Forum | Roblox
Please read the following code sections from the 'AI Development: Finite State Machines' article on the Roblox Developer Forum. This will show you a practical Luau implementation of a timed state transition.
In the large code block, focus on two parts: The if state_machine.current_state == "Idling" then ... end block. Notice how it uses initTick = tick() to store the start time and then checks math.ceil(tick() - initTick) == 5 to trigger the transition. The state_machine.onStateChanged:Connect(...) function at the end. See how it resets initTick = nil when the state changes from 'Idling'. This is a crucial cleanup step.
This example demonstrates the core pattern: record, check, transition, and clean up. The use of onStateChanged to reset the timer is an excellent practice, which you can implement in your state's exit callback.
Exercise: Implementing Your 'Idle' State
Now, let's apply this to the FSM module you built in Module 3. We will create a simple NPC that starts in an Idle state, waits for 5 seconds, and then transitions to a Patrol state.
1. Set up your environment:
- In Roblox Studio, create a new
Partin theWorkspace. Name itNPC. - Create a
Scriptinside theNPCpart. - Make sure your reusable FSM
ModuleScript(from Module 3) is available, for instance, inReplicatedStorage.
2. Write the NPC script:
Open the Script you created inside your NPC part. We will now write the logic. I'll provide a template below. You'll need to adapt it to match the specific method names of your FSM module (e.g., fsm:new(), fsm:addState(), fsm:transitionTo(), fsm:update()).
-- Requiring your FSM module (adjust the path as needed)
local FSM = require(game.ReplicatedStorage.FSM)
local RunService = game:GetService("RunService")

-- Configuration
local IDLE_DURATION = 5 -- The NPC will idle for 5 seconds

-- A variable to store the time when the Idle state was entered
local idleStartTime

-- 1. DEFINE STATES
-- These tables will hold the logic for each state.
-- You'll pass these to your FSM module.

local idleState = {
    -- The Enter callback is called once when we enter this state.
    Enter = function()
        print("NPC has entered the Idle state.")
        -- Record the time we started idling.
        idleStartTime = time()
    end,

    -- The Update callback is called on every frame by RunService.Heartbeat.
    Update = function(dt) -- dt is deltaTime
        -- Check if the idle duration has passed.
        if time() - idleStartTime >= IDLE_DURATION then
            -- Time is up! Transition to the Patrol state.
            -- NOTE: Replace 'fsm' with your FSM instance variable
            -- and 'transitionTo' with your module's transition method.
            fsm:transitionTo("Patrol")
        end
    end,

    -- The Exit callback is called once when we leave this state.
    Exit = function()
        print("NPC is leaving the Idle state.")
        -- Reset the timer variable. This is good practice.
        idleStartTime = nil
    end
}

local patrolState = {
    Enter = function()
        print("NPC has entered the Patrol state.")
        -- We will add patrol logic here in the next lesson.
    end,

    Update = function(dt)
        -- Empty for now
    end,

    Exit = function()
        print("NPC is leaving the Patrol state.")
    end
}


-- 2. INITIALIZE THE FSM
-- NOTE: The following lines are examples. You must adapt them
-- to match the API of your own FSM module from Module 3.

-- Create a new FSM instance, setting 'Idle' as the initial state.
local fsm = FSM.new("Idle")

-- Define the states within the FSM. Your module might have a different way of doing this.
fsm:defineState("Idle", idleState)
fsm:defineState("Patrol", patrolState)

-- If your module requires defining allowed transitions, do so here.
-- fsm:defineTransition("Idle", "Patrol")


-- 3. START THE FSM'S UPDATE LOOP
-- Connect the FSM's update function to the game's heartbeat.
RunService.Heartbeat:Connect(function(dt)
    -- NOTE: Replace 'update' with your module's update method.
    fsm:update(dt)
end)
3. Test your implementation:
Run the simulation. Open the Output window and you should see the following sequence:
- "NPC has entered the Idle state."
- After 5 seconds...
- "NPC is leaving the Idle state."
- "NPC has entered the Patrol state."
If you see this, congratulations! You have successfully implemented your first piece of AI behavior.
Conclusion
In this lesson, we bridged the gap between design and code. You learned how to implement a state and, crucially, how to create a timed transition—a fundamental pattern in AI and game logic.
Here are the key takeaways:
- The
Idlestate is used for an NPC's passive behaviors, making them feel more alive. - Timed transitions are typically handled by recording a start time in a state's
entercallback and checking the elapsed time in theupdatecallback. - It is essential to clean up state-specific variables (like our
idleStartTime) in theexitcallback to prevent bugs when re-entering the state later.
You've now laid the first stone in building our NPC's brain.
Next Steps
Our NPC can now transition from Idle to Patrol, but the Patrol state itself is empty. In the next lesson, we will implement the 'Patrol' state using Roblox's PathfindingService, making our NPC move intelligently between a series of waypoints.