Hello! Welcome to the next stage of your journey with Finite State Machines.
In the previous modules, you learned the fundamental building blocks of FSMs—states, transitions, and events—and even implemented a basic, reusable FSM module in Luau. Now, it's time to apply that knowledge to a core challenge in game development: creating believable Non-Player Character (NPC) behavior.
This lesson is the first step in that direction. Our goal is to design an FSM for a basic NPC by identifying its states and the transitions between them. We'll be acting as game designers, thinking about what an NPC should do and what rules should govern its actions. This design-first approach is crucial for building complex systems in a clean and manageable way.
Let's begin.
Why Use an FSM for NPC AI?
Before we start designing, it's helpful to understand why FSMs are such a popular choice for programming AI. Imagine trying to code an NPC's logic using only a series of if-elseif-else statements. You might have variables like isChasing, isAttacking, isLowOnHealth, etc. As you add more behaviors, this logic can quickly become a tangled, hard-to-debug mess often called "spaghetti code."
To see a great illustration of this problem, let's watch a short segment from a video by The Shaggy Dev. While the example is about a player character, the principle is identical for an NPC.
An introduction to finite state machines and the state pattern for game development
This clip from 'An introduction to finite state machines' demonstrates how quickly character logic can become complicated without a proper structure, leading to code that is difficult to maintain and debug.
Watch the video from 00:52 to 02:35. Pay attention to how adding new abilities like jumping, double-jumping, and attacking rapidly increases the complexity and number of conditional checks.
An FSM solves this by providing a formal structure. Each behavior becomes a self-contained state, and we define clear rules, or transitions, for moving between them. This keeps the logic for each behavior isolated and makes the overall system much easier to understand, build, and expand upon.
Step 1: Identifying the States
The first step in designing an NPC's FSM is to break down its overall behavior into a set of distinct, manageable states. A state is essentially a single, specific action or behavior.
What are some common behaviors for an enemy or guard NPC in a game?
- Waiting in one spot (Idle)
- Moving along a predefined route (Patrol)
- Following a player it has detected (Chase)
- Engaging a player in combat (Attack)
- Running away when health is low (Flee)
- Searching for a player it just lost sight of (Investigate)
Let's look at a concrete example. The following article provides a great breakdown of a simple FSM for a guard NPC.
Finite State Machine in Game AI — Sharing What I Learn 001
Please read the first part of the article 'Finite State Machine in Game AI' by Prathamesh Burade. It provides a clear, practical example of identifying states and transitions for a guard NPC.
Read from the beginning of the article down to the end of the section titled 'Let’s have a walkthrough...'. As you read, study 'Figure 1.1' and note how each state (Patrol, Investigate, Attack, Flee) represents a clear behavior, and the arrows represent the rules for changing behavior.
As the article explains, each state encapsulates one specific job. When the NPC is in the Patrol state, the only thing it's concerned with is moving along its path. When it's in the Attack state, its logic is focused entirely on combat.
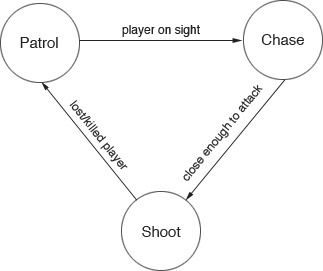
Here are a couple more visual examples of NPC FSM diagrams:

Step 2: Defining the Transitions
Once we have our states, we need to define the rules for moving between them. These rules are the transitions, and they are triggered by events or conditions. An event is something that happens in the game world.
Using the guard example from the article Finite State Machine in Game AI:
-
Event: The guard hears a noise.
-
Transition:
Patrol->Investigate. -
Condition: The guard's health is low.
-
Transition:
Attack->Flee.
Every transition has a starting state, an ending state, and a trigger. The power of an FSM comes from thinking through all these connections systematically. For any given state, you should ask: "What could happen that would cause this NPC to change its behavior?"
Let's look at the Chase state. What could happen while an NPC is chasing a player?
- It gets close enough to attack. (Trigger for
Chase->Attack) - The player gets too far away or hides. (Trigger for
Chase->InvestigateorChase->Patrol) - The NPC takes a lot of damage. (Trigger for
Chase->Flee)
By defining these transitions, you create a complete "brain" for your NPC.
Practical Exercise: Designing an NPC's FSM
Now, let's put this into practice. Your task is to design an FSM for a simple zombie NPC in a Roblox game. Here is the desired behavior:
- The zombie starts by wandering aimlessly within a designated area (Wander).
- If a player comes within its line of sight, it starts to chase the player (Chase).
- If it gets close enough to the player, it stops moving and performs a slow attack animation (Attack). After the attack, it goes right back to chasing.
- If the zombie loses sight of the player for more than 5 seconds while chasing, it gives up and goes back to wandering.
Based on this description, let's design the FSM together.
1. List the States
First, identify the distinct behaviors from the description.
Wander: Moving around aimlessly.Chase: Moving directly towards the player.Attack: Performing an attack animation at close range.
So, we have three states: Wander, Chase, and Attack.
2. Define the Initial State
The description says the zombie "starts by wandering".
- Initial State:
Wander
3. Define the Transitions
Now, let's map out all the possible transitions based on the rules.
-
From
Wander:- To
Chase: The trigger is seeing a player.- Condition:
Player spotted(e.g., player enters a certain radius and is visible).
- Condition:
- To
-
From
Chase:- To
Attack: The trigger is getting close to the player.- Condition:
Player in attack range.
- Condition:
- To
Wander: The trigger is losing the player.- Condition:
Player lost(e.g., player has been out of sight for 5 seconds).
- Condition:
- To
-
From
Attack:- To
Chase: The trigger is the attack animation finishing. The zombie should immediately try to pursue the player again.- Condition:
Attack finished.
- Condition:
- To
This completes our design! We have identified the states, the starting point, and all the rules that govern how the NPC switches between its behaviors. We could draw this out as a state diagram:
           (Player spotted)
[Wander] ------------------> [Chase]
   ^                           |
   | (Player lost)             | (Player in attack range)
   +---------------------------+
                               |
                               v
                             [Attack]
                               |
                               | (Attack finished)
                               +-----> (back to Chase)
Conclusion
In this lesson, you've taken the theoretical concepts of FSMs and applied them to a practical game design problem. We've seen that designing an FSM for an NPC is a two-step process:
- Identify States: Break down the NPC's behavior into a set of distinct, single-purpose actions (e.g., Patrol, Chase, Attack).
- Define Transitions: Specify the events and conditions that cause the NPC to switch from one state to another.
This structured approach prevents the "spaghetti code" that can arise from complex AI logic and creates a blueprint that is much easier to implement, debug, and expand upon.
Next Steps
Now that we have a solid design for an NPC, our next lesson will be to start implementing it. We will begin by coding the 'Idle' state and creating a timed transition to the 'Patrol' state, taking our first practical step in bringing our AI design to life in Roblox.