Hello and welcome back!
In our last lesson, you successfully implemented player detection, enabling your NPC to notice the player and transition from its Patrol state to a placeholder Chase state. This was a crucial step in making your AI reactive. Now, it's time to give that Chase state some teeth.
This lesson focuses on the learning outcome: Implement the 'Chase' state, using PathfindingService to follow a player, with a transition back to 'Patrol' if the player is lost. We will transform your NPC from a passive observer into an active pursuer that can intelligently navigate the game world to hunt down the player.

From MoveTo to PathfindingService
So far, we've used Humanoid:MoveTo() to guide the NPC to static waypoints. This works well for predictable routes, but what happens when the target is a moving player and there are obstacles in the way? Simply calling MoveTo(player.Position) would cause the NPC to run straight into walls.
This is where PathfindingService comes in. It's a powerful Roblox service designed to calculate a navigable path between two points, avoiding obstacles along the way.
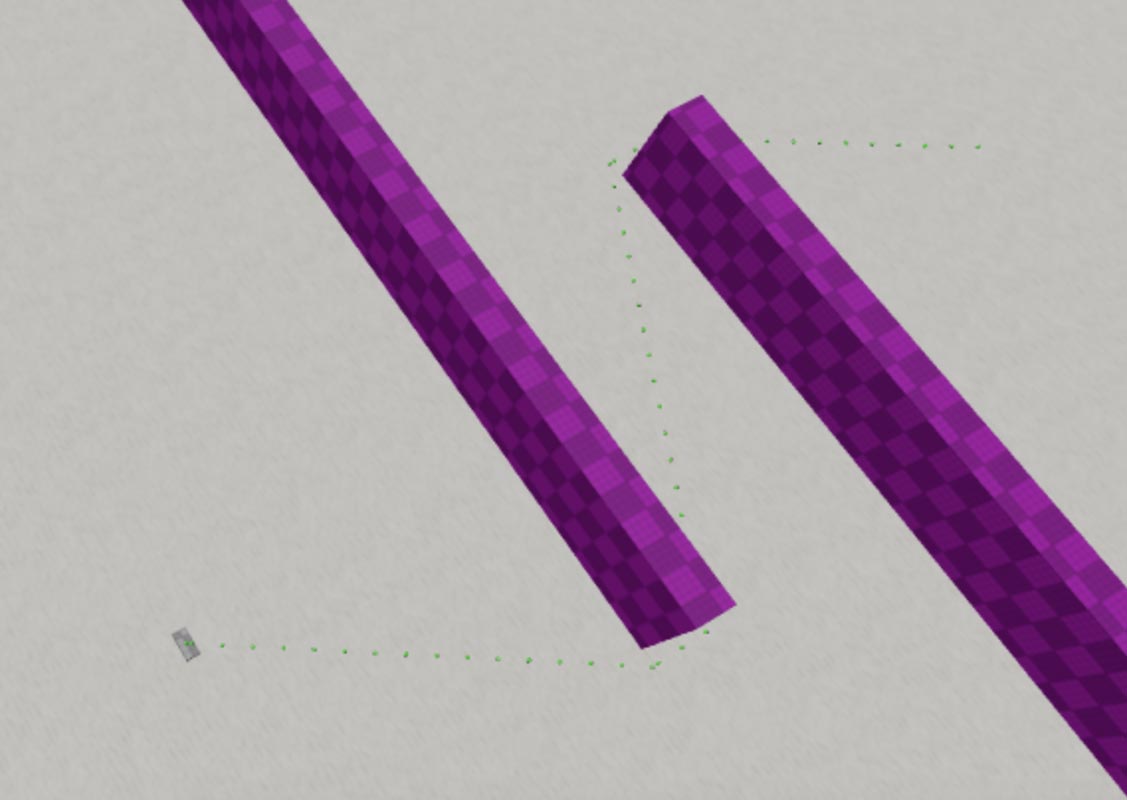
The process involves three main steps:
- Create a Path Object: We ask
PathfindingServiceto create aPathobject that can store the path information. - Compute the Path: We tell the
Pathobject to calculate a route from the NPC's current location to the target's location usingpath:ComputeAsync(). - Follow the Waypoints: The computed path consists of a series of points, or
waypoints. We then command the NPC'sHumanoidto move to each waypoint in sequence until it reaches the end.
The Core Logic of a Chase
A chase is not a one-and-done path calculation. Because the player is constantly moving, the NPC must continuously update its path to adapt. The following video provides an excellent, detailed walkthrough of creating a script that makes an NPC follow the closest player using PathfindingService.
Pathfinding (AI, Dynamic Paths, Modifiers) - Roblox Advanced Scripting #35 (2025)
This video by BrawlDev is a fantastic resource that covers almost everything we need for our 'Chase' state. Pay close attention to how it handles finding a target, calculating a path, and making the character move.
Watch the segments from 1:34 to 7:51 and 9:38 to 10:51. Focus on these key concepts: 1:34 - 7:51: How to get the PathfindingService, create a path object with CreatePath(), and compute the path with ComputeAsync(). Note the use of pcall()—this is a crucial safety measure as path computation can sometimes fail. 9:38 - 10:51: How to get the list of waypoints with GetWaypoints() and then loop through them, using humanoid:MoveTo() and humanoid.MoveToFinished:Wait() to traverse the path.
This video establishes the fundamental pattern for pathfinding. We will now integrate this pattern into the Update function of our chaseState.
Exercise: Implementing the 'Chase' State
Let's get practical. We will now build out the full logic for the chaseState in your NPC script.
1. Configuration and State Variables
First, let's add some configuration variables near the top of your script and prepare your chaseState table to hold data.
-- Add these near your other configuration variables
local PATHFINDING_SERVICE = game:GetService("PathfindingService")
local CHASE_MAX_DISTANCE = 100 -- How far the player can get before the NPC gives up
local PATH_RECOMPUTE_INTERVAL = 1 -- Re-calculate the path every 1 second

-- Find your chaseState table and modify it
local chaseState = {
    -- We'll store the NPC's target and other chase-related data here
    currentTarget = nil,
    lastPathRecompute = 0, -- A timer to control how often we re-calculate the path

    Enter = function(target)
        -- ...
    end,
    Update = function(dt)
        -- ...
    end,
    Exit = function()
        -- ...
    end
}
By adding currentTarget and lastPathRecompute to the chaseState table itself, we make them persistent throughout the duration of the state.
2. Enter: Acquiring the Target
When the FSM transitions to Chase, it passes the player target to the Enter function. We need to store this target and start the chase immediately.
-- Inside your chaseState table
Enter = function(target)
    print("NPC has entered the Chase state. Chasing: " .. target.Name)
    chaseState.currentTarget = target
    chaseState.lastPathRecompute = 0 -- Reset timer to force an immediate path calculation

    -- Stop any previous movement
    humanoid:MoveTo(npc.PrimaryPart.Position)
end,
3. Update: The Heart of the Chase
The Update function is where the continuous logic happens: checking if the target is still valid, checking if it's time to re-calculate the path, and executing the pathfinding.
The logic here follows the pattern you saw in the video and in many online examples, but adapted for our FSM's Update loop.
Make model chase a player with pathfinding
This DevForum post provides a concise, complete script for making a model chase a player. We will model our Update logic on this example.
Review the final code block in this forum thread. Notice the core loop: findNearestChar(), then if a character is found, ComputeAsync a path to them, get the Waypoints, and loop through them with MoveTo. Our Update function will perform the 'compute and move' part of this loop each time its timer is up.
Now, let's implement the Update function. This is the largest piece of code, so read through it carefully.
-- Inside your chaseState table
Update = function(dt)
    -- Add the delta time to our recompute timer
    chaseState.lastPathRecompute = chaseState.lastPathRecompute + dt

    local target = chaseState.currentTarget

    -- == Condition to EXIT the chase state ==
    -- Check if target is gone (left the game) or if their character is gone
    if not target or not target.Parent then
        print("Target lost (disconnected). Transitioning back to Patrol.")
        fsm:transitionTo("Patrol")
        return
    end

    local targetRootPart = target:FindFirstChild("HumanoidRootPart")
    if not targetRootPart then
        print("Target lost (no root part). Transitioning back to Patrol.")
        fsm:transitionTo("Patrol")
        return
    end

    -- Check if target is too far away
    local distance = (npc.PrimaryPart.Position - targetRootPart.Position).Magnitude
    if distance > CHASE_MAX_DISTANCE then
        print("Target is too far away. Transitioning back to Patrol.")
        fsm:transitionTo("Patrol")
        return
    end

    -- == CORE CHASE LOGIC ==
    -- Only recompute the path if our interval has passed
    if chaseState.lastPathRecompute >= PATH_RECOMPUTE_INTERVAL then
        chaseState.lastPathRecompute = 0 -- Reset the timer

        -- Create and compute the path
        local path = PATHFINDING_SERVICE:CreatePath()

        local success, errorMessage = pcall(function()
            path:ComputeAsync(npc.PrimaryPart.Position, targetRootPart.Position)
        end)

        if success and path.Status == Enum.PathStatus.Success then
            local waypoints = path:GetWaypoints()

            -- Follow the path
            -- We spawn a new thread so the path-following doesn't block the Update function
            coroutine.wrap(function()
                for i, waypoint in ipairs(waypoints) do
                    -- If we are no longer in the chase state, stop moving.
                    if fsm:getCurrentState() ~= "Chase" then
                        break
                    end
                    humanoid:MoveTo(waypoint.Position)
                    humanoid.MoveToFinished:Wait()
                end
            end)()
        else
            warn("Pathfinding failed: " .. tostring(errorMessage))
        end
    end
end,
Key Concepts in this Update function:
- Guard Clauses: The checks at the top (
if not target,if distance > ...) are "guard clauses." They ensure the target is still valid and within range. If not, we transition out of theChasestate immediately. - Timed Re-computation: We use
lastPathRecomputeanddt(delta time) to ensure we only run the expensiveComputeAsyncfunction once per second, not on every frame. - Coroutines: The
coroutine.wrapis important. Following a path withMoveToFinished:Wait()can take several seconds. If we did this directly inUpdate, it would freeze all other state logic. Running it in a coroutine allows the path-following to happen in the "background" while theUpdatefunction continues to run every frame, checking distances and timers.
4. Exit: Cleaning Up
Finally, when we leave the Chase state, we should clean up by resetting our state variables and stopping any current movement.
-- Inside your chaseState table
Exit = function()
    print("NPC is leaving the Chase state.")
    chaseState.currentTarget = nil -- Clear the target

    -- Stop the NPC from walking to its last waypoint
    humanoid:MoveTo(npc.PrimaryPart.Position)
end,
5. Test Your Complete Chase State
It's time to see your creation in action!
- Run the simulation. The NPC should start in
Idle, then switch toPatrol. - Walk your character into the NPC's line of sight to trigger the
Chasestate. - The NPC should now actively follow you, navigating around any obstacles you place in its path.
- Run away from the NPC. Once you are more than 100 studs away (
CHASE_MAX_DISTANCE), the NPC should stop, print a message, and transition back to thePatrolstate. - Try to get the NPC to chase you again to confirm it can re-enter the
Chasestate correctly.
Conclusion
Fantastic work! You have now implemented a robust and dynamic Chase state. Your NPC is no longer a simple automaton but a reactive agent that can pursue a target through a complex environment and make decisions based on changing conditions.
Key Takeaways:
PathfindingServiceis the standard tool in Roblox for creating intelligent movement that avoids obstacles.- Chasing a moving target requires periodic path re-computation, which should be timed to avoid performance issues.
- A state's
Updatefunction is used for continuous checks, such as verifying a target's distance, which can trigger a transition out of the current state. - Using coroutines is essential for handling long-running actions (like following a path) without blocking the main update loop of your FSM.
Next Steps
Your NPC can now chase a player, but what happens when it catches them? In our next lesson, we will answer that question by implementing an 'Attack' state, triggered when the NPC is within attack range during the 'Chase' state. This will complete the core "Patrol -> Chase -> Attack" loop that is fundamental to so many game AI.