Hello again! It's great to see you back.
In the last lesson, we successfully built a functional UI Finite State Machine. You created the logic to show and hide different ScreenGuis by using enter and exit callbacks. The system worked, but the transitions were automated with wait() calls. Now, it's time to put the user in control.
This lesson directly addresses the learning outcome: Handle user input events, such as button clicks, as triggers for FSM transitions. We will replace the automated timers with interactive buttons, allowing the user to navigate the UI by triggering state changes themselves.
1. Events as FSM Triggers
The core idea of a Finite State Machine is that it changes state in response to an event or input. In our UI context, the most common event is a user clicking a button.
The beauty of the FSM pattern is the separation of concerns:
- The Button's Job: The button doesn't need to know how to open or close menus. Its only responsibility is to announce that it was clicked and request a transition to a specific state (e.g., "the user wants to go to the Settings menu").
- The FSM's Job: The FSM listens for these requests. When it receives one, it handles all the logic: calling the
exitfunction of the old state (to hide the current GUI) and theenterfunction of the new state (to show the next GUI).
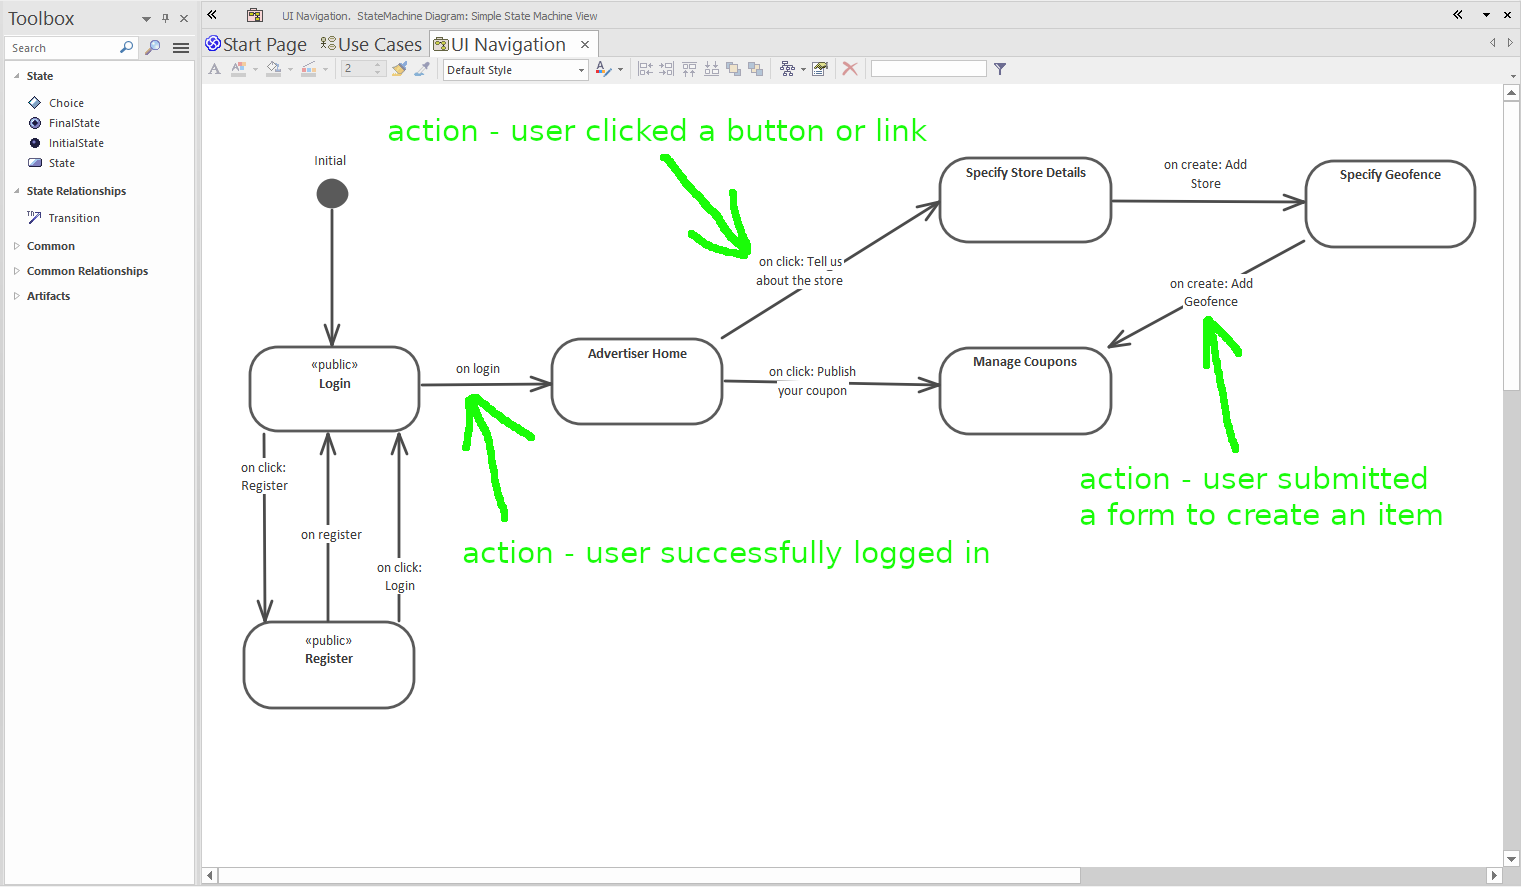
This diagram perfectly illustrates this concept. Notice how each arrow, representing a transition, is labeled with the specific user action that causes it.
2. The handleInput Pattern
From a code architecture perspective, how does an FSM process these inputs? A classic approach is to have a single handleInput() function that directs the input to the current state. The state then decides if that input triggers a transition.
Let's read about this pattern from the highly-regarded book "Game Programming Patterns".
State · Design Patterns Revisited
This chapter from Robert Nystrom's 'Game Programming Patterns' introduces FSMs by refactoring messy conditional logic. It then presents two common implementations: a simple switch statement and the more robust, object-oriented State Pattern.
Please read the following sections: 'Enums and Switches': Focus on the handleInput function. Notice how it first switches on the state_, and then checks the input. This keeps all logic for a single state grouped together. 'The State Pattern': Read the subsections 'A state interface', 'Classes for each state', and 'Delegate to the state'. See how the handleInput method is moved into a separate class for each state. The main Heroine class simply calls the handleInput method on its current state object.
In both implementations, the principle is the same: the FSM receives an input and delegates the handling of that input to the currently active state. In our Roblox Luau context, the "input" will be a button's MouseButton1Click event.
3. Connecting Button Clicks in Roblox
Let's see how this looks in practice within Roblox. We will connect a button's MouseButton1Click event to a function that calls our FSM's transitionTo method.
The following video demonstrates this exact process, using an FSM similar to the ones we've been studying.
Roblox Studio - Finite State Machine EXPLAINED!
In this segment from the 'Roblox Studio - Finite State Machine EXPLAINED!' video by CoodSlayer, the creator wires up the UI buttons to trigger state changes.
Watch from 10:19 to 11:18. Pay close attention to the three lines of code where the MouseButton1Click:Connect(...) function is used. You'll see that the connected function is a simple, one-line call to FSM:changeState(). This is the pattern we will implement.
The pattern is refreshingly simple:
-- Example
local myButton = script.Parent
local fsm = require(game.ReplicatedStorage.MyFsm)

myButton.MouseButton1Click:Connect(function()
    fsm:transitionTo("TargetState")
end)
This clear separation makes your code much easier to manage. If you need to change what happens when you enter the TargetState, you only modify the FSM's state definition, not any of the button scripts.
This pattern is not limited to UI. Any event can trigger a state transition. For example, this next video shows a clickable part in the 3D world that uses the exact same principle to put an object into a "cooldown" state.
State Machines Can Make Your Roblox Game Better!
This clip from 'State Machines Can Make Your Roblox Game Better!' by qweekertom demonstrates a practical, non-UI application of an FSM triggered by user input.
Watch from 05:28 to 06:49. The video shows an FSM with 'idle' and 'cooldown' states for a part. Notice how the ClickDetector.MouseClick event triggers the transition from 'idle' to 'cooldown'. This reinforces that any event can serve as a trigger for your FSM.
4. Your Turn: Making the UI Interactive
Now it's time to apply this to the UI FSM you built in the last lesson. You will add buttons to your ScreenGuis and connect them to the transitionTo function.
Your Task:
- Open the Roblox place from the previous lesson containing your
MainMenuGui,SettingsGui, andGameplayGui. - Add Buttons:
- In
MainMenuGui, add twoTextButtons. Name themPlayButtonandSettingsButton, and label them "Play" and "Settings". - In
SettingsGui, add oneTextButton. Name itBackButtonand label it "Back". - In
GameplayGui, add oneTextButton. Name itMenuButtonand label it "Main Menu".
- In
- Modify Your Script: Open the
LocalScriptthat contains your UI FSM.- Get references to all the new buttons you created.
- Remove the
wait()calls that were automatically triggering transitions. - Connect the
MouseButton1Clickevent for each button to yourUiFsm:transitionTo()function, passing the correct destination state as an argument.PlayButtonshould transition toGameplay.SettingsButtonshould transition toSettings.BackButton(from Settings) should transition toMainMenu.MenuButton(from Gameplay) should transition toMainMenu.
Your previous script should look something like this. Your goal is to modify it to work with the new buttons.
-- In a LocalScript in StarterPlayerScripts

local UiFsm = {
    currentState = nil,
    states = {
        MainMenu = { enter = function() ... end, exit = function() ... end },
        Settings = { enter = function() ... end, exit = function() ... end },
        Gameplay = { enter = function() ... end, exit = function() ... end }
    },
    transitionTo = function(self, newStateName)
        -- ... (transition logic from previous lesson)
    end
}

-- UI References from previous lesson...
local mainMenuGui = ...
local settingsGui = ...
local gameplayGui = ...

-- TODO: Get references to your new buttons here

-- TODO: Connect button events here, for example:
-- playButton.MouseButton1Click:Connect(function()
--     UiFsm:transitionTo("...")
-- end)

-- Start the FSM
UiFsm:transitionTo("MainMenu")

-- TODO: Remove the old wait() based transitions
-- wait(3)
-- UiFsm:transitionTo("Gameplay")
Click here to see a complete solution
-- In a LocalScript in StarterPlayerScripts

local UiFsm = {
    currentState = nil,
    states = {},
    transitionTo = function(self, newStateName)
        if self.currentState and self.states[self.currentState].exit then
            self.states[self.currentState].exit()
        end
        self.currentState = newStateName
        if self.states[self.currentState].enter then
            self.states[self.currentState].enter()
        end
        print("UI transitioned to state:", self.currentState)
    end
}

-- UI References
local player = game.Players.LocalPlayer
local playerGui = player:WaitForChild("PlayerGui")
local mainMenuGui = playerGui:WaitForChild("MainMenuGui")
local settingsGui = playerGui:WaitForChild("SettingsGui")
local gameplayGui = playerGui:WaitForChild("GameplayGui")

-- Button References
local playButton = mainMenuGui:WaitForChild("PlayButton")
local settingsButton = mainMenuGui:WaitForChild("SettingsButton")
local backButton = settingsGui:WaitForChild("BackButton")
local menuButton = gameplayGui:WaitForChild("MenuButton")


-- Define the states and their enter/exit callbacks
UiFsm.states = {
    MainMenu = {
        enter = function()
            mainMenuGui.Enabled = true
        end,
        exit = function()
            mainMenuGui.Enabled = false
        end
    },
    Settings = {
        enter = function()
            settingsGui.Enabled = true
        end,
        exit = function()
            settingsGui.Enabled = false
        end
    },
    Gameplay = {
        enter = function()
            gameplayGui.Enabled = true
        end,
        exit = function()
            gameplayGui.Enabled = false
        end
    }
}

-- Connect button events to FSM transitions
playButton.MouseButton1Click:Connect(function()
    UiFsm:transitionTo("Gameplay")
end)

settingsButton.MouseButton1Click:Connect(function()
    UiFsm:transitionTo("Settings")
end)

backButton.MouseButton1Click:Connect(function()
    UiFsm:transitionTo("MainMenu")
end)

menuButton.MouseButton1Click:Connect(function()
    UiFsm:transitionTo("MainMenu")
end)


-- Start the FSM in the MainMenu state
UiFsm:transitionTo("MainMenu")
When you run the game, you should start at the main menu. Clicking the buttons should now correctly navigate you between the different UI screens.
Conclusion
Excellent work! You have now connected user input to your FSM, creating a truly interactive UI navigation system. This is a fundamental pattern for managing complex application flow in a clean and scalable way.
Key Takeaways:
- User input events, like
MouseButton1Click, are the triggers that drive an interactive FSM. - The role of an input handler is simply to request a state transition (e.g.,
fsm:transitionTo("Settings")). - The FSM encapsulates all the complex logic for what happens during a state change (
enterandexitactions), keeping the input handling code clean and simple.
You've built a solid foundation for your UI. In our next lesson, we'll make it look and feel more professional by addressing the learning outcome: Implement animated transitions between UI states using TweenService. We will enhance the enter and exit callbacks to create smooth fade and movement animations for your UI panels.