Hello again! It's great to reconnect and dive into the next step of building our ray tracer.
In our previous lesson, we established the fundamental mathematical concept of a ray: a parametric equation that describes a line in 3D space. This equation is the theoretical bedrock of our project.
Today, we will bridge the gap between theory and practice. This lesson is focused on the learning outcome: Implement a C++ class for a ray with a method to compute points along its path. We will create the ray.h file and define a ray class that encapsulates the origin and direction. This class will become a core data structure that we'll create and use for every single pixel in our final renders.
1. From Math to Member Variables
Let's start by translating the ray equation directly into a C++ class structure. As you know from your CS background, a class is the perfect way to group related data and functionality. For our ray class, the data is simple:
- An origin point: A from our equation.
- A direction vector: b from our equation.
Both of these will be represented by the vec3 class we conceptually designed in the first module. (You'll recall we also created aliases point3 for geometric points and color for RGB values, though they are all fundamentally vec3 types).
The core of our implementation is laid out clearly in the Ray Tracing in One Weekend book. Please study the following section, which provides the canonical code for our ray class.
Ray Tracing in One Weekend Series
This section from Peter Shirley's 'Ray Tracing in One Weekend' presents the definitive C++ implementation of the ray class. It's a clean and efficient translation of the mathematical concept.
Read the subsection titled 'The ray Class'. Study the C++ code block for ray.h and notice how it declares private member variables for the origin (orig) and direction (dir), a constructor to initialize them, and const accessor methods to retrieve them.
As you saw in the text, the class is elegantly simple:
class ray {
  public:
    ray() {}
    ray(const point3& origin, const vec3& direction)
      : orig(origin), dir(direction)
    {}

    const point3& origin() const { return orig; }
    const vec3& direction() const { return dir; }

    point3 at(double t) const {
        return orig + t*dir;
    }

  private:
    point3 orig;
    vec3 dir;
};
This structure keeps the ray's data encapsulated and provides a clear interface for interacting with it.
2. Implementing the Ray's Path: The at(t) Method
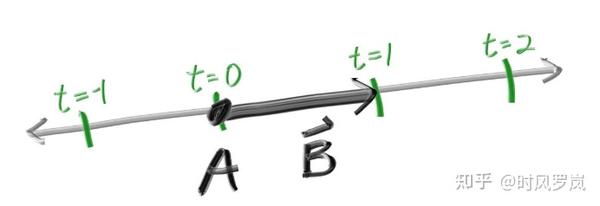
The most important part of this class is the at(t) method. This single line of code is the direct implementation of the equation .
return orig + t*dir;
Given your experience with linear algebra, you can appreciate how cleanly this C++ code represents the vector math. This is possible due to the operator overloading defined within the vec3 class (e.g., operator+ for vector addition and operator* for scalar multiplication). A single call to r.at(5.0) on a ray object r instantly gives us the 3D coordinates of the point that is 5 units along its direction from its origin.
Test your understanding!
Imagine you have a ray object instantiated in your C++ code like this:ray r(point3(10, 5, 0), vec3(-1, 0, 2));
What 3D point would be returned by the call r.at(3.0)?
Show answer
The at(3.0) method calculates .
So, the calculation is:
The method would return a point3 object representing the coordinate .
3. A Practical Walkthrough
To see how this ray.h file fits into our project and gets used, it's helpful to watch someone code it. The following video walks through the creation of the vec3 and ray classes. We'll focus only on the ray class portion.
Ray Tracing in One Weekend C++ Tutorial - Day 1 of 3 - PPM, SDL2, Vectors, Rays, Sphere
This video segment from a 'Ray Tracing in One Weekend' tutorial shows the creation of the ray.h file from scratch. It's a great way to see the code being implemented in context.
Watch the segment from 34:42 to 38:05. The presenter first recaps the ray equation and then implements the ray class in C++. Notice how the point_at_parameter function is identical in function to the at(t) method from the book.
You'll notice the presenter uses slightly different variable names (A, B, point_at_parameter) compared to the book's (orig, dir, at). This is common in programming, but the logic is identical. For our project, we will stick to the conventions used in the Ray Tracing in One Weekend book to maintain consistency.
Conclusion
In this lesson, you've taken a crucial step by turning an abstract mathematical formula into a concrete, reusable C++ class. This ray class is a foundational tool that we will use constantly from now on.
Key Takeaways:
- A C++
rayclass neatly encapsulates the two key components of a ray: an origin (point3) and a direction (vec3). - The
ray::at(t)method is a direct and efficient implementation of the parametric ray equation . - Thanks to operator overloading in our
vec3class, the C++ code forat(t)is clean, readable, and mirrors the mathematical formula.
Next Steps
Now that we can define and manipulate rays, we need something to do with them. A ray tracer's most basic function is to produce an image. In the next lesson, we will learn how to describe the structure of the PPM image format. This simple, text-based format will allow us to easily write our pixel data to a file and see the first visual output from our program.