Hello! Welcome back to your C++ ray tracing project.
In the last lesson, you built a lambertian material class. When a ray hits an object with this material, the scatter() method now tells us two things: the material's color (attenuation) and the direction of a new, randomly scattered ray. However, our ray_color() function currently ignores this new ray and stops after the first hit.
This lesson bridges that gap. Our goal is to implement recursive ray tracing to simulate multiple light bounces. We will modify our main ray_color() function to listen to the material and follow the new scattered ray. This process of a function calling itself is called recursion, and it's the key that unlocks the simulation of light bouncing around a scene, which is the foundation of photorealistic global illumination.
1. The Concept of Recursive Light Bounces
In the real world, the color we see from a point on a diffuse surface isn't just its own color; it's its color modulated by the light that's hitting it. That light might have come from a light source, or it might have bounced off another object first.
A path tracer simulates this by following a path of light backward from the camera.
- A ray from the camera hits point P1.
- To find out what light is arriving at P1, we ask its material for a new direction and cast a new ray from P1.
- This new ray might hit another point, P2. To find out the light arriving at P2, we repeat the process, casting another ray.
- This continues until a ray either hits a light source or flies off into the scene background.
The final color is the combination of the colors and attenuations gathered at each bounce. This "ray-spawning" process forms a tree of rays, as visualized below.
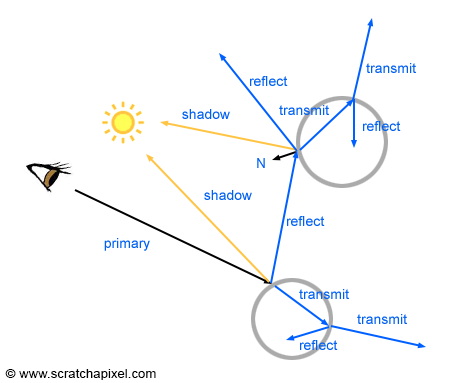
This process naturally maps to a recursive function. We can define ray_color as: "The color seen by this ray is the material's attenuation at the hit point, multiplied by the ray_color of the scattered ray."
Let's watch a short video that provides an excellent conceptual overview and pseudocode for this exact logic.
This lecture from UC Davis, titled "Recursive Ray Tracing," clearly explains the logic. We will focus on the section that presents the pseudocode for the recursive RayColor function.
Watch from 00:32:33 to 00:41:30. Pay close attention to the pseudocode structure and especially the line that demonstrates the recursive call for reflections: color += reflection_coefficient * RayColor(reflected_ray).
The key insight from the video is that the RayColor function calls itself to determine the contribution from reflected or scattered rays. This is exactly what we will implement.
2. Modifying ray_color() for Recursion
Right now, your ray_color() function probably looks something like this, returning a color based on the surface normal for debugging or just the material's color:
// Old version - for illustration
color ray_color(const ray& r, const hittable& world) {
    hit_record rec;
    if (world.hit(r, 0.001, infinity, rec)) {
        // Simple visualization of normals
        return 0.5 * (rec.normal + color(1, 1, 1));
    }
    // Background
    // ...
}
We will now modify it to perform the recursive step. Inside the if (world.hit(...)) block, we will:
- Call the material's
scatter()method. - If it successfully scatters a ray, we will recursively call
ray_color()with the new scattered ray. - The result of this recursive call will then be multiplied by the material's
attenuationcolor.
This simulates the energy loss and color filtering at each bounce. For example, when a white light ray hits a red ball, the attenuation is red. The scattered ray continues, and whatever color it finds will be multiplied by red, effectively tinting the light path. This is how "color bleeding" emerges naturally from the algorithm.
3. The Problem: Infinite Recursion
There's a critical flaw in the logic so far. What if a ray gets stuck bouncing between two parallel mirrors? It would recurse forever, quickly exhausting the program's memory and causing a stack overflow crash.
To prevent this, we must set a limit on the number of bounces. We'll add a depth parameter to our ray_color() function. Each time we recurse, we'll decrement the depth. If it reaches zero, we stop the recursion and return black, signifying that the light's energy has been fully absorbed or that we've simply stopped tracing its path.
This is a standard technique in recursive algorithms and is essential for a working ray tracer. To understand its implementation, let's review a clear C++ pseudocode example.
Implementing Whitted Ray-Tracing in C++
The article 'Overview of the Ray-Tracing Rendering Technique' on Scratchapixel provides an excellent high-level C++ structure for a recursive ray tracer, including the handling of recursion depth.
Read the section 'Implementing Whitted Ray-Tracing in C++'. Focus on the structure of the castRay() function. Notice how it takes a depth parameter, checks it at the beginning, and passes depth + 1 in its recursive calls. We will use a similar approach.
4. Implementation: The New ray_color()
Now, let's bring these concepts together into code. You will update your ray_color() function and the main render loop that calls it.
1. Update the ray_color function signature:
It now needs to accept the recursion depth.color ray_color(const ray& r, const hittable& world, int depth)
2. Add the "bail out" condition:
This is the base case for the recursion. If we're out of bounces, the path contributes no light.
// Inside ray_color()
if (depth <= 0) {
    return color(0, 0, 0);
}
3. Implement the recursive call:
Replace the old logic inside if (world.hit(...)) with the scatter-and-recurse logic.
// Inside ray_color(), after the depth check
hit_record rec;

// Using a t_min of 0.001 helps avoid "shadow acne" where a ray re-intersects the surface it just left.
if (world.hit(r, 0.001, infinity, rec)) {
    ray scattered;
    color attenuation;
    if (rec.mat->scatter(r, rec, attenuation, scattered)) {
        return attenuation * ray_color(scattered, world, depth - 1);
    }
    return color(0, 0, 0); // Material absorbed the ray (e.g., a future black hole material)
}
Note: In the previous lesson, you created the material as a shared_ptr. Depending on your hit_record implementation, you might access it via rec.mat_ptr or rec.mat.
4. Update the main render loop:
In your main() function, define a max depth and pass it in the initial call to ray_color() for each pixel sample.
// In main()
const int image_width = 400;
const int image_height = 225;
const int samples_per_pixel = 100;
const int max_depth = 50; // Maximum number of ray bounces

// ... scene setup ...

for (int j = image_height-1; j >= 0; --j) {
    std::cerr << "\rScanlines remaining: " << j << ' ' << std::flush;
    for (int i = 0; i < image_width; ++i) {
        color pixel_color(0, 0, 0);
        for (int s = 0; s < samples_per_pixel; ++s) {
            auto u = (i + random_double()) / (image_width-1);
            auto v = (j + random_double()) / (image_height-1);
            ray r = cam.get_ray(u, v);
            pixel_color += ray_color(r, world, max_depth); // Pass max_depth here
        }
        write_color(std::cout, pixel_color, samples_per_pixel);
    }
}
Once you've made these changes and recompile, your diffuse spheres should no longer look like flat circles. They will appear as solid, shaded objects, and if you have a ground plane, you may even notice subtle color bleeding between objects.
Test your understanding!
Consider the line: return attenuation * ray_color(scattered, world, depth - 1);
If a white ray (1,1,1) hits a pure red sphere albedo=(1,0,0), and the subsequent scattered ray hits a pure blue sphere albedo=(0,0,1), and that second scattered ray flies off into a black background (0,0,0), what color is returned from the very first call to ray_color?
- Red
(1,0,0) - Blue
(0,0,1) - Black
(0,0,0) - Purple
(1,0,1)
Show answer
- Black
(0,0,0)
Let's trace it:
- The second bounce (
depth = max_depth - 1) hits the blue sphere. Its material scatters a ray. The recursive callray_color(..., depth-2)returns the black background color(0,0,0). The return value for this level isattenuation_blue * blackwhich is(0,0,1) * (0,0,0) = (0,0,0). - The first bounce (
depth = max_depth) hits the red sphere. Its material scatters a ray. The recursive callray_color(..., depth-1)returns the result from the step above, which is black(0,0,0). The final return value isattenuation_red * blackwhich is(1,0,0) * (0,0,0) = (0,0,0).
This demonstrates how color is propagated: the final contribution to the pixel depends on what the end of the light path looks like. If our path had ended at a bright white light source instead of a black background, the result would have been red * blue * white, which is (0,0,0)! A red object and a blue object absorb all but red and blue light respectively, leaving nothing to reflect.
Conclusion
Congratulations! You have just implemented one of the most fundamental and powerful concepts in modern computer graphics. By making ray_color recursive, you've transformed your renderer from a simple object detector into a light transport simulator. This single change is what allows path tracers to generate incredibly realistic global illumination effects that are difficult or impossible with older techniques.
Key Takeaways:
- Recursive ray tracing simulates light bounces by having the
ray_colorfunction call itself with the new ray generated by a material'sscattermethod. - The final color is a product of the attenuation at each bounce, which correctly models how materials filter light.
- A recursion depth limit is essential to prevent infinite loops and keep render times manageable. It acts as the base case for the recursion.
Next Steps
So far, our only material causes rays to scatter randomly. What about shiny, metallic surfaces where light bounces off predictably? In our next lesson, we will derive the reflection formula for a vector about a normal. With that, we'll create a new metal material class that produces mirror-like reflections, which will plug directly into the powerful recursive renderer you've built today.