Hello! Welcome back to our C++ ray tracing project.
In our last session, we took a deep dive into the vector mathematics behind perfect, mirror-like reflections. You successfully derived the reflection formula, r = v - 2(v · n)n, which is the key to creating shiny surfaces.
Today, we'll put that theory into practice. Our goal is to implement a metal material class with configurable specular reflection fuzziness. This means we'll not only create perfectly polished mirrors but also simulate rougher metals with blurry reflections. This concept of "roughness" directly corresponds to the material parameters you're likely familiar with in production renderers like Arnold or Karma, bridging the gap between our simple tracer and industry-standard tools.
Let's get started.
1. Implementing Perfect Specular Reflection
First, we'll implement a perfectly smooth metal material. This involves creating a C++ function for the reflection formula we derived and then building a new metal material class that uses it.
The reflect Function
Let's translate our formula, r = v - 2(v · n)n, into a C++ helper function. Remember our convention:
vis the incoming ray's direction (pointing towards the surface).nis the surface normal (pointing out from the surface), which we assume is a unit vector.

The C++ implementation is a direct translation of this vector math. It will take the incoming vector v and the normal n and return the reflected vector.
The metal Material Class
Just like our lambertian class, the new metal class will inherit from our abstract material base class and override the scatter method. The logic inside scatter will be:
- Calculate the reflected direction by calling our new
reflectfunction. - Create a new scattered ray originating from the hit point (
rec.p) with this reflected direction. - Set the
attenuationcolor. For a metal material, the reflected light's color is modulated by the metal's surface color, which we call its albedo. So,attenuationis simply the albedo of our metal. - Return
trueto signify that the ray was successfully scattered.
Ray Tracing in One Weekend: Metal
The web page 'Ray Tracing in One Weekend: Metal', based on the book by Peter Shirley, provides the exact C++ code we need for both the reflect function and the initial metal class. It's a great practical guide to implementing these concepts.
Please read the subsection 'Metal Reflection'. It provides the reflect function and the first version of the metal class. Pay close attention to how the scatter method is implemented.
After implementing the code from the resource, you'll have a metal class that looks something like this:
class metal : public material {
    public:
        metal(const color& a) : albedo(a) {}

        virtual bool scatter(
            const ray& r_in, const hit_record& rec, color& attenuation, ray& scattered
        ) const override {
            vec3 reflected = reflect(unit_vector(r_in.direction()), rec.normal);
            scattered = ray(rec.p, reflected);
            attenuation = albedo;
            return true;
        }

    public:
        color albedo;
};
(Note: I've adapted the code to our existing class structure. Your implementation should follow this pattern.)
At this point, you can add some metal spheres to your scene and see perfect, mirror-like reflections!
2. Simulating Roughness with Fuzziness
Perfect mirrors are rare. Most metallic surfaces have microscopic imperfections that cause light to scatter slightly, blurring the reflection. In PBR terminology, this is controlled by the Roughness parameter. We'll call it fuzziness.
So, how do we simulate this? Instead of reflecting the ray in a single, perfect direction, we'll slightly randomize it. The idea is to pick a random point in a small sphere around the tip of the "perfect" reflection vector and use that as our new direction. The fuzz parameter will control the radius of this sphere: a larger radius means more scattering and a blurrier reflection.
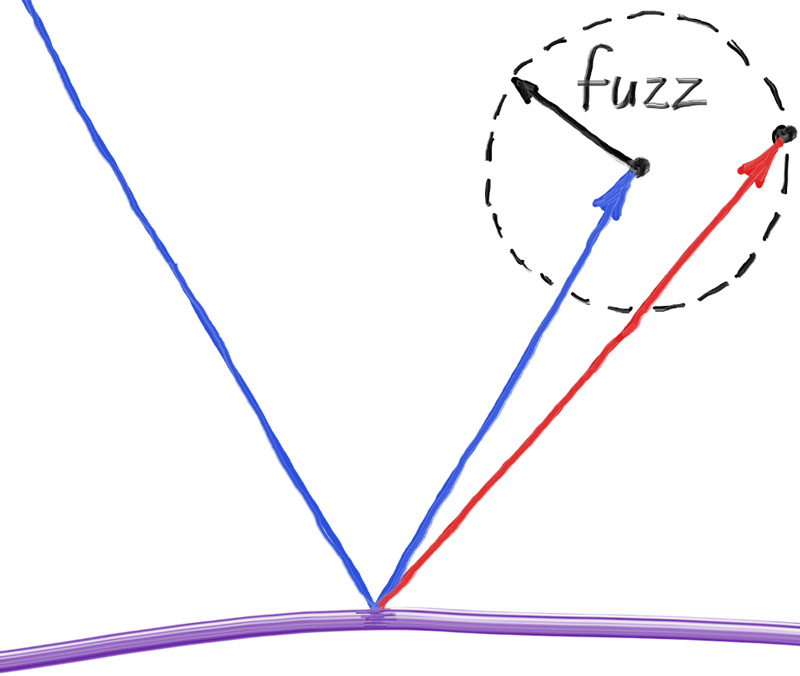
To implement this, we'll modify our metal class:
- Add a
fuzzmember variable (adoubleorfloat). - Update the constructor to accept a fuzziness value. It's good practice to clamp this value between 0 and 1.
- In the
scattermethod, after calculating thereflectedvector, add a random vector to it. A good way to get this random vector is by using therandom_in_unit_sphere()function (which you should already have from implementing the Lambertian material) and scaling it by thefuzzvalue.
new_direction = reflected + fuzz * random_in_unit_sphere() - Create the scattered ray with this new, fuzzed direction.
Ray Tracing in One Weekend: Metal
The same web page also covers how to implement fuzzy reflections. It provides the final version of the metal class.
Now, read the 'Fuzzy Metal' subsection. Focus on how the metal class is modified to include the fuzz parameter and how the scatter method is updated to generate the perturbed reflection.
Handling an Edge Case
There's one final detail. If the surface is very rough (fuzz is large) and the ray hits the surface at a grazing angle, the randomized reflected ray might scatter below the surface. This is physically incorrect and can cause visual artifacts.
We can detect and prevent this by checking if the new scattered direction is pointing away from the surface. A simple way to do this is with a dot product: if dot(scattered.direction(), rec.normal) is positive, the ray is pointing away from the surface. If it's zero or negative, we should discard the ray (by returning false from scatter), effectively having the surface absorb it.
The final scatter method will look something like this:
virtual bool scatter(
    const ray& r_in, const hit_record& rec, color& attenuation, ray& scattered
) const override {
    vec3 reflected = reflect(unit_vector(r_in.direction()), rec.normal);
    scattered = ray(rec.p, reflected + fuzz * random_in_unit_sphere());
    attenuation = albedo;
    return (dot(scattered.direction(), rec.normal) > 0);
}
Now you have a fully functional metal material with adjustable roughness! You can create objects in your scene like this:
// A polished gold sphere
auto material_gold = make_shared<metal>(color(0.8, 0.6, 0.2), 0.0);
world.add(make_shared<sphere>(point3(-1, 0, -1), 0.5, material_gold));

// A rough, brushed aluminum sphere
auto material_aluminum = make_shared<metal>(color(0.8, 0.8, 0.8), 0.3);
world.add(make_shared<sphere>(point3(1, 0, -1), 0.5, material_aluminum));
Test your understanding!
You create two spheres, both with a metal material.
- Sphere A has
fuzz = 0.0. - Sphere B has
fuzz = 1.0.
How would you expect the reflections on Sphere A and Sphere B to differ visually? How would the reflection on Sphere B compare to a sphere with a lambertian (diffuse) material?
Show answer
- Sphere A (
fuzz = 0.0) would act as a perfect mirror. Reflections of other objects would be sharp and clear. - Sphere B (
fuzz = 1.0) would have very blurry, hazy reflections. You might be able to make out the general color and shape of reflected objects, but no fine details. - Compared to a Lambertian sphere, Sphere B would still look metallic. The light scattering, while random, is centered around the perfect reflection direction. This means it will still catch specular highlights from light sources. A Lambertian sphere scatters light equally in all directions across its hemisphere, resulting in a completely matte appearance with no distinct reflections or highlights.
Conclusion
Fantastic work! You've just implemented one of the most fundamental material types in computer graphics. By building on the mathematical foundation from the last lesson, you've created a versatile metal material that can simulate surfaces from polished mirrors to brushed aluminum.
Key Takeaways:
- The reflection formula
r = v - 2(v · n)ntranslates directly into a C++ helper function. - A
metalmaterial class can be created by implementing ascattermethod that returns a reflected ray. The material'salbedodetermines theattenuationcolor. - Fuzziness or roughness is simulated by perturbing the perfect reflection vector with a random vector scaled by a
fuzzparameter. - An edge case check using
dot(scattered_direction, normal) > 0ensures that fuzzed rays don't scatter below the surface.
Next Steps
Our rendered images are starting to look quite good, but there's a subtle issue with how they appear on a monitor. Our calculations of light are all linear, but our eyes and screens don't perceive brightness linearly. In the next lesson, we will apply gamma correction to our final pixel colors. This is a crucial step that will make the lighting and shadows in our scenes look much more natural and pleasing to the eye.