Hello! Welcome to the fourth lesson in our C++ foundations module.
In our previous lessons, we've built up a solid C++ toolkit. We learned how to define our own data types with classes, manage dynamic lists of objects with std::vector, and handle memory automatically and safely using smart pointers like std::shared_ptr. We now have the tools to create and manage the objects in our scene. But a ray tracer isn't much use if we can't see the image it produces!
Today, we'll build the final piece of our foundational C++ knowledge. This lesson addresses the learning outcome: write image data to files using std::ofstream. We will learn how to take the pixel data that our ray tracer will eventually generate and save it as an image file that you can open and view. This is the crucial link between the abstract calculations in your program and a concrete, visual result.
1. The Basics of Writing to a File in C++
Before we can write an image file, we first need to understand the general mechanism for file output in C++. The C++ Standard Library provides a powerful tool for this in the <fstream> header: std::ofstream, which stands for "output file stream".
Think of a stream as a conduit. Just as you use std::cout to stream characters to the console, you use std::ofstream to stream data into a file. The basic process is always the same:
- Include the
<fstream>header. - Create an
std::ofstreamobject. - Open a specific file.
- Write data to the stream using the
<<operator. - Close the file to ensure all data is saved.
To get a quick, practical overview of this process, let's watch a short video.
Using ofstream To Write To Files | C++ Tutorial
This tutorial from Portfolio Courses demonstrates the fundamental usage of std::ofstream in just a few minutes.
Watch the following segments: 00:00 - 01:05: This covers the core workflow of including <fstream>, creating an object, opening a file, writing, and closing. 01:05 - 01:40: This shows how to check if a file failed to open, which is an important piece of robust programming. 04:47 - 04:58: This reinforces the importance of closing the file. Focus on the syntax and the sequence of operations.
As you saw, the syntax is straightforward and mirrors how you already use std::cout. This simple mechanism is all we need to write any kind of text-based file, including our first images.
2. Choosing an Image Format: The Case for PPM
You're familiar with many image formats from your work in VFX—EXR, TIFF, PNG, JPEG, etc. Most of these formats are complex. They involve sophisticated compression algorithms, metadata handling, and binary data structures. Writing a library to create a .png or .exr file is a project in itself!
For learning, we want to focus on the ray tracing logic, not the intricacies of file formats. Therefore, we'll start with the Portable Pixmap (PPM) format. It is the "hello world" of image formats.
The ASCII version of PPM (which we'll use) is incredibly simple: it's a plain text file. You can open it in a text editor and see the pixel values directly. This makes it perfect for learning and debugging.
A PPM file consists of two parts:
- A Header: A few lines of text defining the image properties.
- Pixel Data: A list of RGB (Red, Green, Blue) color values for every pixel in the image.
Let's watch a video that introduces the format and its structure.
C++ Image Programming From Scratch - 4.1
This video from Ferrabacus explains the PPM format and why it's a great choice for learning image programming from scratch.
Watch from 00:16 to 06:15. Pay close attention to the explanation of the P3 PPM header and how the pixel data is laid out.
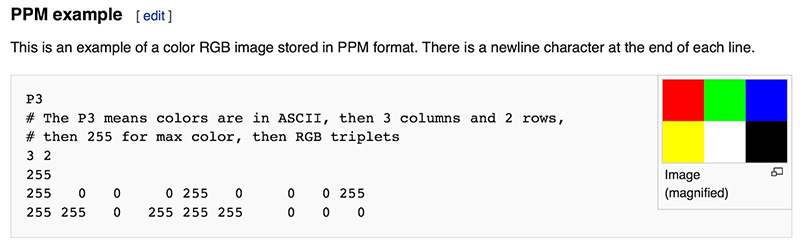
To summarize, the structure of a P3 (ASCII color) PPM file is:
- The "magic number"
P3. - The image
widthandheight, separated by a space. - The maximum color value (we'll use
255). - The pixel data: a series of RGB triplets, where each value is an integer from 0 to 255. Pixels are listed row by row, from top to bottom, and within each row, from left to right.
Here is a great visualization of this structure:
3. Implementation: Writing Your First Image
Now, let's combine our knowledge of std::ofstream and the PPM format to write a program that generates an image. We'll create a simple gradient.
The logic is as follows:
- Define the image dimensions.
- Open an output file stream to
image.ppm. - Write the PPM header (
P3, width, height, 255). - Use a nested loop. The outer loop will iterate over the image rows (from top to bottom), and the inner loop will iterate over the columns (from left to right).
- Inside the inner loop, calculate a color for the current pixel. We can map the pixel's
(x, y)coordinates to RGB values to create a gradient. - Write the R, G, and B integer values to the file, separated by spaces.
- Close the file.
The following video segment walks through this exact process.
C++ Image Programming From Scratch - 4.1
This continues the Ferrabacus video, demonstrating the live coding of a program that generates a PPM image.
Watch from 08:44 to 15:10. This is the core implementation part of the lesson. Follow along as the code is built: Setting up the ofstream and writing the header. Implementing the nested loops to iterate through pixels. Calculating and writing color values for each pixel.
Here is a complete, clean version of the code to generate a gradient image. This is the code you will build upon.
#include <iostream>
#include <fstream>

int main() {
    // Image dimensions
    const int image_width = 256;
    const int image_height = 256;

    // Open the file
    std::ofstream ppm_file("image.ppm");

    // Write the PPM header
    ppm_file << "P3\n";
    ppm_file << image_width << " " << image_height << "\n";
    ppm_file << "255\n";

    // Write the pixel data
    for (int j = 0; j < image_height; ++j) {
        // Optional: Print progress to the console
        std::cerr << "\rScanlines remaining: " << (image_height - 1 - j) << ' ' << std::flush;

        for (int i = 0; i < image_width; ++i) {
            // Generate a color based on pixel coordinates
            auto r = double(i) / (image_width - 1);
            auto g = double(j) / (image_height - 1);
            auto b = 0.25;

            // Convert float [0,1] to integer [0,255]
            int ir = static_cast<int>(255.999 * r);
            int ig = static_cast<int>(255.999 * g);
            int ib = static_cast<int>(255.999 * b);

            // Write the pixel color to the file
            ppm_file << ir << ' ' << ig << ' ' << ib << '\n';
        }
    }

    // Close the file
    ppm_file.close();
    std::cerr << "\nDone.\n";

    return 0;
}
Note on Color Conversion:
Notice the lines static_cast<int>(255.999 * r). In our ray tracer, colors will be calculated as floating-point numbers, typically in the range [0.0, 1.0]. To write them to a standard PPM file, we must convert them to integers in the range [0, 255]. We do this by multiplying by 255. Using 255.999 ensures that a value of 1.0 becomes 255 and doesn't accidentally round up to 256. This process is called quantization. The Scratchapixel article "Digital Images: from File to Screen" discusses this in more detail in its "Image Quantization" section if you're curious.
Test your understanding!
Modify the code snippet above to generate a different image. Instead of the current gradient, create an image where:
- The red component is fixed at
0. - The green component varies from
0to255based on the pixel's horizontal position (i). - The blue component varies from
0to255based on the pixel's vertical position (j).
What do you expect the final image to look like?
Show answer
You would modify the color calculation inside the loops like this:
// Generate a color based on pixel coordinates
auto r = 0.0;
auto g = double(i) / (image_width - 1);  // Green varies horizontally
auto b = double(j) / (image_height - 1); // Blue varies vertically
The resulting image should be black at the top-left corner (0,0,0), transition to pure green at the top-right corner (0,255,0), pure blue at the bottom-left corner (0,0,255), and a mix of green and blue (cyan) at the bottom-right corner (0,255,255).
Key Takeaways
- The
std::ofstreamclass from the<fstream>library is the standard C++ tool for writing data to files. - The basic file writing workflow is to create a stream object, open a file, write to it with
<<, and close it. - The Portable Pixmap (PPM) format is a simple, text-based image format that is ideal for learning and debugging graphics programs.
- Generating a PPM image involves writing a simple header followed by RGB color data for each pixel, typically using nested loops to iterate over the image dimensions.
- Colors computed as floating-point values must be quantized (scaled and converted) to integer values before being written to an 8-bit-per-channel image format like PPM.
Next Steps
This lesson completes our C++ foundations module. You now have all the essential building blocks: defining objects with classes, managing collections with std::vector, handling memory with smart pointers, and now, saving your results to a file with std::ofstream.
Our project is about to grow beyond a single main.cpp file. In the next lesson, we will cover the final topic of this module: Organize C++ code across multiple header and source files for a scalable project structure. This will prepare us to build a clean, maintainable ray tracer as we move into the next module, "Rays, Pixels, and Image Output."