Hello! Welcome to the fifth and final lesson of our C++ Foundations module.
In the last lesson, we connected our code to the outside world by learning to write image data to a file using std::ofstream. With that, our simple, single-file program can produce a visible result. However, as you know from your work as a pipeline TD, real-world projects are rarely contained in a single file. As we add more features—spheres, materials, a camera—our main.cpp would quickly become thousands of lines long and impossible to manage.
Today, we'll address this by tackling the learning outcome: Organize C++ code across multiple header and source files for a scalable project structure. We will learn the standard professional practice for breaking a C++ application into logical, reusable, and maintainable pieces. This is the architectural blueprint that will allow our ray tracer to grow in complexity without collapsing into chaos.
This lesson bridges the gap between foundational C++ syntax and the actual structure of our ray tracer project, setting us up perfectly for the next module.
1. The Core Principle: Declaration vs. Definition
The fundamental reason C++ projects are split into multiple files lies in the way the compiler works. It processes one source file (.cpp) at a time, in a process called compilation. Each .cpp file it compiles is called a translation unit. After all translation units are compiled into intermediate object files, a separate program called the linker joins them together to create the final executable.
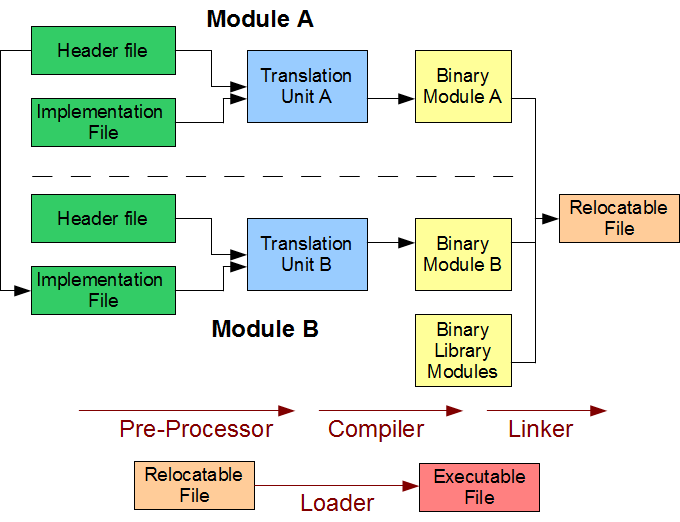
This process creates a problem: if the compiler is working on main.cpp, and you call a function that is defined in utils.cpp, how does the compiler know that function even exists? It hasn't seen utils.cpp yet.
The solution is to provide a declaration of the function in main.cpp. A declaration is a promise that says, "A function with this name, return type, and parameters exists somewhere." The actual code, the definition, can be in another file.
Managing these declarations manually would be a nightmare. This is where header files (.h or .hpp) come in. They act as a central, shareable collection of declarations.
To see this in action, let's watch a clear explanation of why header files are necessary and how they solve this core problem.
This video from The Cherno's excellent C++ series explains the role of header files by demonstrating the problem of using a function from another file.
Watch from 00:42 to 06:21. Focus on these key points: The error you get when you try to use a function in one .cpp file that's defined in another. How a function declaration (the signature without the body) solves the compilation error. How moving these declarations into a header file (.h) and using #include automates this process.
In summary:
- .cpp files (Source files) contain definitions—the actual implementation of your functions and methods.
- .h files (Header files) contain declarations—the interfaces (e.g., class definitions, function signatures) that you want to share across different
.cppfiles.
2. Header Guards: Preventing Repetition
When you #include a file, the preprocessor literally copies and pastes its contents into your source file. This leads to a new problem: what if multiple files you include all include the same header?
For example, ray.h might include vec3.h, and sphere.h might also include vec3.h. If your main.cpp then includes both ray.h and sphere.h, the contents of vec3.h would be pasted into main.cpp twice. This would lead to a "redefinition" error, because you'd be defining the vec3 class twice in the same translation unit.
To prevent this, we use header guards. There are two common methods.
Let's continue with the same video from The Cherno, which now explains how to solve the multiple-inclusion problem.
Watch from 06:21 to 11:30. Pay attention to: #pragma once: A simple, modern directive that tells the compiler to include this file only once per translation unit. Traditional Include Guards (#ifndef/#define/#endif): The classic method that achieves the same goal. It's good to recognize this pattern as you'll see it in a lot of existing code.
For our project, we will use #pragma once. It's cleaner and supported by all major modern compilers. You should place it at the very top of every header file you create.
// In a file like vec3.h
#pragma once

// The rest of your header file contents go here...
class vec3 {
    // ...
};
3. A Professional Directory Structure
Now that we know the roles of .h and .cpp files, how do we organize them? Simply throwing them all into one folder doesn't scale. We'll adopt a standard structure used in professional software development.
A well-organized project clearly separates source code, public interfaces, build artifacts, and external libraries. This makes the project easy to navigate, build, and maintain.
The following article provides an excellent overview of a standard C++ project layout.
How to Organize a C++ Project: Directory Structure and ...
This article from studyplan.dev, 'Organizing a C++ Project', details a conventional and scalable directory structure. It forms the basis of how we will build our ray tracer.
Please read the sections 'Typical Project Directory Layout' and 'Header and Source File Organization'. Focus on understanding the purpose of each directory (src, include, build, libs) and the concept of public vs. private headers.
Here is a visual summary of such a structure:
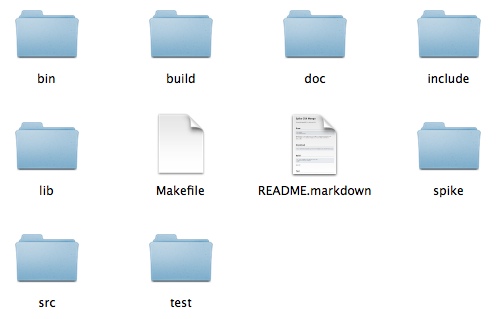
Key principles for our project:
src/directory: This will contain all our.cppimplementation files, includingmain.cpp.include/directory: This will contain the public header files (.h) for our classes (vec3,ray,camera, etc.). These files define the "public API" of our ray tracer's components.build/directory: This is where all compiler output (object files, the final executable) will go. This is called an out-of-source build. It keeps our source directories clean; to do a full rebuild, you can simply delete thebuildfolder. We will configure our tools to work this way.#includepaths: When including our own headers, we will use quotes:#include "vec3.h". When including standard library headers, we will use angle brackets:#include <vector>.
Test your understanding!
Imagine we are creating a Camera class for our ray tracer. It has a public method get_ray() that users will call, and a private helper method calculate_orientation() that is only used internally by other Camera methods.
Based on the principles above:
- In which file would you put the
class Camera { ... };definition? - In which file would you put the implementation of the
get_ray()method (e.g.,Ray Camera::get_ray(...) { ... })? - What about the implementation of
calculate_orientation()?
Show answer
- The class definition
class Camera { ... };goes ininclude/camera.h. This is the public interface. - The implementation of the public method
get_ray()goes insrc/camera.cpp. - The implementation of the private helper method
calculate_orientation()also goes insrc/camera.cpp. All implementation details belong in the source file, regardless of whether the method is public or private.
4. Case Study: Structuring Our Ray Tracer
Let's look at how this applies directly to a project like ours. The blog post below shows an example of someone taking the code from Ray Tracing in One Weekend (which we are following) and refactoring it from a flat structure into a modular one.
[C++] Hands-on Learning C++ from Code: Reading and ...
This post from dev.to shows a practical refactoring of the ray tracing project, moving from a messy, flat file structure to a clean, hierarchical one.
Read the section 'Improving the file structure'. Compare the 'before' and 'after' directory trees to see a tangible example of the organization we are aiming for.
The "after" structure in that article is a great goal. For now, we will start with a simpler version and build it out as we add features. Our initial project structure will look like this:
my-ray-tracer/
├── build/          // Will be created by our build commands
├── include/
│   └── vec3.h      // Will be one of our first classes
├── src/
│   ├── main.cpp
│   └── vec3.cpp
└── image.ppm       // Output will be saved in the root
As we proceed, we will add ray.h/.cpp, camera.h/.cpp, hittable.h/.cpp, and so on, following this clean separation of interface and implementation. A build tool like CMake is typically used to manage the compilation of such a project, automatically finding all the files and linking them correctly. We won't dive into CMake syntax just yet, but we will use simple build commands that follow its principles.
Key Takeaways
- Separation of Concerns: Use header (
.h) files for declarations (the "what") and source (.cpp) files for definitions (the "how"). - Header Guards: Always use
#pragma onceat the top of every header file to prevent redefinition errors during compilation. - Standard Directory Structure: Organize your project with
src/for source files,include/for headers, and abuild/directory for an "out-of-source" build. - Scalability: This modular structure is essential for managing complexity. It allows you to work on one component at a time and makes your code easier for others (and your future self) to understand.
Next Steps
Congratulations on completing the C++ Foundations module! You now have the essential C++ skills and the architectural knowledge to start building our ray tracer in a professional, scalable way.
In our next lesson, we will begin Module 2: Rays, Pixels, and Image Output. We will formally define what a ray is and implement our very first component, the Ray class, using the new multi-file structure we learned today.