Hello! Welcome back to our course.
In our last lesson, we focused on making data complete and trustworthy by handling missing values. You're now equipped to teach managers how to remove, replace, and fill in gaps in their datasets. Now that we've addressed the completeness of the data, our next step is to ensure it has the right structure for analysis.
This lesson tackles a very common data structuring task: splitting a single column into multiple columns based on a delimiter. Often, data is exported in a condensed format, like a full name in one column ("John Smith") or a full address in another ("123 Main St, Anytown, USA"). For any meaningful analysis—like grouping by last name or mapping locations by state—this information needs to be separated. By the end of this lesson, you'll be able to guide your workshop participants through this essential Power Query technique.
Why Split Columns? The Business Case for Managers
Before diving into the "how," it's crucial to explain the "why" to your audience of managers. They need to see this not as a technical chore, but as a gateway to better insights. Here are some scenarios you can use:
- Customer Analysis: A
Full Namecolumn is hard to work with. Splitting it intoFirst NameandLast Nameallows for personalization and proper sorting. - Geographic Reporting: An
Addresscolumn containing "City, State" is not directly usable for a map visual. Splitting it allows managers to filter reports by state or see sales distribution by city. - Product Information: A
Product Codelike"HDWR-BOLT-10mm"contains multiple pieces of information. Splitting it by the hyphen delimiter (-) intoCategory,Item, andSizecolumns enables analysis of sales by product category.
The core message is that splitting columns unlocks the individual components of their data, making filtering, sorting, and visualization much more powerful.
The Main Tool: Split Column by Delimiter
Power Query makes this task incredibly simple. The primary feature is Split Column by Delimiter.
First, you'll need to show your participants where to find this function.
Split columns by delimiter - Power Query
The official Microsoft documentation, 'Split columns by delimiter', clearly points out the three places you can access this feature. It's good to show all three so managers can use whichever is most convenient.
Review the short section 'Where to find Split Columns > By Delimiter'. It shows the locations on the Home tab, the Transform tab, and in the right-click menu.
Here's a visual guide you can use in your workshop to make it even clearer:
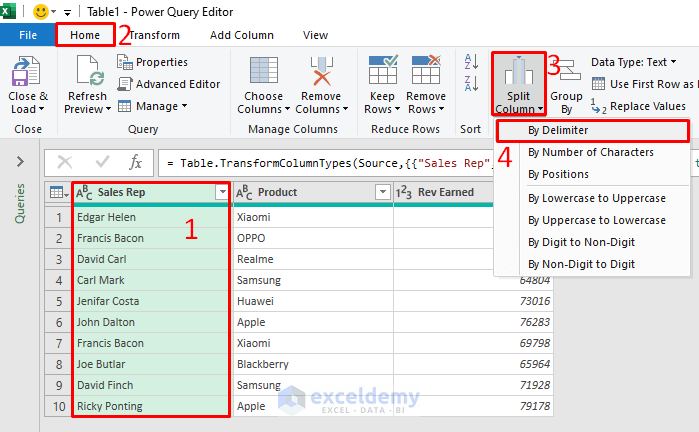
Once you've selected the column you want to split and chosen the "By Delimiter" option, Power Query will open a dialog box. It's quite intelligent and will often guess the correct delimiter (like a space, comma, or tab).
16 - Split Columns in Power Query in Excel
This video from TrumpExcel provides a great initial demonstration. It covers the basics of selecting a column, opening the split column dialog, and letting Power Query do the work.
Watch from the beginning to 3:18. Pay attention to how the video explains the three main splitting options: 'leftmost delimiter', 'rightmost delimiter', and 'each occurrence'. This is a critical concept for your participants to grasp.
Choosing Your Split Strategy
As the video explained, the "Split at" option is key. You'll want to teach your managers to choose the right strategy for their specific data:
- Left-most delimiter: Splits the column into two at the first occurrence of the delimiter. Perfect for splitting
"John Smith"into"John"and"Smith". - Right-most delimiter: Splits the column into two at the last occurrence of the delimiter. This is very useful for names with middle initials, like
"Walter J Miller". Using the right-most space ensures you get"Walter J"and"Miller". - Each occurrence of the delimiter: Creates a new column for every instance of the delimiter. Ideal for data like
"PartA/PartB/PartC", which would result in three separate columns.
After splitting, Power Query automatically names the new columns (e.g., Name.1, Name.2). A crucial final step you must teach is to double-click the new column headers and rename them to something meaningful, like First Name and Last Name.
Practical Workshop Scenarios
To make this concrete for your audience, you can walk them through a few common business scenarios.
Scenario 1: Handling Inconsistent Spacing
Data is rarely perfect. Sometimes a delimiter might be surrounded by extra spaces, like "Sales / John Doe". If you only use / as the delimiter, you'll be left with " Sales" and " John Doe", with unwanted leading spaces that need to be cleaned.
There's a more efficient way.
How to Split and Transform Text in Excel (Unbelievable Power Query Tricks)
This video from Leila Gharani demonstrates a fantastic pro-tip: including the surrounding spaces within the custom delimiter itself. This cleans and splits the data in a single step.
Watch from 3:57 to 5:51. The key moment is when she adjusts the delimiter from just a slash (/) to space / space. This is a powerful and practical trick to teach.
Scenario 2: Splitting by Special Characters (like a Line Break)
Sometimes, data is separated not by a visible character, but by a line break within a single cell. This often happens with data copied from other applications. Power Query is smart enough to handle this.
16 - Split Columns in Power Query in Excel
Let's return to the TrumpExcel video, which shows exactly how Power Query handles a line feed delimiter.
Watch from 3:18 to 5:10. This demonstrates that Power Query can automatically detect non-standard delimiters like line feeds and gives you the option to select them manually from a list of special characters.
Advanced Splitting Techniques
For more complex data, Power Query offers even more powerful tools. While these might be "advanced" for a beginner workshop, showing a quick example can highlight the power of the software.
- Splitting by Text Position: You can split a column by the number of characters (e.g., split after the first 2 characters to separate a state code like
"CA"from the rest of an ID). - Splitting by Content: You can split based on the transition from a number to a letter, or vice versa. This is perfect for extracting an ID number embedded in text, like
"EmployeeID12345". The video by Leila Gharani (from 5:51 to 7:09) shows a great example of this. - Splitting into Rows: What if a cell contains a list of items, like
"Apples, Oranges, Bananas", and you want to analyze each item individually? Instead of splitting into many columns, you can split into rows. This would transform the single row into three rows, one for each fruit.
Split Column by Delimiter in Power BI and Power Query
This article from RADACAD explains when splitting to rows is a better choice than splitting to columns. It's a useful concept for your managers to be aware of.
Read the section 'Split into Rows'. The key idea is that this method is best when the different parts of the text carry the same logical meaning (e.g., a list of products or tags).
Test your understanding!
A manager has a dataset with a column named Order Details containing data in the format "Product_ID - Customer_Name". For example, one cell might contain "PROD4521 - Smith, John".
To prepare this for analysis, they need three separate columns: ProductID, LastName, and FirstName. What sequence of 'Split Column' operations would you teach them to achieve this?
Show answer
- First Split: Select the
Order Detailscolumn. Use Split Column by Delimiter. Choose a custom delimiter of" - "(space, hyphen, space) and split at the left-most delimiter. This creates two columns:PROD4521andSmith, John. Rename the first new column toProductID. - Second Split: Select the second new column (containing
Smith, John). Use Split Column by Delimiter again. This time, use a comma (,") as the delimiter and split at the left-most delimiter. This creates two more columns:SmithandJohn. - Clean and Rename: Rename the final two columns to
LastNameandFirstName. You may also need to use theTrimfunction (under theFormatmenu) on theFirstNamecolumn to remove the leading space.
Conclusion
You are now ready to teach managers how to reshape their data by splitting columns. This is a fundamental skill that moves them beyond just cleaning data to actively structuring it for meaningful analysis.
Key Takeaways for Your Workshop:
- Always start with the "why": splitting columns unlocks deeper analysis of categories, locations, names, and more.
- The primary tool is Split Column by Delimiter, accessible from the Home/Transform tabs or the right-click menu.
- Teach the three main strategies: splitting at the left-most, right-most, or each occurrence of the delimiter.
- Show practical tricks, like including spaces in the delimiter to clean and split simultaneously.
- Always remind them to rename the new columns for clarity.
Preview of the Next Lesson:
We've learned how to break columns apart. But what about the reverse? In the next lesson, we will cover merging multiple columns into a single column, the logical counterpart to splitting. This is useful for creating unique IDs or concise labels for reports.