Introduction
Welcome back! In our last lesson, you created a functional floor plan for your beauty mini-market. You mapped out the major zones, defined the customer flow, and allocated space for essential areas like the checkout and back of house. You now have the architectural blueprint of your store.
Today, we will bring that blueprint to life. The learning outcome for this lesson is to describe key visual merchandising techniques for displaying beauty products effectively. We'll zoom in from the overall layout to the individual shelves and display tables. If the floor plan was your website's wireframe, visual merchandising is the UI/UX design—the art and science of presenting products in a way that is intuitive, attractive, and persuasive. Given your background in digital marketing, you'll find many parallels between creating a great user experience online and a great shopper experience in-store.
1. The Fundamental Principles of Display
Before we focus on beauty products specifically, let's cover the universal rules that govern effective visual merchandising. These principles are the foundation for creating displays that are pleasing to the eye and easy for customers to understand.
The video 'Visual Merchandising Basics' from ZenGenius, Inc. provides an excellent overview of these core concepts. As you watch, notice how these principles work together to create a cohesive presentation.
Please watch the following segments: Vertical and Horizontal Merchandising (00:31 - 01:11) Pyramiding (01:11 - 01:35) Consistency and Repetition (02:22 - 03:06) The Power of Three (04:56 - 05:39) Focus on how these simple rules create structure and visual appeal.
Let's translate these core principles to your beauty mini-market:
-
Vertical & Horizontal Merchandising: This is about creating clean lines that are easy for the eye to follow.
- Vertical: Group a single product line (e.g., a specific brand's moisturizers, cleansers, and serums) in a column from top to bottom. This helps customers see the entire range at a glance.
- Horizontal: Arrange products of the same type (e.g., all brands of vitamin C serums) across a single shelf. This is excellent for comparison. You'll likely use both methods in different parts of your store.
-
Pyramiding: This is a classic technique for creating a focal point. When setting up a display table, place the tallest item in the center and arrange shorter items on either side, forming a triangle shape. This naturally draws the eye to the hero product at the top.
-
The Rule of Three (or The Power of Three): This is a powerful and simple concept. The human brain finds groupings of three to be inherently more appealing and memorable. Instead of placing one lonely product or a chaotic jumble of ten, create small vignettes with three related items. For example: a cleanser, a toner, and a moisturizer. Or three lipsticks in a popular color family.
-
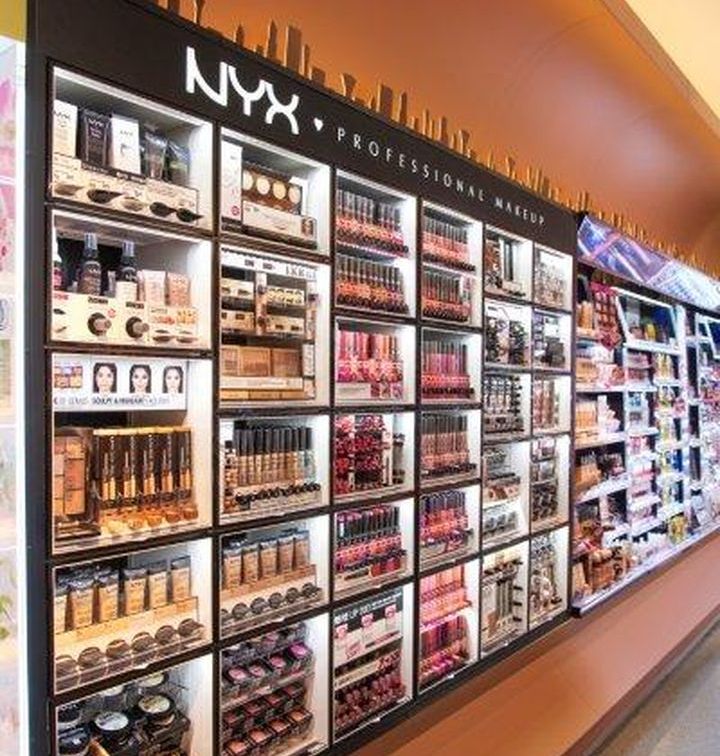
Repetition and Consistency: Repeating a pattern, color, or product grouping creates a strong visual rhythm and makes the store look well-organized and intentional. This helps customers quickly understand what you are selling.
2. Storytelling Through Product Grouping
Effective merchandising isn't just about making shelves look neat; it's about telling a story and helping the customer solve a problem. Your digital marketing expertise in creating customer personas and user journeys is directly applicable here. Think of your displays as telling a story that resonates with a specific customer need.
Best Practices for Health & Beauty Displays to Maximize ROI
The article 'Best Practices for Health & Beauty Displays to Maximize ROI' explains how strategic grouping can improve the shopping experience and drive sales. This aligns with the digital marketing concept of increasing average order value.
Please read the section titled 'Find Cross-Promotion Strategies.' Pay attention to the different ways you can group complementary products together.
Here are three key strategies for grouping products to tell a story:
-
By Routine or Usage (Cross-Merchandising): Group products that are used together. This is incredibly helpful for the customer and a great way to increase the basket size.
- Example: Create an "Evening Skincare Routine" display featuring a makeup remover, a gentle cleanser, a night serum, and a rich moisturizer.
-
By Theme: Create displays around a specific theme, season, or desired outcome. This is very similar to running a thematic digital campaign.
- Example: A "Summer Glow" endcap featuring sunscreens, lightweight foundations with SPF, bronzers, and hydrating face mists.
- Example: A "Self-Care Sunday" table with bath bombs, face masks, body scrubs, and calming essential oils.
-
By Ingredient: As customers become more knowledgeable, grouping by a star ingredient can be very effective.
- Example: A display dedicated to products featuring hyaluronic acid, pulling together serums, moisturizers, and even foundations from different brands that share this key ingredient.
3. High-Impact Techniques for Beauty Retail
Now let's focus on techniques that are particularly effective for cosmetics and skincare. Beauty products are often small, come in many shades, and rely heavily on the customer's ability to see and test them.
11 Cosmetic Retail Display Ideas Plus Tips for Beautiful Setups
To see how major brands do it, we'll look at the article '11 Cosmetic Retail Display Ideas Plus Tips for Beautiful Setups'. It's packed with real-world examples that you can adapt for your store.
First, read the section 'Tips for Creating a Stunning and Effective Cosmetic Retail Display.' This provides a great checklist of best practices.
Drawing from that article and other resources, here are some key techniques to implement:
Arrange by Color Gradient
For products like foundation, concealer, and lipstick, arranging them by shade is non-negotiable. It's visually stunning and functionally essential for customers trying to find their match.

Create an Interactive Tester Area
Beauty is a sensory experience. Customers want to feel the texture of a cream, see the true color of a lipstick, and smell a lotion. A "try-before-you-buy" section is critical for building trust and driving sales.
- Best Practices: As highlighted in the Watsons example from the resource LINK, your tester station should be clean, well-lit, and equipped with mirrors and hygienic disposable applicators (cotton swabs, mascara wands, small spatulas).
Use Creative and Low-Cost Props
You don't need expensive custom fixtures to create beautiful displays. Some creativity can go a long way, which is perfect for a new store's budget.
5 *TOP* AMAZING Retail Store 🏪 Display Hacks that ACTUALLY WORK 🛍️!
For some clever and affordable ideas, let's watch '5 TOP AMAZING Retail Store 🏪 Display Hacks' from the channel How to Run a Retail Store.
Please watch from 03:35 to 04:58. Pay attention to the ideas of using rocks in bowls and thrifted books as risers. These are brilliant, low-cost alternatives to standard acrylic displays.
- Books as Risers: Stacking a few hardback books (with the covers removed for a uniform, classy look) creates different height levels on a flat table, adding visual interest and highlighting certain products.
- Bowls with Rocks/Sand: For small, awkward items like makeup brushes, lip pencils, or rollerball perfumes, filling a beautiful bowl with small, polished stones or sand allows you to stand the products upright, making them look organized and chic.
4. Activity: Design a Feature Display
Let's put these concepts into practice. Imagine you are creating a feature display on a 3-foot by 3-foot table near the front of your store. The theme is "The 5-Minute Morning Face."
Your Task:
On a piece of paper, sketch the layout of this display table. You don't need to be an artist; simple shapes and labels will do. Your display should include the following products:
- A tinted moisturizer (hero product)
- A concealer
- A cream blush
- A mascara
- A tinted lip balm
In your sketch and a few accompanying bullet points, explain how you would apply at least three of the visual merchandising techniques you learned in this lesson. For example:
- Will you use the pyramid principle? If so, which product is at the top?
- How will you use the rule of three?
- Will you use props like books or bowls? How?
- How will you arrange the items to tell the story of a quick and easy morning routine?
This exercise will help you transition from theory to practical application, which will be essential when you start setting up your actual store.
Conclusion
In this lesson, you've moved from the macro view of your store's layout to the micro view of product presentation. You now have a toolkit of techniques to make your beauty products not just visible, but desirable.
Key Takeaways:
- Build on a Foundation: Core principles like vertical/horizontal arrangement, pyramiding, and the rule of three create a clean and organized look.
- Tell a Story: Group products by routine, theme, or ingredient to help customers solve problems and discover new items, much like a well-curated landing page.
- Beauty is Interactive: Effective beauty merchandising relies on color gradients for easy shopping and clean, accessible tester stations for building customer confidence.
- Be Creative with Your Budget: You can create high-end looking displays using inexpensive props like books and natural elements.
Preview of the Next Lesson:
Now that you know how to make your products look amazing inside the store, how do you get customers to walk through the door in the first place? In our next lesson, we will focus on the single most important piece of visual merchandising: "Create an effective window display to attract foot traffic." We'll take the principles you learned today and apply them to your store's biggest advertisement—its front window.