Welcome back! In our previous lesson, we successfully set up a workflow to fetch data from a local JSON file using JavaScript and an AI assistant. You now have the data loaded and ready to use within your script. The next logical step, and the focus of this lesson, is to take that data and make it visible on your webpage.
Today, we'll dive into how to write JavaScript, with AI help, to dynamically generate HTML elements from your fetched data. This is a fundamental skill in web development that transforms your static pages into interactive applications. By the end of this session, you'll be able to instruct an AI to turn an array of data into a structured list of content on your website, bringing your project one major step closer to completion.
From Data to Display: Dynamic HTML
So far, your JavaScript can "see" the data from your JSON file by logging it to the console. But your users can't see the console. Our goal is to take a raw data structure, like the JSON array of users shown below, and use it to build visible HTML elements on the page itself.
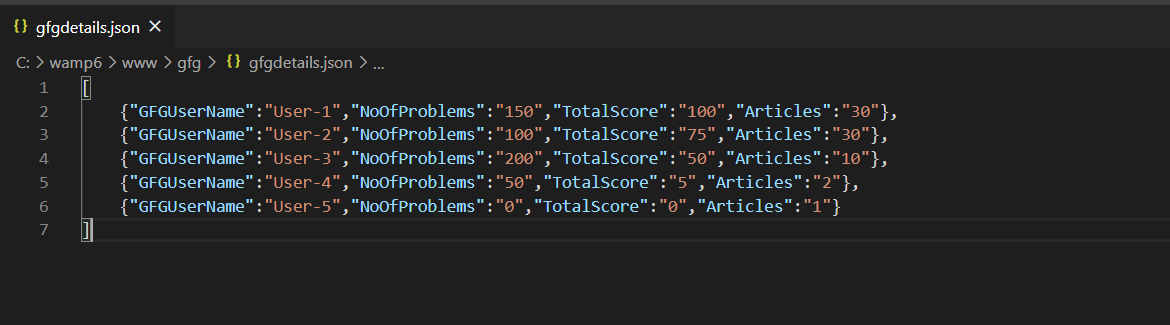
This process is called dynamic HTML generation. Instead of hard-coding every entry in your HTML file, you create a template with JavaScript, which then loops through your data and builds the final HTML automatically. The end result is that your webpage can display 5, 50, or 500 items using the same block of code.

There are two primary methods in JavaScript to achieve this, and we'll explore both so you can understand the code your AI assistant generates.
Method 1: The DOM API (Building Brick by Brick)
The first method involves using the browser's Document Object Model (DOM) API. Think of this as giving JavaScript direct commands to build a house, brick by brick: "create an H2 element," "put this text inside it," "now attach that H2 to the main section." It is structured, explicit, and easy to follow.
The Mozilla Developer Network (MDN) provides a fantastic, detailed walkthrough of this exact process. We'll focus on the core JavaScript functions that perform the dynamic generation.
Working with JSON - Learn web development | MDN
This article from MDN demonstrates how to fetch data and use it to populate a "superhero" team page. It's a perfect illustration of the DOM API method.
Please read through the following sections of the article: Start at the Top-level function section. This shows the fetch part, which should be familiar from our last lesson. Notice how it calls two other functions, populateHeader and populateHeroes, after the data is fetched. Next, read the Populating the header section. Pay close attention to the use of document.querySelector, document.createElement, .textContent, and appendChild. These are the core "brick-laying" commands. Continue to Creating the hero information cards. This is the most important part. It shows how to loop through an array (the members of the superhero team) and create a set of HTML elements for each hero. Notice the nested loop for handling the list of superpowers. Finally, review the short section on calling the function, which kicks everything off.
As you can see from the MDN example, the DOM API approach involves a clear sequence for each piece of content:
- Create the element (
document.createElement). - Populate the element with content (
.textContent). - Append the element to a parent in the document (
.appendChild).
This method is very robust and gives you fine-grained control over every element you create.
Method 2: HTML Strings (Building with a Blueprint)
The second common method is to use JavaScript's template literals to build a complete string of HTML, and then inject it into the DOM in one go. If the DOM API is like building brick-by-brick, this is like having a blueprint for a whole wall, building it on the side, and then dropping it into place.
This approach is often faster to write and can be easier to read for visual thinkers, as the code looks very much like the final HTML output.
Let's look at a practical example of this method.
How to fetch data from local JSON file using Vanilla JavaScript and ...
This article provides a concise example of using HTML strings to render data.
Please read the section on displaying data. Focus on how it uses data.map() to loop through the array and builds an HTML string using backticks () for newDiv.innerHTML. The ${element.name}` syntax is template literal interpolation, which places data directly into the string.
The key here is the use of innerHTML. It replaces the entire content of a selected element with the HTML string you provide. A more advanced and often safer alternative is insertAdjacentHTML, which lets you add new HTML without destroying existing content.
You can see insertAdjacentHTML in action in this short segment from the video we reviewed in the last lesson.
Read JSON File into HTML with JavaScript Fetch API
This clip from the ByteGrad video shows how to use insertAdjacentHTML to add list items inside a loop.
Watch the segment from creating a list. Notice how the presenter uses forEach to loop through the data and listEl.insertAdjacentHTML('beforeend', ...) to add each new <li> without overwriting the previous one. This is a very efficient way to build lists.
Your AI-Assisted Workflow for Generating HTML
Now you understand the two main techniques. The good news is you don't need to memorize the exact syntax for either. Your role is to understand the concepts so you can tell your AI assistant what you want.
Let's combine what we've learned into a practical prompt.
Activity: Prompting for HTML Generation Code
Imagine you have your data.json file from the last lesson, which contains an array of product objects.
- Open your preferred AI tool (Gemini, ChatGPT, etc.).
- In your
index.htmlfile, add an empty container element where the products will go, like this:<div id="product-container"></div>. - Now, use a detailed prompt like the one below.
Prompt:
"I am using thefetchAPI in JavaScript to get an array of product objects. The array is stored in a variable calledproducts.Each object in the
productsarray has this structure:{ "name": "String", "category": "String", "price": "Number" }I have an empty
divin myindex.htmlwith anidofproduct-container.Write a JavaScript function called
displayProductsthat takes theproductsarray as an argument.Inside the function, you should:
- Find the
product-containerelement on the page.- Clear any existing content inside it to prevent duplicates on re-run.
- Loop through each object in the
productsarray.- For each product, create and append a new
divwith a classproduct-cardto theproduct-container.- Inside each
product-card, there should be:
- An
<h2>element containing the product'sname.- A
<p>element containing the text 'Category: ' followed by the product'scategory.- Another
<p>element containing the text 'Price: $' followed by the product'sprice.Please provide two versions of the
displayProductsfunction:
- One version using the DOM API (
createElement,appendChild).- A second version using
innerHTMLand template literals."
Run this prompt. The AI should give you two clean, well-commented functions that accomplish the same task using the two different methods we've discussed. You can now choose the one you find more readable.
Practical Application: Connecting Fetch to Display
The final step is to integrate your new AI-generated function with the fetch code from the previous lesson.
- Copy your preferred version of the
displayProductsfunction into yourscript.jsfile. - Find your
fetchcall. The magic happens in the final.then()block, where you have access to the parsed data. - Call your new function from within that block, passing the data to it.
Your code should look something like this:
// Your AI-generated displayProducts function goes here
// function displayProducts(products) { ... }

// Your fetch call from the previous lesson
fetch('./data.json')
  .then(response => response.json())
  .then(data => {
    // 'data' is the array of products from your JSON file
    console.log(data); // You can keep this for debugging
    displayProducts(data); // <-- CALL YOUR NEW FUNCTION HERE
  })
  .catch(error => console.error('Error fetching data:', error));
- Save your
script.jsandindex.htmlfiles. - If it's not already running, start your Live Server and view the page. You should now see your data rendered as a list of product cards on the webpage!
Conclusion
In this lesson, you've bridged the gap between fetching data and displaying it to the user. You now have a complete, albeit simple, data-driven application.
Here are the key takeaways:
- JavaScript can dynamically generate HTML from data, preventing the need to hard-code content.
- The two primary methods are the DOM API (
createElement,appendChild), which offers granular control, and HTML Strings (innerHTML,insertAdjacentHTML), which are often faster to write. - Your job is to understand the structure of your data and the desired HTML output, then describe it clearly to an AI assistant.
- The
displayfunction is typically called within the.then()block of afetchcall, where the data becomes available.
You now have a solid foundation for fetching and displaying data. But what happens when things go wrong? A typo in the JSON file or a broken fetch path can leave you with a blank page. In our next lesson, we will focus on becoming a detective: using browser developer tools to diagnose and fix these common issues, again using your AI assistant to help interpret errors and suggest solutions.