Welcome back! In our last lesson, we started clothing the skeleton by focusing on the pectoralis major, understanding its fan-like structure and how it creates the form of the chest.
Today, we're moving down the torso to the abdominal muscles. This lesson will focus on the two main muscle groups that define the mid-section: the rectus abdominis (the "six-pack") and the external obliques (the muscles on your sides). Our goal is to identify and draw these muscles, understanding how they connect the ribcage to the pelvis and how they work together to allow the torso to bend and twist.
1. The Rectus Abdominis: Structure and Form
The most famous of the abdominal muscles is the rectus abdominis. While it's known as the "six-pack," it's actually a single, long muscle that runs vertically down the front of the torso. Let's start with its formal anatomical structure.
The video "How to Draw Abs - Anatomy" from Proko will give us a precise breakdown of the rectus abdominis. This will cover the muscle's origin, insertion, and the tendinous structures that create its segmented appearance.
Watch from 01:02 to 04:24. As you watch, pay attention to: Origin and Insertion: Note how it connects the pelvis (pubic crest) to the ribcage (ribs 5-7 and xiphoid process). Function: Its primary job is to flex the spine, bringing the ribcage and pelvis closer together. Tendinous Structures: Understand the roles of the linea alba (center line), linea semilunaris (side borders), and tendinous intersections (horizontal dividers) in creating the classic 'ab' shape.
Now that you have the technical foundation, let's look at this muscle from a more practical, drawing-oriented perspective.
Draw Abs Like a Pro – in Just 10 Minutes
Marco Bucci's video, "Draw Abs Like a Pro," offers a fantastic artist-centric view. He focuses on the rhythms and shapes that are most important for creating a convincing drawing.
Watch the beginning of the video, from 00:00 to 02:11. Focus on how he simplifies the muscle's origin to the thoracic arch for drawing purposes and how the divisions fan out, creating a natural rhythm.
Here is a quick-reference chart from GVAAT.com to summarize the attachment points.
| Muscle | Origin | Insertion |
|---|---|---|
| Rectus Abdominis | pubis | ribs 5, 6, 7, xiphoid process (sternum) |
The key takeaway is that the rectus abdominis is a single muscle, but the grid-like appearance comes from tendons that crisscross it. For drawing, thinking about the fanning pattern of these intersections, as Marco Bucci showed, is often more useful than trying to draw a perfect grid.
2. The External Obliques: Defining the Sides
Flanking the rectus abdominis are the external obliques. These muscles are crucial for defining the shape of the waist and are responsible for twisting the torso.
Let's return to Marco Bucci's video to see where they are and how they work.
Draw Abs Like a Pro – in Just 10 Minutes
This next segment from "Draw Abs Like a Pro" introduces the external obliques.
Watch from 03:56 to 04:50. Notice the diagonal direction of the muscle fibers, which run from the ribs down and inward, like putting your hands in your pockets. Also, note the tendinous area that helps separate the obliques from the rectus abdominis.
The diagonal direction of the oblique fibers is a critical detail. It contrasts with the vertical fibers of the rectus abdominis. This diagram clearly illustrates the different directions.
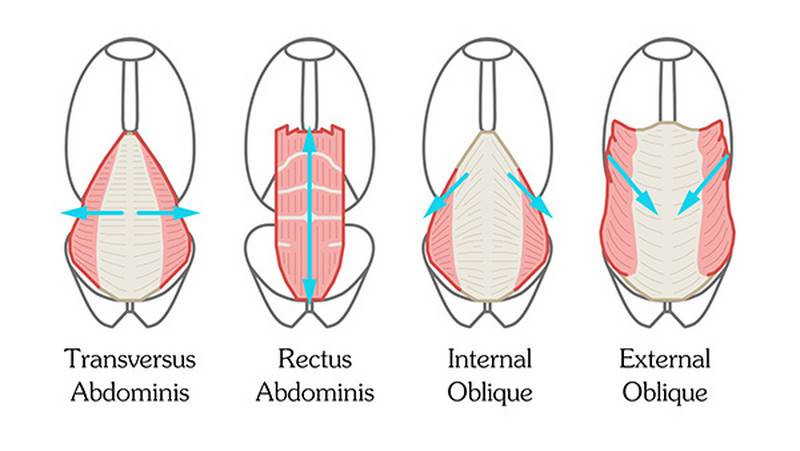
The obliques don't just fill in the space; they play a major role in the torso's silhouette.
5 Big Tips on Drawing Abs & Mid-Sections
The article "5 Big Tips on Drawing Abs & Mid-Sections" from Love Life Drawing explains the importance of the obliques in shaping the figure's outline.
Read the sections 'External obliques' and 'Flank portion'. Pay attention to how the lower part of the muscle bulges out slightly over the pelvis, creating a form sometimes called the 'flank pad'. This is often more important for the silhouette than the 'six-pack' is.
3. Drawing the Abdominal Group as a Whole
Now let's put it all together. A common beginner mistake is to get fixated on drawing the "six-pack" grid and lose sight of the bigger picture. The entire mid-section acts as a single, flexible unit connecting the two large masses of the ribcage and pelvis.

The "Love Life Drawing" article introduces a very helpful concept for this.
5 Big Tips on Drawing Abs & Mid-Sections
Let's revisit the "5 Big Tips..." article to learn about a more holistic approach to drawing the mid-section.
Read the sections 'The gestural bridge', 'Rectus abdominis', and 'LINES AND SHADING'. Focus on the idea of the abdominal area as a 'flexible bridge' and the importance of seeing shadow shapes rather than just a grid of lines.
Thinking of this area as a cohesive, flexible volume that squashes and stretches will make your drawings much more dynamic and believable.
4. Practice: From Anatomy to Form
Time to apply these concepts in Procreate. This exercise will help you connect the anatomical knowledge to the act of drawing.
Exercise: Analyze and Construct (25 minutes)
Part 1: Anatomical Trace-Over (10 mins)
- Find a clear reference photo of a standing figure where the abdominal muscles are visible. Sites like Pinterest are great for this; search for "male anatomy reference" or "figure drawing pose."
- Import the photo into Procreate.
- On a new layer, use a bright color (e.g., red) to trace the outline of the rectus abdominis. On another layer, use a different color (e.g., green) to trace the external obliques.
- Within these colored shapes, draw small arrows to indicate the muscle fiber direction (vertical for the rectus abdominis, diagonal for the obliques).
Part 2: Drawing from Posed Reference (15 mins)
- Find a reference photo of a figure in a pose that involves a twist or a crunch. This is key, as it will force you to think about squash and stretch.
- Start by lightly sketching the simple forms of the ribcage and pelvis, paying close attention to their tilt and the space between them.
- Next, draw the "gestural bridge" connecting them. Focus on the overall shape—is it stretching on one side and compressing on the other?
- Now, draw the simplified forms of the rectus abdominis and obliques over this gestural shape. Don't just draw a static grid; let the muscle forms follow the bend and twist of the torso.
To see this process in action, watch how Marco Bucci applies these ideas to various poses.
Draw Abs Like a Pro – in Just 10 Minutes
This final clip from "Draw Abs Like a Pro" shows a series of rapid-fire drawings that demonstrate how the abdominal muscles behave in different dynamic poses, including crunching, stretching, and bending.
Watch from 06:11 to 09:26. You don't need to copy these drawings exactly. Instead, observe how he indicates the forms in each pose. Notice how the 'six-pack' flattens out in a stretch and compresses into deeper folds in a crunch.
Conclusion
Excellent work today! You've now mapped out the entire front of the torso, from the pectorals down to the pelvis.
Key Takeaways:
- The rectus abdominis runs vertically from the ribs to the pelvis. Its segmented look comes from tendinous intersections.
- The external obliques flank the rectus abdominis, with fibers running diagonally downward and inward. They are crucial for defining the torso's silhouette.
- It's more effective to draw the mid-section as a unified, flexible form that connects the ribcage and pelvis, rather than focusing only on the "six-pack" grid.
- The abdominal forms change dramatically with movement, squashing in a crunch and stretching out in a lean.
In our next lesson, we will complete our study of the torso by turning our attention to the back, where we will identify and draw the major back muscles: the trapezius and the latissimus dorsi.