Hello! Welcome to your first lesson in the Digital Art course.
Given your background as a software developer, you're likely comfortable picking up new applications quickly. Today, we'll leverage that by taking a systematic tour of Procreate, the digital illustration app we'll be using on your iPad. Our goal is to get you confidently navigating the entire interface, from managing your art files to understanding the layout of the main drawing space.
Mastering the tool is the essential first step before we can dive into the fundamentals of drawing and, eventually, the human anatomy you're eager to study. Let's get started.
1. The Gallery: Your Digital Sketchbook Collection
Every time you open Procreate, you'll land in the Gallery. Think of this as the top-level directory for all your project files. It's where you'll create, organize, and manage your individual artworks.
To begin, let's watch a short video that covers how to manage your projects in the Gallery.
Intro to Procreate - The Basics for Beginners in 10 Minutes
Watch this segment from the video 'Intro to Procreate' by luma_llama. It provides a clear overview of the Gallery page and its functions.
Watch from the start until 01:21. Pay attention to how to select, stack (group), share, and duplicate projects. These are the basic file management operations you'll use frequently.
As you saw, you can organize related drawings into "Stacks," which are conceptually similar to folders in a file system. This is great for keeping studies, exercises, and final pieces for a single project together.

2. Creating a Canvas
From the Gallery, you create a "canvas" to start a new artwork. A canvas is your digital drawing surface.
Procreate Beginners Series: Part One | The Fundamentals
This clip from the official Procreate channel demonstrates how to create your first canvas.
Watch from 00:37 to 01:07. The video will show you how to create a new canvas using the 'Screen Size' preset, which is a great starting point.
While "Screen Size" is convenient, you can also define custom canvas dimensions (width, height, and DPI). A key concept here, which might resonate with your programming background, is resource limitation: the larger the canvas dimensions, the fewer layers you can have. This is due to memory constraints on the iPad. We'll cover layers in more detail shortly, but it's an important trade-off to remember.
3. The Canvas Interface: Your Workspace
Once you create a canvas, you're in the main workspace. The interface is designed to be minimal to maximize your drawing area. Let's break it down into its core components.
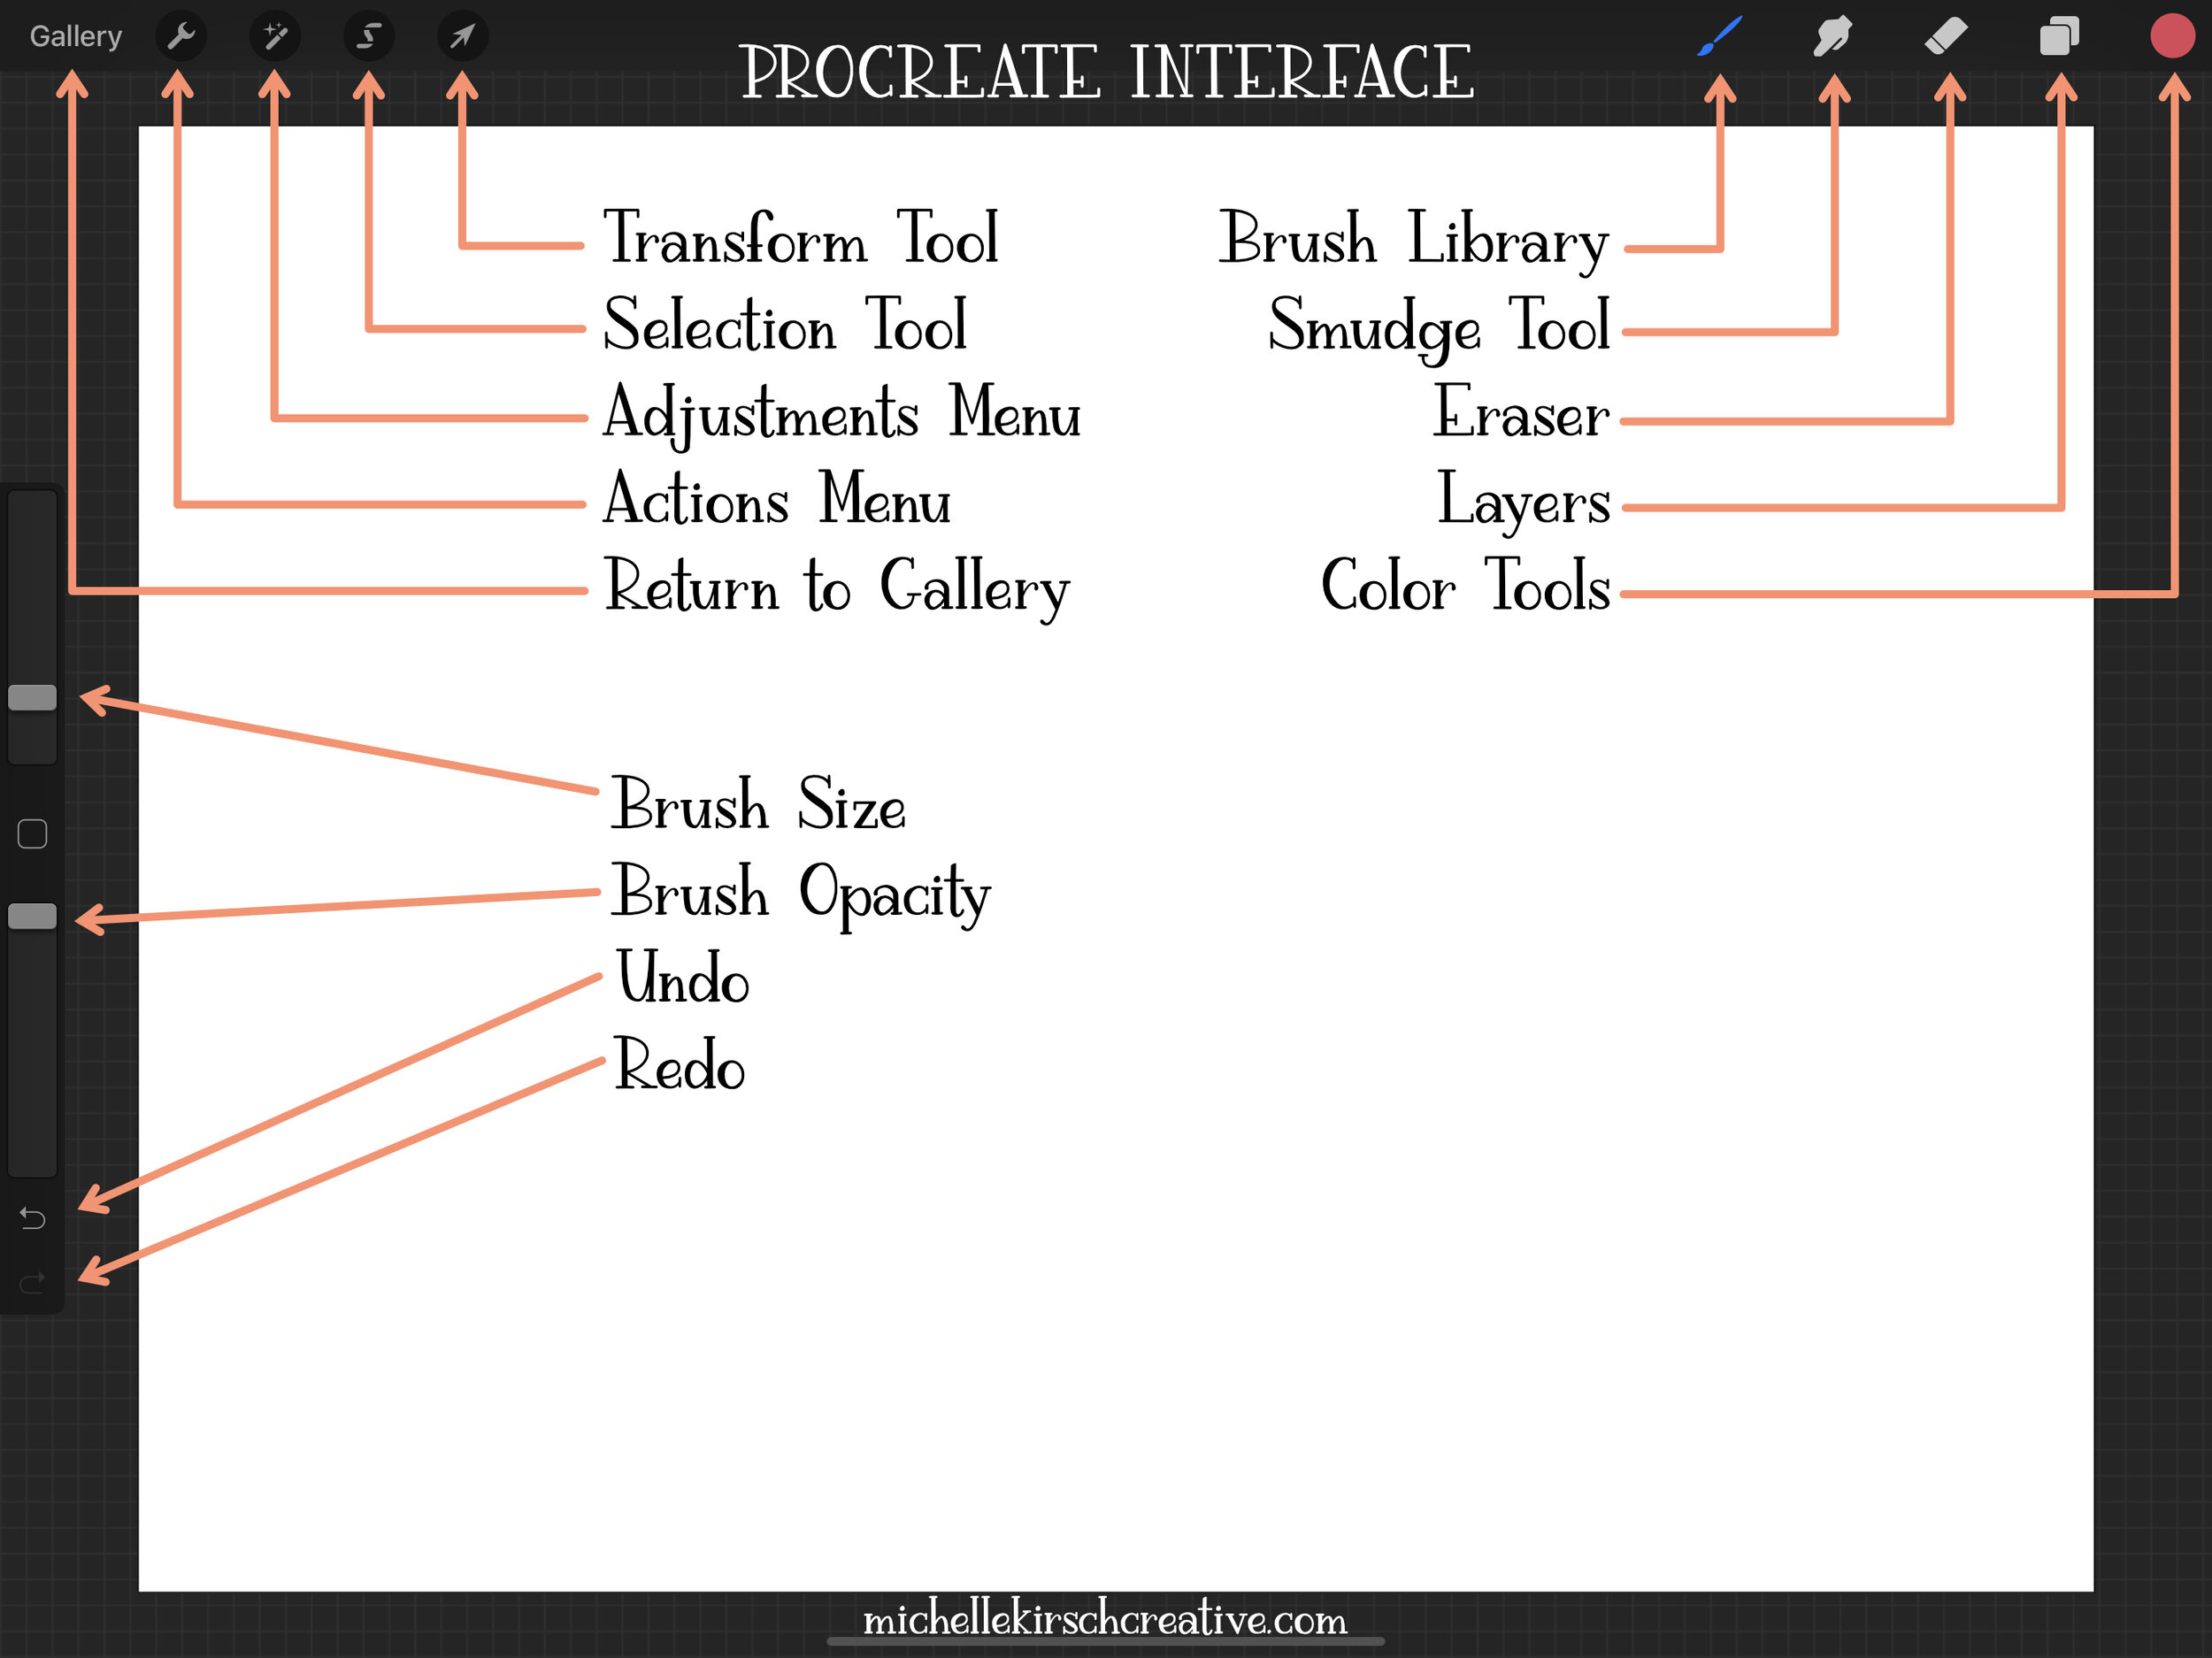
The interface can be logically divided into four main areas:
- Top Left: Editing Tools (Actions, Adjustments, etc.)
- Top Right: Painting Tools (Brushes, Layers, Colors)
- Left Sidebar: Modifiers (Size, Opacity)
- Canvas Area: Your actual drawing space.
Let's look at the function of each menu.
Interface — Procreate Handbook
The official Procreate Handbook provides a concise and authoritative reference for the interface. Please read the following sections to get a detailed description of each tool group.
Read the sections titled 'Painting Tools (top right)', 'Sidebar (left side)', and 'Editing Tools (top left)'. You can skim the descriptions for now; the goal is to understand the general purpose of each icon.
To summarize the reading:
- Top Right (Painting Tools): This is where you'll spend most of your time. It holds the Brush tool, Smudge tool, Eraser, Layers panel, and Color panel.
- Top Left (Editing Tools): These are for broader adjustments and actions.
- Gallery: Takes you back to the Gallery view.
- Actions (Wrench Icon): Contains preferences, canvas controls, and options to add text or photos. This is also where you'll go to export your work.
- Adjustments (Magic Wand Icon): Applies image effects and color adjustments like Blur, Sharpening, and Hue/Saturation.
- Selection (Ribbon Icon): Allows you to select a part of your layer to edit in isolation.
- Transform (Cursor Icon): Lets you move, scale, and rotate the content of your selected layer.
- Left Sidebar: Provides quick access to sliders for Brush Size and Brush Opacity, plus Undo and Redo buttons.
4. Essential Gestures & Key Panels
An efficient workflow in Procreate relies heavily on multi-touch gestures. You'll also frequently interact with the Layers and Color panels.
Essential Gestures
Watch this short clip to see the most important gestures in action.
Procreate Beginners Series: Part One | The Fundamentals
This segment from Procreate's beginner series covers the fundamental gestures for working on the canvas.
Watch from 04:26 to 05:07. Focus on the gestures for Undo (two-finger tap), Redo (three-finger tap), and navigating the canvas (pinch to zoom and rotate).
The Layers Panel
Layers are a fundamental concept in digital art. Think of them as transparent sheets stacked on top of each other. You can draw on one layer without affecting the others. This is incredibly powerful for separating elements like a background, a character's line art, and its colors.
Given your experience with software development, you can think of the layers panel as representing a stack, where items higher in the list appear in front of items lower in the list.
Intro to Procreate - The Basics for Beginners in 10 Minutes
Let's see the Layers panel in action. This video gives a practical demonstration of creating and managing layers.
Watch from 04:00 to 05:00. Pay attention to how to create a new layer, reorder layers by dragging, and the options that appear when you swipe left on a layer (Lock, Duplicate, Delete).
5. Hands-On Exploration
Now it's time to put it all together. The goal of this exercise is not to draw anything complex, but simply to get your hands on the interface and build muscle memory.
Please open Procreate on your iPad and follow these steps:
- In the Gallery, tap the
+icon and select Screen Size to create a new canvas. - Tap the Color circle in the top right. Pick any color you like.
- Tap the Layers icon (two squares) in the top right. Tap the
+to create a new layer. - On your canvas, draw a few random lines or shapes.
- Undo your last mark by tapping the screen with two fingers.
- Redo the mark by tapping with three fingers.
- Use a two-finger pinch to zoom into your drawing.
- Use a two-finger twist to rotate the canvas. A quick pinch out will reset its position.
- Tap the Gallery button in the top left to return to your collection. Your new artwork should be the first thumbnail.
- In the Gallery, tap Select, tap your new artwork, and then tap Stack to put it in its own group.
Feel free to spend a few minutes exploring. Try opening the other menus we discussed, like Actions (wrench) and Adjustments (wand), just to see what's inside.
Conclusion
Excellent work on your first day! We've taken a comprehensive tour of the Procreate interface.
Key Takeaways:
- The Gallery is for managing your art files.
- The main canvas is organized into Painting Tools (top right), Editing Tools (top left), and Modifiers (sidebar).
- Layers are like transparent, stackable sheets that let you organize and edit your artwork non-destructively.
- Basic gestures like two-finger tap (Undo), three-finger tap (Redo), and pinch-to-zoom/rotate are essential for a smooth workflow.
You are now equipped with the foundational knowledge to navigate Procreate. In our next lesson, we will begin making intentional marks. We'll focus on the Brush and Eraser tools, learning how to select different types and control their fundamental properties like size and opacity.