Hello! Welcome back to your digital art training.
In the last couple of lessons, you learned how to add pixels with the Brush tool and remove them with the Eraser tool. You now have control over making marks on the canvas. Today, we'll introduce a concept that is a cornerstone of digital art: Layers.
The learning outcome for this lesson is to perform basic layer management: create, group, reorder, merge, and adjust opacity.
If drawing with brushes is like writing individual lines of code, then using layers is like structuring that code into functions and objects. Each layer is an independent component you can work on, modify, or re-arrange without breaking the entire program. This organized, non-destructive approach is essential for building complex projects, whether in software or in art. Mastering layers is a critical step towards creating the detailed figure illustrations you're aiming for.
1. What Are Layers?
At its simplest, a layer is like a transparent sheet of acetate. You can draw on it, and because it's transparent everywhere else, you can see the layers stacked underneath it. By stacking these sheets, you can build up an image piece by piece, keeping elements like sketches, line art, and colors separate.
This separation is the key to a non-destructive workflow. It means you can change the color of a character's shirt without having to redraw the character's face, or erase a stray sketch line without touching your final ink work.
To help visualize this, let's watch a video that uses a great real-world analogy.
Procreate Layers Explained Easily
The instructor in this video uses plastic sheet protectors to explain the concept of layers in a very clear, tangible way.
Watch the first part of the video from 0:05 to 3:58. Focus on understanding how layers are like stacked transparent sheets that let you draw on one without affecting the others below it.
2. The Layers Panel: Your Control Center
All layer operations happen in the Layers panel in Procreate. You can access it by tapping the icon that looks like two overlapping squares in the top-right corner of the interface.
Let's look at the most fundamental operations you'll be using constantly.
How to use layers in Procreate Like a Pro! (Beginners Guide!)
This video from Artsydee provides a quick and comprehensive tour of the most common layer operations. It moves quickly, so feel free to pause and follow along in Procreate.
Watch from the beginning until 2:16. Pay attention to how to: Create new layers with the + icon. Rename layers to keep track of what's on them. Group multiple layers into a folder for organization.
By tapping on a layer, you can also bring up a menu with more options.

3. Organizing and Combining Layers
As your artwork becomes more complex, you'll need to manage your layers to keep your workspace tidy.
Grouping
As shown in the video, grouping is like putting files into a folder. It’s perfect for organizing related parts of your drawing. For figure drawing, you might have one group for the head (containing layers for sketch, ink, color, etc.) and another group for the torso.
Merging
Sometimes, you'll want to combine layers. For example, after you're happy with the shadows on top of a color layer, you might merge them to simplify your project.
- Merge Down: Combines the currently selected layer with the one directly below it.
- Flatten: Merges all visible layers in your artwork into a single layer. This is a very decisive action, so use it with care!
The video you just watched also touches on merging and another useful trick: duplicating.
How to use layers in Procreate Like a Pro! (Beginners Guide!)
Let's revisit the same video to see how to merge layers and a pro tip for experimenting safely.
Watch the section from 2:48 to 3:27. This part covers duplicating layers (great for making backups before a big change) and merging them.
Duplicating a layer or a group before merging is a great habit. It's like creating a backup of a file before making a destructive change.
4. Adjusting Layer Opacity
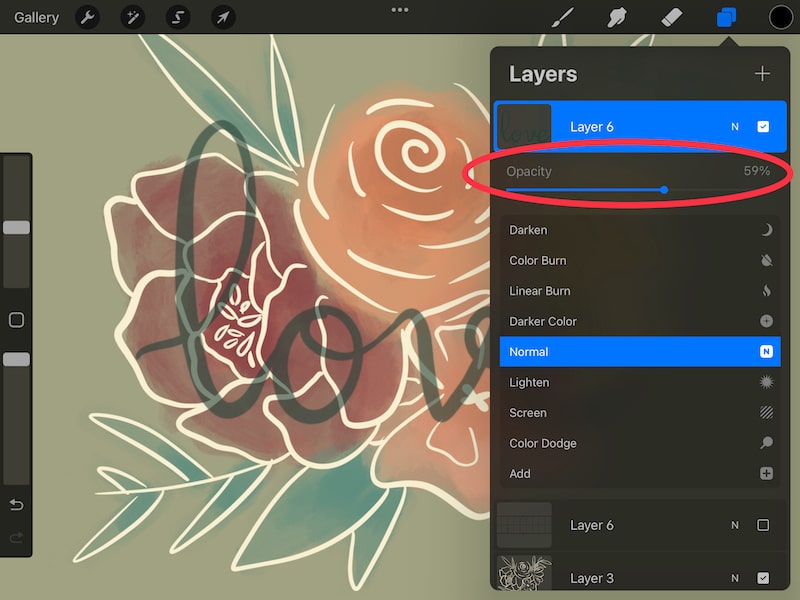
Opacity controls the transparency of a layer. 100% opacity is a solid, completely opaque layer. 0% opacity is completely invisible.
Adjusting opacity is one of the most common layer actions. Its most frequent use is to lower the opacity of a rough sketch layer so you can easily see to draw clean line art on a new layer above it.
For a handy reference that summarizes these organizational tools, please review the official Procreate guide.
The official Procreate guide provides a clear, concise reference for layer organization and transparency options.
Please review 'Part Three Organizing layers' and the 'Transparency options' section within 'Part Four Tools'. This will reinforce what you've learned and introduce a useful two-finger shortcut for changing opacity.
5. Practical Exercise: A Standard Workflow
Now, let's put all these concepts together in a practical exercise that mimics a standard illustration workflow. Open Procreate and create a new canvas. This should take about 20-25 minutes.
1. The Sketch Layer
- On the default "Layer 1", use a pencil brush (like the 6B Pencil) to sketch a simple object. A piece of fruit, a coffee mug, or a simple cartoon character head are all great options.
- Tap on this layer in the Layers panel and choose Rename. Name it
Sketch.
2. The Ink Layer
- Tap the
Sketchlayer, then tap the 'N' icon. Lower the Opacity slider to around 20-30%. Your sketch should now look faint. - Tap the
+icon to create a new layer. It will appear above your sketch. Rename this new layer toInk. - Select a pen brush (like the Studio Pen from the Inking set) and a black or dark color.
- On the
Inklayer, trace over your faint sketch to create a clean outline. - Once done, you can hide the
Sketchlayer by tapping the checkbox on the right side of that layer. You should now only see your clean line art on a white background.
3. The Color Layer
- Create a new layer. Rename it
Color. - Reorder the layers by tapping and holding the
Colorlayer and dragging it below theInklayer. - On the
Colorlayer, use any brush to fill in the base colors of your drawing. Because this layer is underneath theInklayer, your colors will not cover up your line art.
4. The Shadow Layer & Grouping
- Create one more new layer. Position it directly above the
Colorlayer (and still belowInk). Rename itShadows. - Choose a slightly darker version of your base color. Using a soft brush (like the Soft Brush from Airbrushing), gently paint in some shadows.
- Now, let's organize. In the Layers panel, swipe right on both the
ShadowsandColorlayers to select them both. Tap the Group button at the top of the panel. - Rename this new group to
Artwork Colors.
5. Merging (for practice)
- Open the
Artwork Colorsgroup. Tap on theShadowslayer and select Merge Down from the menu. - Observe that the
ShadowsandColorlayers have now been combined into one. - This action is destructive, so let's reverse it. Use the two-finger tap gesture on your canvas to Undo. Your layers should be separate again.
You have now completed a mini-project using all the core layer management skills!
Conclusion
Today you've unlocked one of the most powerful features in all of digital art. An organized layer structure is the foundation of any complex piece.
Key Takeaways:
- Layers are like transparent sheets that allow for a non-destructive workflow.
- You can manage layers through the Layers panel to create, rename, and delete them.
- You can reorder layers to control which elements appear in front of others.
- Grouping layers helps keep complex projects tidy.
- Merging layers simplifies your project but is a destructive action.
- Adjusting opacity is essential for tasks like tracing over a sketch.
In our next lesson, we will cover the Selection and Transform tools. Now that you know how to isolate elements onto their own layers, you'll learn how to select, move, resize, and rotate those elements with precision.