Hello! Welcome back.
In our last lesson, we completed our detailed study of the head by learning to construct the ear. We saw how even a complex form like the ear can be broken down into a simple ? and Y structure, a principle we will continue to apply.
Today, we transition from the head to the torso. A convincing figure drawing requires a solid connection between these two major masses, and that connection is the neck. This lesson is dedicated to achieving the learning outcome: Draw the neck, focusing on the sternocleidomastoid muscle and its connection to the trapezius.
We'll move beyond the common beginner mistake of drawing the neck as a simple tube and instead construct it using its key anatomical components. For someone with your goal of mastering figure anatomy, this is a crucial step.
1. The Basic Form: A Tilted Cylinder
Just as we started the head with a sphere, we'll start the neck with a simplified geometric form: a cylinder. However, its placement and angle are very specific.
Learn to Draw the Neck - Forms You Should Know
The video 'Learn to Draw the Neck - Forms You Should Know' by Proko provides an excellent foundation. Let's start by understanding the neck's basic shape and orientation.
Watch from 0:26 to 1:21. Pay close attention to two key points: The cylinder of the neck is tilted forward. The top of the cylinder is wider and slants down toward the front, while the base is higher in the back and lower in the front.
This initial step is critical. By establishing the neck as a tilted cylinder, you immediately give it a sense of three-dimensionality and a correct, natural posture that a simple vertical tube lacks. Think of this cylinder as the foundational block upon which we will build the more complex muscle forms.
2. The Two Pillars: Sternocleidomastoid and Trapezius
Two muscles are primarily responsible for the visible shape of the neck. Understanding their attachments is the key to drawing it accurately from any angle.
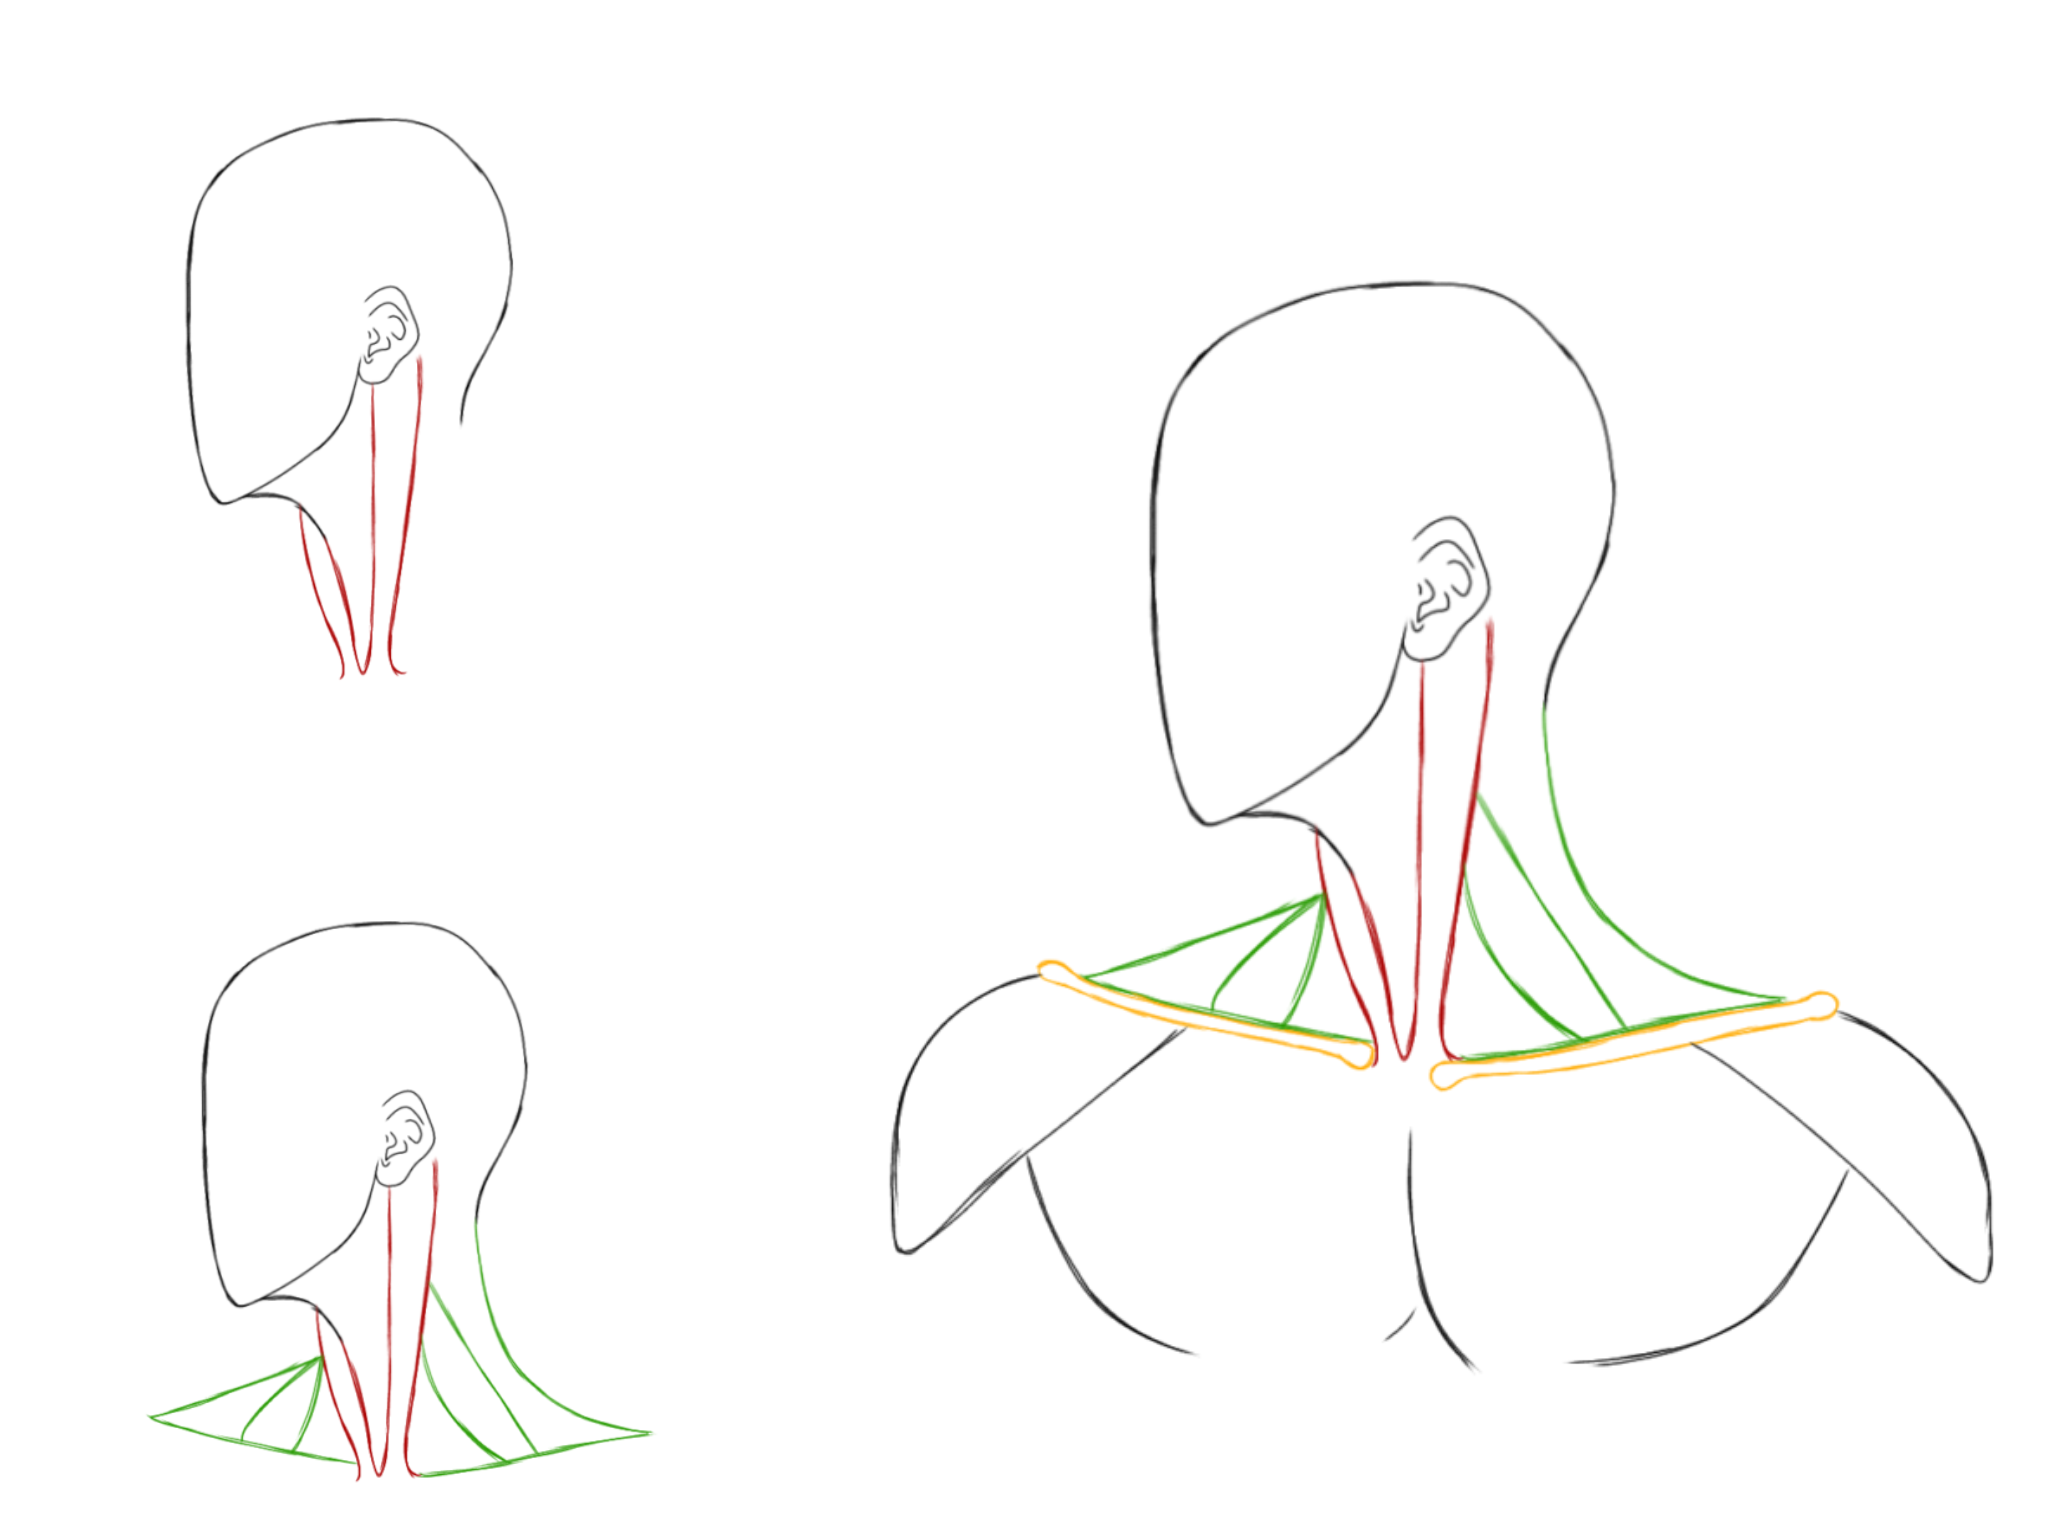
- Sternocleidomastoid (SCM): These are the two prominent, strap-like muscles that form a 'V' shape on the front of the neck. They are the most important muscles for defining the neck's form.
- Trapezius (Traps): This is a large, diamond-shaped muscle on the back, but its upper portion creates the sloping line from the neck down to the shoulders.
To understand how these muscles are attached, let's consult a detailed guide.
How to Draw the Neck, a Step-by-Step Guide
The article 'How to Draw the Neck, a Step-by-Step Guide' by Gvaat offers precise descriptions and diagrams of the muscle attachments. Knowing these origin and insertion points is like knowing how different components of a system are wired together.
Read the section titled 'How to draw the neck – main muscle mapping'. Focus on the 'Sterno-cleido-mastoid attachment' and 'Traps – Trapezius' subsections. Don't worry about memorizing the exact Latin names of the bones, but focus on the key connection points: SCM: Originates at the sternum (chest bone) and clavicle (collarbone) and inserts behind the ear. Trapezius: Connects the base of the skull and spine to the shoulder blade and the outer part of the clavicle.
The image below provides a fantastic, simplified visualization of these two muscle groups and their relationship to the clavicle (collarbone). This is what you should aim to construct in your drawings.
3. Dynamics and Form of the SCM
The SCM isn't just a flat strap; it has volume and changes shape dramatically with movement. When the head turns, one SCM contracts and becomes a hard, cord-like form, while the other stretches and flattens.
Let's return to the Proko video to see this in action.
Learn to Draw the Neck - Forms You Should Know
This section of the Proko video beautifully illustrates the SCM's three-dimensional form and how it behaves when the head turns.
Watch from 2:26 to 3:32. Notice how the SCM is simplified as its own cylinder. Pay attention to the description of its two heads at the base—the sternal head (a cord-like tendon) and the clavicular head—and how they become visible during movement.
4. Practice: Step-by-Step Construction (30 minutes)
Now it's time to put this knowledge into practice in Procreate. Your goal is to draw the neck from three primary angles: front, three-quarter, and profile. We will follow a clear constructional process.
The article "How to Draw a Neck" from Dessindigo uses excellent color-coding to make the muscle placement clear. We will use its visual approach to guide our drawing process.
This guide from Dessindigo will serve as our blueprint for the practice exercise. The color-coding is especially helpful for visualizing the placement of the SCM and Trapezius.
Quickly review the sections 'THE NECK MUSCLES', 'DRAWING A NECK IN PROFILE', and 'DRAWING A FRONT VIEW NECK'. Don't read in depth, but observe the step-by-step images to understand the construction sequence before you begin drawing.
Drawing Exercise:
Open Procreate and create a new canvas. For each of the three views (front, 3/4, profile), follow these steps. Feel free to have the Dessindigo article open for reference.
- Draw the Head and Shoulders: Lightly sketch a basic Loomis head and indicate the line of the shoulders with the clavicles.
- Block in the Cylinder: Draw the tilted cylinder of the neck connecting the head to the torso. Make sure it's lower in the front and higher in the back.
- Place the SCM (Sternocleidomastoid): Draw two bands running from just behind the ears down to the pit of the neck where the clavicles meet the sternum. In a front view, this forms the 'V'. In a profile view, you will only see one clearly. In a 3/4 view, one will be prominent and the other will be partially visible.
- Add the Trapezius: From the back of the neck/skull, draw two sloping lines down to the outer edges of the shoulders. This line defines the character's silhouette.
- Refine the Contour: With the underlying muscles mapped out, draw the final outline of the neck. The final shape is a result of these muscles, not an arbitrary curve.
- Repeat: Create at least one drawing for each of the three main views. Focus on construction, not rendering.
For an additional challenge: After your initial drawings, try sketching a neck with the head turned sharply to one side. Observe in a mirror or reference photo how one SCM pops out while the other flattens.

Conclusion
Fantastic work today. You've moved beyond simple symbols and have begun to construct the neck with an understanding of its underlying anatomical structure. This is a foundational skill for any character artist.
Key Takeaways:
- Foundation: The neck's basic form is a cylinder that tilts forward and is higher in the back than in the front.
- Key Muscles: The shape of the neck is defined primarily by two muscles: the Sternocleidomastoid (SCM), which forms a "V" from behind the ears to the clavicles, and the Trapezius, which creates the slope of the shoulders.
- Attachment Points are Anchors: Knowing that the SCM connects behind the ear to the clavicle/sternum gives you immovable landmarks to build from, no matter the pose.
- Form Follows Function: The muscles change shape dynamically with movement. A turning head causes one SCM to contract and pop out, which is a crucial detail for creating dynamic poses.
In our next lesson, we will continue down the body and begin our study of the arms. We'll start by exploring how the shoulder muscles integrate with the arm, specifically learning to draw the transition from the deltoid to the upper arm. This will build directly on the shoulder structure established by the trapezius today.