Hello! Welcome to your next lesson on state management in React.
In the past few lessons, we've focused on building forms and managing their state—like input values and validation errors—using the useState hook. So far, that state has always lived inside the component that uses it. This is called local state.
But what happens when two separate components need to access or modify the same piece of information? For instance, what if you have a form in one component and want to display a live preview of the data in a different, sibling component? This is a very common scenario, and local state isn't enough to solve it.
Today, you'll learn one of the most fundamental patterns in React for solving this problem. Our learning outcome is to lift state up to a common ancestor to share data between sibling components.
This principle is often called creating a "single source of truth." As a Laravel developer, you're familiar with this concept from a backend perspective, where a model or database is the single source of truth for your application's data. In React, we apply the same idea to UI state.
1. The Problem: Unsynchronized Sibling Components
Imagine you're building a shopping cart UI. You might have one component to display a product (ProductCard) and another to show a summary of the entire cart (CartSummary).
<ShoppingCart>
  <ProductCard />
  <CartSummary />
</ShoppingCart>
If the ProductCard has a "Add to Cart" button, it might have its own quantity state. But when you click that button, how does the CartSummary component know that the total number of items has changed? It doesn't. Each component is an island with its own state.
This video introduces this exact problem clearly.
React 19 Tutorial - 26 - Sharing State Between Components
Watch the beginning of this video from Codevolution. It sets up a scenario with a ProductCart and a CartSummary component, each with its own independent (and therefore unsynchronized) state.
Watch from the beginning until 03:49. Notice how clicking the 'Add to Cart' button updates the quantity in the ProductCart, but the CartSummary remains unchanged. This highlights the problem we need to solve.
This leads to several issues, as noted in the "React Expanded State Management" article:
- Data Inconsistency: The product component shows one quantity, while the summary shows another.
- Duplicated State: Multiple components are trying to track the same information.
- Broken UI: The user experience is confusing and feels broken.
To fix this, we need a way for these components to share a single, centralized state.
2. The Solution: Lifting State Up
The solution is to "lift" the state from the child components up to their closest common parent. The parent component then "owns" the state and passes it down to the children via props.
This process involves three key steps:
- Identify the closest common parent of the components that need to share state. In our example, it's the
ShoppingCartcomponent. - Move the state from the children up to this parent component. You'll use
useStatein the parent. - Pass the state and handler functions down as props to the children.
- Children that need to display the state receive it as a prop.
- Children that need to update the state receive a function (like
setQuantity) as a prop.
This diagram perfectly illustrates the flow: data is passed down via props, and change requests are sent up via function calls.
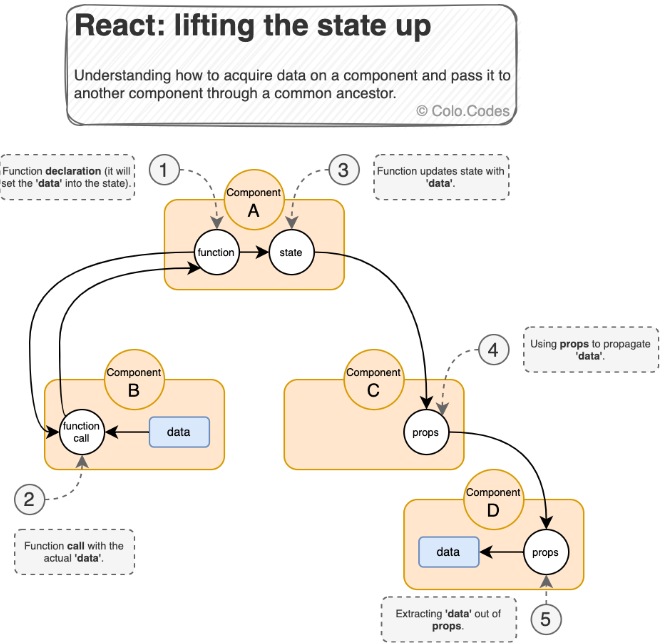
Now, let's see this in action. The rest of the Codevolution video walks through the entire refactoring process.
React 19 Tutorial - 26 - Sharing State Between Components
Continue watching the Codevolution video to see how to solve the synchronization problem by lifting state.
Watch from 03:49 to 11:27. Pay close attention to: Moving State: The quantity state is moved from ProductCart into the parent ShoppingCart component. Passing State Down: The ShoppingCart passes the quantity value down to ProductCart and CartSummary as a prop. Passing Handlers Down: The ShoppingCart defines a handleAddToCart function and passes it down to ProductCart as a prop (onAddToCart). The child calls this function when its button is clicked.
After lifting the state, the parent ShoppingCart component becomes the single source of truth for the cart's data. Both ProductCart and CartSummary read from this same source, ensuring the UI is always synchronized.
3. Controlled vs. Uncontrolled Components
This process of lifting state up introduces an important concept: controlled and uncontrolled components.
- An uncontrolled component manages its own state internally. Our original
ProductCardwith its ownuseStatefor quantity was uncontrolled. The parent had no idea what its state was. - A controlled component receives its value and its change handlers via props. It has no internal state of its own. Our refactored
ProductCardis now controlled byShoppingCart.
You've already been working with controlled components! The form inputs we built in previous lessons, where you passed value={name} and onChange={e => setName(e.target.value)}, are the classic example of controlled components.
To solidify this idea, please read the "Deep Dive" section from the official React documentation.
Sharing State Between Components
The official React documentation gives a great explanation of controlled and uncontrolled components. This is a crucial concept that comes directly from lifting state.
Read the section titled Deep Dive: Controlled and uncontrolled components. It clearly defines the difference and explains the trade-offs between flexibility and ease of use.
4. Practice: Synchronize the Inputs
Let's apply what you've learned. Here is a simple app with two independent input fields. Your task is to modify the code so that typing in one input immediately updates the other, and vice-versa.
Starting Code:
import { useState } from 'react';

function Input({ label }) {
  const [text, setText] = useState('');

  function handleChange(e) {
    setText(e.target.value);
  }

  return (
    <label>
      {label}
      {' '}
      <input
        value={text}
        onChange={handleChange}
      />
    </label>
  );
}

export default function SyncedInputs() {
  return (
    <>
      <Input label="First input" />
      <Input label="Second input" />
    </>
  );
}
Your Goal:
Modify SyncedInputs and Input so they share state.
Hint
- Where does the state need to live? What is the closest common parent of the two
<Input>components? - The parent will need to hold the
textstate and ahandleChangefunction. - The
Inputcomponent will need to receive thetextand the handler function as props. It will become a controlled component.
Solution
import { useState } from 'react';

// The Input component is now a controlled component.
// It receives its value and a handler function from its parent.
function Input({ label, text, onChange }) {
  return (
    <label>
      {label}
      {' '}
      <input
        value={text}
        onChange={onChange}
      />
    </label>
  );
}

// The parent component now "owns" the state.
export default function SyncedInputs() {
  const [text, setText] = useState('');

  function handleChange(e) {
    setText(e.target.value);
  }

  return (
    <>
      {/* It passes the state and the handler down to both children. */}
      <Input label="First input" text={text} onChange={handleChange} />
      <Input label="Second input" text={text} onChange={handleChange} />
    </>
  );
}
Conclusion
You've just learned one of the most powerful and common patterns in React. It's the primary way to manage state that affects multiple parts of your application UI.
Key Takeaways:
- When sibling components need to share state, lift the state up to their closest common ancestor.
- The parent component becomes the "single source of truth" for that state.
- The parent passes the state down to children via props.
- The parent passes event handler functions down via props to allow children to trigger state updates.
- This process often turns children into controlled components, which are driven by props rather than their own local state.
Preview of Next Lesson:
You have now covered all the core concepts for managing local and shared state for simple-to-medium complexity components. In the final lesson of this module, you will build a multi-field contact form that consolidates and logs form data on submission. This project will be a great opportunity to apply everything you've learned about useState, controlled components, form handling, validation, and now, potentially lifting state.