Hello! In our last lesson, we focused on the local side of Git, mastering the git add and git commit commands to create a clean, versioned history on your own machine. This gave you a private record of your work, completely isolated from others.
Today, we'll bridge the gap between your local repository and the shared, central repository. This lesson covers the essential collaborative part of the Git workflow. You will learn how to synchronize your work with a team by "pushing" your local commits to the remote server and "pulling" updates from others. Mastering these operations is the final step in understanding the complete, fundamental cycle of distributed version control, moving you from a solo developer to a collaborating team member.
The Collaborative Workflow: Push and Pull
In a distributed system like Git, every developer has a full copy of the repository. Collaboration happens by explicitly synchronizing these copies. This is different from a centralized mainframe system like Endevor, where you work directly against a single source of truth. In Git, you commit your changes locally first, and only when you are ready do you share them.
This synchronization is handled by two core commands:
git push: Sends your committed changes from your local repository to the remote repository (e.g., on GitHub).git pull: Fetches changes from the remote repository and merges them into your local repository.
The diagram below illustrates this flow. You and your team members work on your local repositories and then use push and pull to keep the central remote repository and each other's work in sync.

Let's start by reading a brief overview of this workflow from a guide designed for mainframe developers moving to Git.
Git for source code management | IBM Z DevOps Guide
This IBM guide frames the Git workflow for developers coming from a z/OS background, making the concepts highly relatable.
Please read the section under the heading Developing new features or bug fixes. Pay close attention to the sequence of commands shown: git pull, git commit, and git push. This is the standard cycle of work in a collaborative Git environment.
Sharing Your Changes: git push
Once you have made one or more commits locally, those changes exist only on your machine. To share them with your team, you use the git push command. This command uploads your committed snapshots to the remote repository.
The basic structure of the command is git push <remote-name> <branch-name>.
<remote-name>is the nickname for the remote server. When youclonea repository, Git automatically creates a remote namedoriginthat points to the URL you cloned from.<branch-name>is the branch you want to push. For now, we will be working with the default branch, which is typically namedmain.
So, a common command you will use is git push origin main.
The following video demonstrates how to connect a local repository to a remote one on GitHub and push the local history for the first time.
Git and GitHub Tutorial for Beginners
This segment from Kevin Stratvert's tutorial clearly shows the commands needed to push local work to a remote server.
Watch the section from the demonstration on pushing an existing repository. Note the sequence: adding a remote named origin, and then using git push to send the local commits to the cloud.
Getting Updates: git pull
While you are working on your features, your teammates are also working and pushing their own changes to the remote repository. To get their latest work onto your local machine, you use git pull.
It's a best practice to pull changes frequently, especially before you start new work. This keeps your local repository up-to-date and reduces the chances of significant conflicts later.
Technically, git pull is a compound command that does two things:
git fetch: It downloads the latest history from the remote repository but does not yet integrate it with your local work. It's like getting the latest mail but leaving it in the mailbox.git merge: It then merges the downloaded changes into your current local branch. This is like taking the mail out of the mailbox and sorting it with your own papers.
For most day-to-day work, using git pull is sufficient. Let's watch a clear explanation of this process.
Git and GitHub Tutorial for Beginners
This short clip explains exactly how git pull works and its relationship to fetch and merge.
Watch the segment from this explanation on how to get changes back from the remote. The distinction between fetch, merge, and pull is explained very clearly.
What happens if you push when the remote has changes?
A common scenario is that you try to push your work, but a team member has pushed their changes since you last pulled. Git will protect you from overwriting their work by rejecting your push and telling you that your local branch is out-of-date.
The solution is to pull first (git pull), which will merge the remote changes into your local branch. Git will often create a "merge commit" to tie the two histories together. After the merge is complete and your local history contains the remote changes, you can then successfully push your work.
Push and Pull in the Eclipse IDE
Since you have experience with Eclipse, you'll be glad to know these Git operations are fully integrated into the IDE through the EGit plugin. This is the same environment where you will use Micro Focus Enterprise Developer. The concepts are identical, but you can use menus and dialogs instead of the command line.
The standard Git options are found by right-clicking your project and navigating to the Team menu.
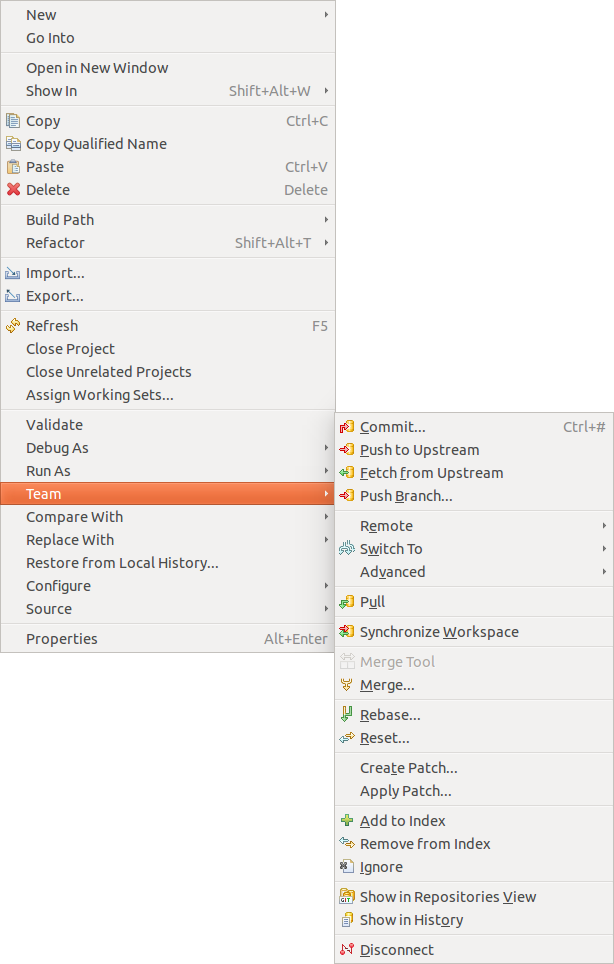
Let's read the specific sections from the EGit tutorial that cover these synchronization actions.
This tutorial from EclipseSource provides a step-by-step guide to using Git within the Eclipse IDE.
First, read the section Fetch and Pull. This explains how to update your local project with changes from the remote repository. Next, read the section Push, which details how to send your local commits to the remote repository.
To see this in a live demonstration, the following video walks through the entire process of connecting an Eclipse project to a GitHub repository and synchronizing changes.
How To Add Eclipse Project To GitHub | How to Commit, Push, Pull from Eclipse to GitHub
This video by Automation Step by Step provides a practical walkthrough of the commit, push, and pull cycle within Eclipse.
Watch the segment from committing and pushing. The presenter demonstrates staging changes, committing, and then pushing them to the remote GitHub repository. Briefly watch the next part from making another change, which reinforces the push workflow. Finally, notice where the pull command is located in the menu at the end. This confirms how you would get updates from others.
Conclusion
You have now completed the fundamental cycle of version control with Git. You know how to get a project (clone), track your local changes (add, commit), and synchronize with a team (push, pull). This workflow forms the backbone of modern, collaborative software development.
Key Takeaways:
- The collaborative workflow involves synchronizing your local repository with a shared remote repository.
git pushis used to upload your local commits to the remote repository, sharing your work with the team.git pullis used to download changes from the remote repository and merge them into your local branch, keeping your workspace up-to-date.- The standard development cycle is:
pull-> make changes ->add/commit->push. - These fundamental operations are available both on the command line and directly within IDEs like Eclipse (and by extension, Micro Focus Enterprise Developer).
With this solid foundation in version control, you are now fully equipped to manage source code in a modern development environment. In our next lesson, we will transition into the Micro Focus Enterprise Developer IDE. We'll start by creating a new COBOL project and importing your existing mainframe source code into this new, Git-managed structure.