Hello! In our last lesson, we built a solid conceptual foundation by comparing the centralized model of mainframe library managers with the distributed nature of Git. We discussed how Git enables developers to have a full, independent copy of the entire project repository on their own machines.
Today, we move from concept to practice. This lesson is all about that crucial first step: creating your own local copy of a remote project. You will learn how to use the git clone command, the gateway to collaborating on any Git-based project. We'll explore how to do this both from the command line—to understand the fundamentals—and directly within the Eclipse IDE, an environment you're already familiar with.
What is Cloning?
In the last lesson, we talked about the "Remote Repository" as the shared, central source of truth for a project. To start working on that project, you need to bring a complete copy of it to your local machine. This process is called cloning.
The git clone command does more than just copy files. It creates a new directory on your machine, pulls down the entire history of the project—every commit ever made—and sets up a connection back to the original remote repository. This connection is typically named origin by default, and it's how Git knows where to push your changes to and pull others' changes from later on.

To get a formal understanding of the command, let's turn to a well-regarded guide from Atlassian.
This document provides a detailed explanation of the git clone command. It's an excellent resource for understanding the mechanics of what happens when you clone a repository.
Please read the following sections: Purpose: repo-to-repo collaboration development copy: Read this section to understand why cloning is fundamental to Git's distributed model. Pay attention to the comparison with SVN, which shares some similarities with centralized mainframe SCMs. Focus on the text from this paragraph. Usage: This section explains the practical command. Read the introductory paragraph from the start. Note the key detail that cloning automatically creates the origin remote connection.
Finding the Repository URL
The most important piece of information you need to clone a repository is its URL. This is the address of the remote repository on a hosting service like GitHub. You can usually find this URL under a green "Code" button on the repository's main page.
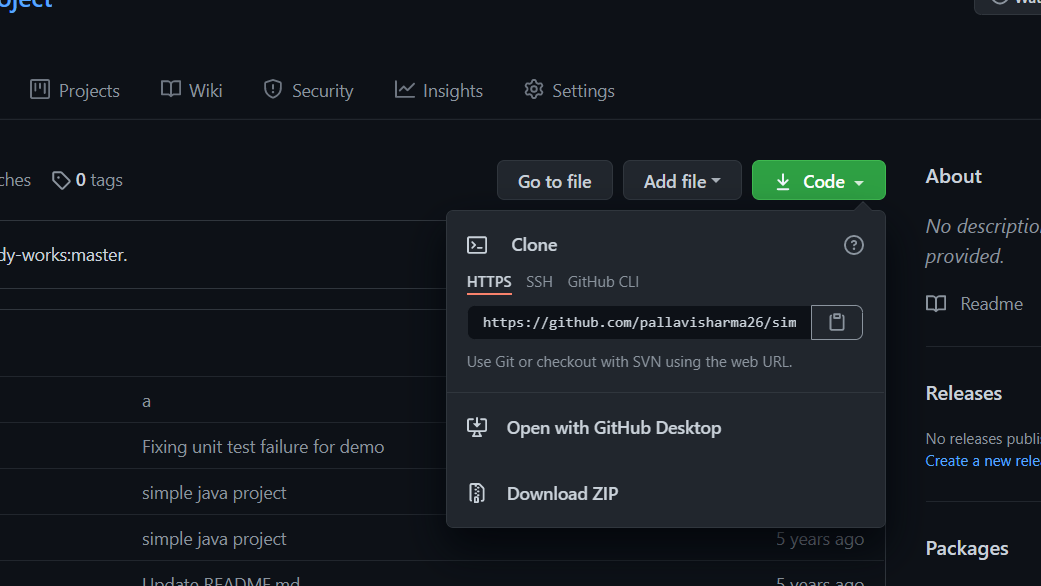
As the Atlassian article and this image suggest, there are a few different types of URLs, or "protocols," you can use.
- HTTPS (e.g.,
https://github.com/user/repo.git): This is the most common and easiest to use, especially when you're behind a corporate firewall. It works just like a web browser. You will often be prompted for your username and password (or a personal access token). - SSH (e.g.,
git@github.com:user/repo.git): This method uses a secure key-based authentication system. It's more secure and convenient for frequent use as you don't have to re-enter your credentials, but it requires some initial setup of SSH keys.
For our purposes today, we will use the HTTPS URL, as it requires no prior setup.
Cloning from the Command Line
The most fundamental way to interact with Git is through the command line. Even if you primarily use an IDE, understanding the command-line equivalent is crucial for troubleshooting and for automating tasks later on.
The following video provides a clear, step-by-step demonstration of cloning a repository.
Git Tutorial for Beginners: Command-Line Fundamentals
This tutorial by Corey Schafer is an excellent introduction to Git. We will focus on the segments covering initial configuration and the clone command itself.
First, if you haven't configured Git on your machine before, you need to tell it who you are. Watch the segment on initial setup to see how to set your user.name and user.email. This is a one-time setup on any new machine. Next, watch the core demonstration of cloning a project. The instructor clones a repository into an empty directory. Pay close attention to the command structure: git clone <URL> . (the dot at the end tells Git to clone into the current directory). Watch the segment from cloning the repo.
The basic syntax is git clone <URL>. This will create a new directory named after the repository. If you want to clone it into a specific directory, you can provide that as a second argument: git clone <URL> <directory_name>.
Cloning within the Eclipse IDE
Your experience with Eclipse gives you a significant advantage. The Eclipse IDE has excellent Git integration through a plugin called EGit. This allows you to perform all the Git operations we've discussed directly within the IDE. Let's see how to clone a repository using EGit.
The process involves pointing Eclipse to the Git repository's URL, and it will handle the cloning and importing of the project into your workspace.
Eclipse Git Tutorial - Vogella
This comprehensive Vogella tutorial is the definitive guide to using Git in Eclipse. We'll walk through the process of setting up and cloning.
Check Installation and Configuration: Most modern Eclipse installations include EGit. First, quickly read section 2, Installation, just to be aware of how to install it if needed. Then, follow the steps in section 3.1, Configuration, to ensure your user name and email are set up within Eclipse. This is the same configuration the command line uses. Clone the Repository: Now, jump to section 5, Clone an existing repository. Follow the steps carefully. You will select "Projects from Git (with smart import)" and then "Clone URI". Import the Project: After cloning, the repository exists on your local disk, but it's not yet in your Eclipse workspace. The final step of the wizard handles this. Read the short section that follows, from Importing projects, to see how to import the project into your workspace. GitHub Specifics: For additional context, quickly review section 12.1, Clone project. This part mentions how Eclipse can use a URL from your clipboard and touches on authentication.
To see this process in action, you can also watch this short video demonstration.
How To Add Eclipse Project To GitHub | How to Commit, Push, Pull from Eclipse to GitHub
This video provides a clear visual walkthrough of the process described in the Vogella tutorial.
Please watch the segment from the Git perspective. The presenter demonstrates how to open the "Git" perspective in Eclipse, select the "Clone a Git repository" option, paste the URL, and complete the process.
Conclusion
In this lesson, you have learned the practical skill of cloning a remote repository, which is the starting point for all collaborative work in Git. You now understand how to obtain the repository URL from a service like GitHub and use the git clone command to create a full local copy of the project. Critically, you've seen how to perform this action both on the command line for fundamental understanding and through the EGit plugin to leverage your existing expertise in the Eclipse IDE.
Key Takeaways:
git cloneis the command to create a local copy of a remote repository.- Cloning copies the entire project history, not just the latest files.
- The command automatically sets up a tracking connection named
originto the remote URL. - You can clone using either the command line (
git clone <URL>) or an IDE integration like Eclipse's EGit plugin. - The HTTPS protocol is the most straightforward way to specify the repository URL for cloning, though SSH is a common alternative.
Now that you have a local copy of a project, the next logical step is to start making changes. In our next lesson, we will dive into the local workflow, exploring how you can track your modifications using the staging area with git add and save them to your local repository's history with git commit.