Hello! Welcome back to our deep dive into the core of Spring and Spring Boot.
In our last lesson, we focused on the individual bean, exploring its lifecycle from creation to destruction and the different scopes that govern its existence. We saw how Spring manages beans that we explicitly define. But this leads to a critical question for any Spring Boot developer: what about the vast number of beans that Spring Boot seems to configure automatically, just by adding a starter dependency? This "magic" is central to Spring Boot's value proposition.
Today, we will demystify that magic. Our goal is to explain Spring Boot's auto-configuration mechanism and how to create a custom auto-configuration. By the end of this lesson, you'll understand that this is not magic at all, but a clever, conditional system that you can understand, control, and even extend—a key piece of knowledge for any senior-level Spring interview.
1. The Starting Point: @SpringBootApplication
The entire auto-configuration process is kicked off by a single annotation you've used in every application: @SpringBootApplication. This is not a simple marker; it's a composite annotation that bundles three powerful features.

The key that unlocks the auto-configuration mechanism is @EnableAutoConfiguration. When Spring Boot starts, this annotation tells it to begin its process of guessing the configuration you might need based on the dependencies on your classpath.
2. The Core Principle: Configuration Based on Conditions
At its heart, auto-configuration is a sophisticated "if-then" system. Spring Boot makes educated guesses:
- If it sees
spring-boot-starter-web(which includes Tomcat and Spring MVC) on the classpath, then it assumes you are building a web application and automatically configures an embedded Tomcat server, aDispatcherServlet, and other web-related beans. - If it sees a JPA implementation like Hibernate and a
DataSourceclass on the classpath, then it automatically configures anEntityManagerFactory, aTransactionManager, and other necessary beans for data access.
This proactive setup saves you from writing mountains of boilerplate configuration code. But how does it make these decisions? The answer lies in the Spring Framework's @Conditional annotation.
To understand Spring Boot's mechanism, we must first understand the foundation it's built upon.
How Spring Boot's Autoconfigurations Work
Let's start from the beginning with the @Conditional annotation itself. This guide from Marco Behler provides an excellent first-principles explanation of how conditionals work in the core Spring Framework, which is the basis for everything Spring Boot does.
Please read the sections titled 'Conditionals' up to (but not including) 'Half-Time Break: What is Spring Boot?'. Focus on understanding what problem @Conditional solves and how a custom Condition implementation works.
As the article explains, the core idea is simple: a bean (or an entire configuration class) is only loaded if a specific condition—evaluated in code—returns true.
Spring Boot takes this concept and provides a set of specialized, ready-to-use conditional annotations that cover the most common checks. These are the workhorses of auto-configuration:
@ConditionalOnClass: The configuration is applied only if a specific class is found on the classpath.@ConditionalOnMissingClass: The configuration is applied only if a specific class is not found.@ConditionalOnBean: The configuration is applied only if a bean of a certain type already exists in theApplicationContext.@ConditionalOnMissingBean: The configuration is applied only if a bean of a certain type does not already exist. This is crucial as it allows you to override any auto-configured bean by simply defining your own.@ConditionalOnProperty: The configuration is applied only if a specific property in yourapplication.properties(or other environment properties) has a certain value, or is present/absent.
3. Case Study: DataSourceAutoConfiguration
Let's see how these annotations work together in a real-world example. The automatic configuration of a DataSource is a classic case.
How Spring Boot's Autoconfigurations Work
The Marco Behler guide continues with a brilliant, line-by-line analysis of DataSourceAutoConfiguration. This is exactly the level of detail you'd be expected to discuss in a senior-level interview.
Please read the section 'How to analyze an AutoConfiguration: DataSourceAutoConfiguration'. Follow the breakdown of how the annotations @ConditionalOnClass, @ConditionalOnMissingBean, and @ConditionalOnProperty are used to decide whether to create a DataSource bean and which connection pool (like HikariCP) to use.
This deep dive shows that there is no magic. DataSourceAutoConfiguration is simply a @Configuration class loaded with conditional logic. It checks:
- Is there a
DataSourceclass on the classpath? (@ConditionalOnClass) - Has the user already defined their own
DataSourcebean? If so, back off. (@ConditionalOnMissingBean) - Is a connection pool library like HikariCP on the classpath? (
@ConditionalOnClass) - Has the user specified a preference for a different pool via properties? (
@ConditionalOnProperty)
Based on the answers, it decides whether to create a DataSource bean and which implementation to use.
Test your understanding!
You add spring-boot-starter-data-jpa to your project and define your own DataSource bean in a @Configuration class to connect to a legacy database with a very specific configuration. What will Spring Boot's DataSourceAutoConfiguration do? Why?
Show answer
Spring Boot's DataSourceAutoConfiguration will back off and not create its own DataSource bean. This is because most of its internal @Bean methods for creating a data source are annotated with @ConditionalOnMissingBean(DataSource.class). Since your custom DataSource bean is present in the application context, this condition evaluates to false, and the auto-configuration gracefully yields to your custom setup.
4. The Discovery Process: spring.factories and AutoConfiguration.imports
So, Spring Boot evaluates these conditional configuration classes. But how does it even know which classes to check? It discovers them by reading specific files packaged inside dependency JARs.
Demystifying Spring Boot's Magic: A Deep Dive into Auto- ...
Let's explore this discovery mechanism. The article from MEsfandiari explains how Spring Boot finds its auto-configuration candidates.
Read the subsections under 'The Mechanics: How Does Auto-Configuration Actually Work?', specifically the part about 'Locating Auto-Configuration Classes'. Pay attention to the two files mentioned: the legacy spring.factories and the modern AutoConfiguration.imports.
To summarize:
- Legacy (Pre-Spring Boot 2.7): Spring Boot looks for a file named
META-INF/spring.factoriesin all JARs on the classpath. It reads the list of class names under theorg.springframework.boot.autoconfigure.EnableAutoConfigurationkey. - Modern (Spring Boot 2.7+): It looks for
META-INF/spring/org.springframework.boot.autoconfigure.AutoConfiguration.imports. This file is a simple text file listing the fully qualified names of the auto-configuration classes, one per line. This new format offers better performance.
5. Creating Your Own Custom Auto-Configuration
Understanding the mechanism is great, but creating your own auto-configuration solidifies that knowledge and is a powerful skill. This is how you create reusable "starters" for your organization.
Let's say you want to create a starter that provides a default NotificationSender bean across all your microservices.
Demystifying Spring Boot's Magic: A Deep Dive into Auto- ...
The 'Demystifying Spring Boot's Magic' article provides a clear, step-by-step example of how to build your own simple auto-configuration.
Read the entire section 'Crafting Your Own Auto-Configurations (Custom Starters)'. Follow the three steps: defining the service, creating the auto-configuration class with @ConditionalOnMissingBean, and registering it in the .imports file.
The process is a direct application of everything we've learned:
- Define the component: Create your interface and a default implementation (e.g.,
NotificationSenderandEmailNotificationSender). - Create the
@Configurationclass:- Annotate it with
@Configuration. - Add a
@Beanmethod that creates an instance of your default implementation. - Crucially, add conditional annotations. At a minimum, you'll want
@ConditionalOnMissingBeanto allow users to provide their own implementation, and perhaps@ConditionalOnClassto ensure a required library is present.
- Annotate it with
- Register your configuration: Create the file
src/main/resources/META-INF/spring/org.springframework.boot.autoconfigure.AutoConfiguration.importsand add the fully qualified name of your configuration class to it.
When you package this project as a JAR and include it as a dependency in another Spring Boot application, it will automatically get your default NotificationSender, unless it defines its own!
6. Debugging and Controlling Auto-Configuration
What do you do when the "magic" doesn't work as expected, or when you want to disable a part of it?
Auto-Configuration Report:
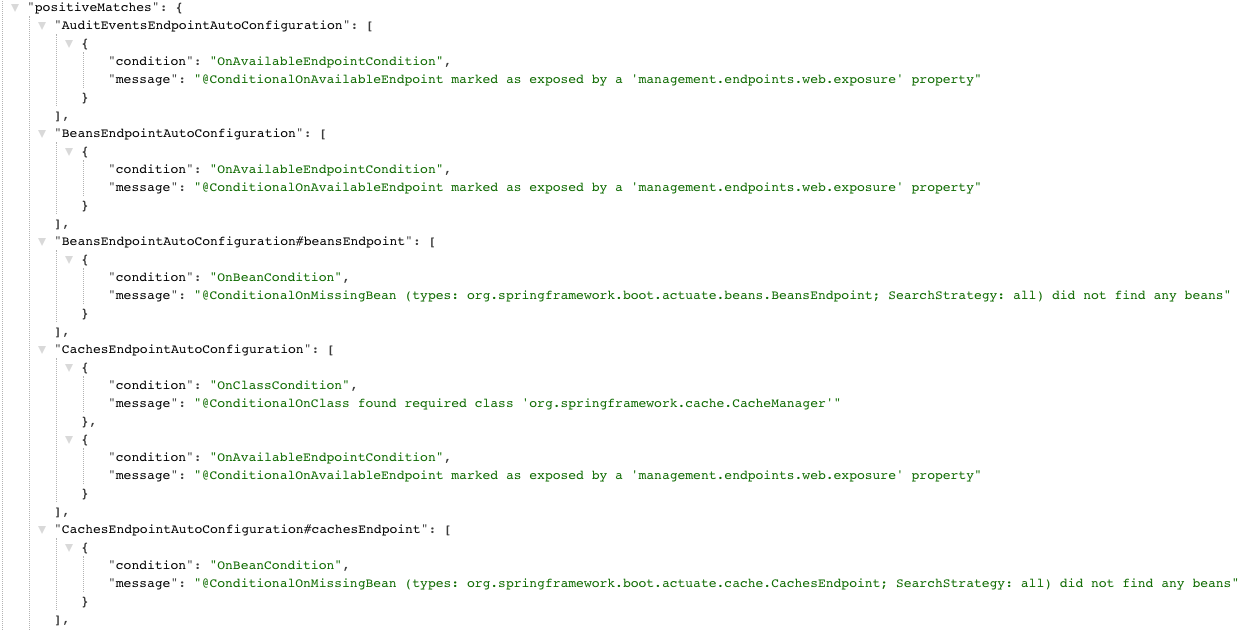
You can ask Spring Boot to provide a detailed report of which auto-configurations were applied ("positive matches") and which were not ("negative matches") and why. You can enable this by setting debug=true in your application.properties or by running your app with the --debug flag.
This report is invaluable for troubleshooting. It will tell you exactly which condition failed (e.g., "did not find required class 'com.example.SomeClass'").
Excluding an Auto-Configuration:
If an auto-configuration is interfering with your setup or is simply not needed, you can explicitly disable it.
Demystifying Spring Boot's Magic: A Deep Dive into Auto- ...
Both of our main resources mention how to exclude configurations. Let's quickly review this feature.
Find the subsection 'Selective Exclusion' within the section 'Why Invest Time Understanding This “Magic”?' and note the syntax for excluding an auto-configuration class.
As shown, you use the exclude attribute on the @SpringBootApplication annotation:
@SpringBootApplication(exclude = {DataSourceAutoConfiguration.class})
public class MyApplication {
    // ...
}
Conclusion
Today we've pulled back the curtain on one of Spring Boot's most powerful features. You now have the deep understanding required for senior-level interviews on this topic.
Key Takeaways:
- Auto-configuration is not magic; it's a conditional system triggered by
@EnableAutoConfiguration. - It works by inspecting the classpath and environment, using annotations like
@ConditionalOnClass,@ConditionalOnMissingBean, and@ConditionalOnPropertyto make decisions. - Auto-configuration candidates are discovered via the
META-INF/spring.factoriesorMETA-INF/spring/org.springframework.boot.autoconfigure.AutoConfiguration.importsfiles inside dependency JARs. - You can easily override any auto-configured bean by simply defining a bean of the same type in your own configuration.
- You can create your own reusable starters by building a custom auto-configuration and registering it correctly.
- You can debug the process using the auto-configuration report and disable specific configurations with the
excludeattribute.
Preview of the Next Lesson:
We've now seen how the Spring container creates and wires beans, both manually and automatically. But this wiring process can sometimes lead to complex problems. In our next lesson, we'll tackle a classic interview question and a real-world headache: we will learn how to solve a circular dependency problem in a Spring application and explain the underlying cause.