Hello! Welcome back to our module on Spring & Spring Boot Core.
In our last lesson, we established the foundational principles of Inversion of Control (IoC) and Dependency Injection (DI). We learned how the Spring container takes charge of creating objects (beans) and wiring their dependencies together, primarily through constructor injection. This is the "who creates what and how" of Spring.
Today, we'll answer the next logical questions: How long do these beans live? Is there always just one instance of a bean? And what happens to a bean from its creation to its eventual destruction? This brings us directly to today's learning outcome: to explain the Spring bean lifecycle, its scopes (e.g., singleton, prototype), and implement lifecycle callbacks. Understanding these concepts is crucial for managing application state, handling resources correctly, and answering deep-dive questions in a senior developer interview about how Spring works "under the hood."
1. Spring Bean Scopes: How Many Instances?
When the Spring container creates a bean, it also decides its scope. The scope defines the lifecycle and visibility of that bean instance. For interviews, you must be fluent in the two most fundamental scopes: singleton and prototype.
Spring Beans Explained: Configuration, IoC Container ...
To start, let's get a comprehensive overview of the different bean scopes available in Spring. This article, 'Spring Beans Explained' by Kamil Mazurek, provides a clear breakdown.
Please read the section titled 'Spring Bean Scopes'. Focus on understanding the definition and typical use cases for Singleton, Prototype, Request, Session, and Application scopes.
Let's recap the two most important scopes:
- Singleton (Default): Only one single instance of the bean is created per Spring IoC container. Every time any other bean requests a dependency of this type, the container injects a reference to that same, single instance.
- Best for: Stateless services, repositories, and configuration beans. Since these beans are shared across threads, they must be thread-safe. This is why it's best practice to make them stateless.
- Prototype: A new instance is created every single time the bean is requested from the container.
- Best for: Stateful objects, like a shopping cart or a report builder, where each user or task needs a unique, isolated instance.
The other scopes (request, session, application) are specific to web applications and define the bean's lifetime relative to an HTTP request, a user's session, or the entire web application's lifecycle, respectively. While good to know, singleton and prototype are the most universally applicable and frequently discussed in interviews.
Test your understanding!
A teammate proposes creating a UserSessionDetails bean to hold information about the currently logged-in user. They suggest making it a singleton bean for efficiency. What feedback would you provide?
Show answer
This is a bad idea. A singleton UserSessionDetails bean would be shared across all users of the application. This would lead to one user's data overwriting another's, causing serious data integrity and security issues.
The correct scope would be session, where each user gets their own instance of UserSessionDetails that lasts for the duration of their HTTP session. If it were a non-web application, a prototype scope would be necessary, with the application manually managing the lifecycle of each user's instance.
The Singleton-Prototype Injection Problem
Here's a classic senior-level interview question: "What happens if you inject a prototype-scoped bean into a singleton-scoped bean?"
At first glance, you might think the singleton will get a fresh instance of the prototype every time it's needed. However, that's incorrect. The dependency injection happens only once—when the singleton bean is created. At that time, it receives a single instance of the prototype bean, and it will hold on to that same instance for its entire lifetime, defeating the purpose of the prototype scope.
So how does Spring solve this?
5 years in Spring, yet certification taught me this
The article '5 years in Spring, yet certification taught me this' has a great section that addresses this exact problem. It discusses two common solutions.
Read the subsection 'Having fun with scopes'. Focus on the 'Proxy approach' and 'Lookup Method Injection' as two distinct solutions to this problem.
To summarize the solutions:
- Scoped Proxy (
proxyMode): You annotate the prototype bean with@Scope(value = "prototype", proxyMode = ScopedProxyMode.TARGET_CLASS). Spring then injects a proxy object into the singleton instead of the actual prototype. When the singleton calls a method on this proxy, the proxy intercepts the call and asks the container for a new instance of the prototype, forwarding the call to it. - Lookup Method Injection (
@Lookup): You define an abstract method in your singleton class that returns the prototype type and annotate it with@Lookup. Spring dynamically creates an implementation of this method that, when called, looks up a fresh instance of the prototype bean from the container.
2. The Spring Bean Lifecycle
Now that we understand scopes, let's zoom out and look at the entire journey of a bean. The Spring bean lifecycle refers to the sequence of events from its instantiation by the container to its final destruction.
This lifecycle diagram provides a great visual overview of all the steps involved.
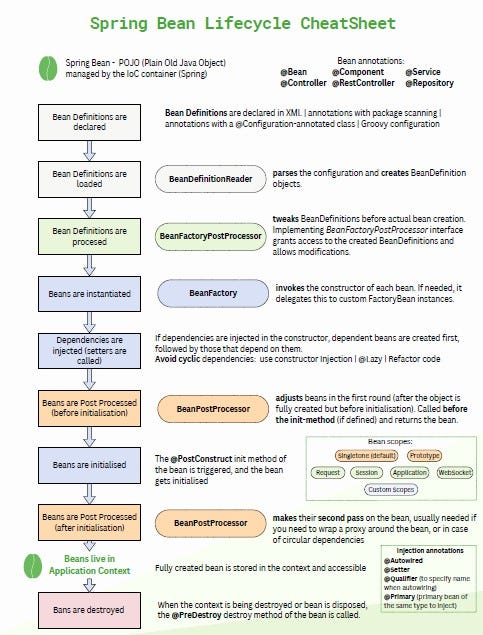
To get a more structured understanding of this flow, let's refer back to our primary resource.
Spring Beans Explained: Configuration, IoC Container ...
The 'Spring Beans Explained' article provides a clear, step-by-step conceptual flow of the lifecycle for singleton beans.
Read the section 'Spring Bean Lifecycle' and pay close attention to the 8 steps listed, from Instantiation to Destruction. This provides the conceptual framework for the rest of our lesson.
The key phases we are interested in are:
- Instantiation: Spring creates the bean instance (e.g., calls the constructor).
- Populate Properties: Spring injects dependencies (DI).
- Initialization: Custom initialization logic is run.
- In Use: The bean is ready and being used by the application.
- Destruction: The bean is being removed, and custom cleanup logic is run.
3. Implementing Lifecycle Callbacks
Spring provides hooks that allow you to execute custom code during the initialization and destruction phases. This is essential for tasks like acquiring or releasing resources (e.g., database connections, file handles, network sockets).
There are three primary ways to implement these callbacks. For a senior-level interview, you're expected to know all three and articulate the pros and cons of each.
Spring Beans Explained: Configuration, IoC Container ...
Let's explore the practical implementation of these callbacks. The next two sections of the 'Spring Beans Explained' article cover the different ways to define initialization and destruction logic.
Read the sections 'Bean Creation and Initialization' and 'Bean Destruction and Cleanup'. For each phase (initialization and destruction), make sure you understand the three approaches: using annotations (@PostConstruct, @PreDestroy), using interfaces (InitializingBean, DisposableBean), and using a custom method (initMethod, destroyMethod).
Here’s a summary table, perfect for interview prep:
| Method | Initialization | Destruction | Pros & Cons |
|---|---|---|---|
| Annotations | @PostConstruct |
@PreDestroy |
Recommended. JSR-250 standard. Keeps code decoupled from Spring. Clean and modern. |
| Spring Interfaces | InitializingBean (implement afterPropertiesSet()) |
DisposableBean (implement destroy()) |
Couples your code directly to the Spring framework. Less ideal but sometimes necessary for deep integration. |
| Custom Methods | @Bean(initMethod = "...") |
@Bean(destroyMethod = "...") |
Defined in @Configuration. Excellent for third-party library beans where you cannot modify the source code. |
Interview Pro Tip: If asked about the order, Spring executes initialization callbacks in this sequence:
@PostConstructannotated methodsafterPropertiesSet()fromInitializingBean- Custom
initMethod
4. The Prototype Lifecycle "Gotcha"
We've discussed the lifecycle for singleton beans, but what about prototypes? This is another critical distinction that interviewers love to probe.
Once the Spring container creates and initializes a prototype bean and gives it to the client, it relinquishes all further responsibility for it. The container does not manage the complete lifecycle of a prototype bean.
What does this mean in practice?
5 years in Spring, yet certification taught me this
The article '5 years in Spring...' contains an excellent explanation and a memorable analogy for why Spring doesn't manage the destruction of prototype beans.
Read the section 'Not what you would expect from bean lifecycle'. The analogy of the coffee machine (singleton) versus the coffee capsule (prototype) is a powerful way to remember this concept.
The key takeaway is this: for a prototype-scoped bean, Spring will execute initialization callbacks (like @PostConstruct), but it will never call any destruction callbacks (like @PreDestroy).
The responsibility for cleaning up a prototype bean and releasing any resources it holds falls entirely on the client code that requested it. If you fail to do this, you will have a resource leak in your application.
Test your understanding!
You are writing a service that generates a large temporary report file on disk. You decide to create a ReportGenerator bean with a prototype scope to handle this. The ReportGenerator has a close() method to delete the temporary file. How can you ensure close() is always called, given that @PreDestroy will not work?
Show answer
The client code that obtains the ReportGenerator instance is responsible for its cleanup. The best practice is to have the ReportGenerator implement the java.lang.AutoCloseable interface (where the close() method is defined). The client code can then use a try-with-resources block to ensure the close() method is called automatically, even if exceptions occur.
// In your service (the client of the prototype)
// Assuming you get the prototype from the ApplicationContext

try (ReportGenerator generator = context.getBean(ReportGenerator.class)) {
    generator.createReport();
    // The generator.close() method will be called automatically here.
} catch (Exception e) {
    // Handle exception
}
This approach correctly places the cleanup responsibility on the client, which is necessary for prototype beans.
Finally, let's see these concepts in action within a familiar layered architecture.
Spring Beans Explained: Configuration, IoC Container ...
This final reading shows how lifecycle callbacks are used in a practical setting, within a service bean in a typical Spring Boot application.
Skim through the 'Practical Example: Simple Layered Architecture' section. You don't need to read every line of code, but focus on the ItemService class and notice the use of @PostConstruct and @PreDestroy for logging initialization and shutdown events.
Conclusion
Well done! You have now explored the complete lifecycle of a Spring bean. Understanding scopes and lifecycle hooks is fundamental to writing robust, resource-efficient Spring applications and a key area of knowledge for any senior developer.
Key Takeaways:
- Bean Scopes define the number of instances and lifetime of a bean. Singleton (one instance, the default) and Prototype (new instance per request) are the most important.
- The Bean Lifecycle for a singleton involves instantiation, dependency injection, initialization, being in use, and finally, destruction.
- Lifecycle Callbacks allow you to run custom logic during initialization and destruction. The modern, recommended approach is using the JSR-250 annotations
@PostConstructand@PreDestroy. - Prototype Lifecycles are different: Spring creates, configures, and initializes a prototype bean but does not manage its destruction.
@PreDestroyand other destruction callbacks are not called. The client is responsible for cleanup.
Preview of the Next Lesson:
We've seen how Spring meticulously manages the lifecycle of individual beans that we define. But what about the hundreds of beans that Spring Boot seems to configure for us "magically" when we add a dependency like spring-boot-starter-data-jpa? In our next lesson, we will demystify this magic by diving into Spring Boot's auto-configuration mechanism and even learn how to create a custom auto-configuration.