Hello! Welcome back.
In our last lesson, we successfully containerized our Spring Boot application into an optimized, multi-stage Docker image. An image is a perfect, self-contained package, but it's static. The real challenge, and a core topic in senior developer interviews, is how to run, manage, and scale these images in a real-world production environment. How do you handle application crashes, scale up to meet sudden traffic spikes, or roll out updates with zero downtime?
This is the role of a container orchestrator, and Kubernetes is the undisputed industry standard. Today, we'll explore its foundational concepts. Your learning outcome is to explain core Kubernetes objects: Pod, ReplicaSet, Deployment, and Service. Mastering these building blocks is essential for designing and managing scalable microservices systems.
1. The Kubernetes Philosophy: Desired State Management
Before we dive into the objects themselves, it's crucial to understand how Kubernetes thinks. Kubernetes operates on a declarative model. Instead of giving it a series of commands (e.g., "run this container," "check if it's alive," "if not, restart it"), you provide a manifest file (usually in YAML) that declares the desired final state of your system. Kubernetes then works continuously to make the cluster's actual state match your desired state.
These declarative definitions are called Kubernetes resources or objects.
To get a quick overview of this concept, read the first two sections of the guide 'Developing and deploying Spring Boot microservices on Kubernetes' from LearnKube.
Read the introductory section titled 'Kubernetes resources'. Focus on understanding the declarative interface and the role of YAML files in defining the target state.
2. The Smallest Unit: The Pod
In Docker, the smallest unit is a container. In Kubernetes, it's a Pod.
A Pod is the smallest and simplest deployable unit in Kubernetes. It acts as a wrapper around one or more containers.
You might wonder, why not just work with containers directly? Pods provide a crucial layer of abstraction:
- Shared Execution Context: Containers within the same Pod share the same network namespace (they can communicate via
localhost) and can share storage volumes. - Atomic Unit: All containers in a Pod are scheduled on the same node and share the same lifecycle. They are created, started, stopped, and deleted together.
The most common pattern is a single container per Pod. However, the ability to run multiple co-located containers enables powerful patterns like sidecars, where a helper container extends the functionality of the main application container (e.g., a logging agent, a service mesh proxy, or a monitoring data scraper).
Crucially, Pods are ephemeral. They can be destroyed and replaced at any time (due to a node failure, scaling down, or an update). When a Pod is recreated, it gets a new IP address. This instability is a key reason we need higher-level objects to manage them.
Day-34 | KUBERNETES DEPLOYMENT | REPLICASETS | #k8s #devopscourse #kubernetes #devops
This video by Abhishek Veeramalla clearly explains the distinction between a container, a Pod, and the higher-level objects we'll discuss next. It's a common interview question.
Watch from 00:54 to 04:20. Focus on why Pods exist as an abstraction over containers and the limitations of deploying Pods directly.
3. Ensuring Reliability: ReplicaSet and Deployment
Since Pods are mortal, we need a manager to enforce our desired state—for example, "I always want 3 replicas of my application running." This is the job of controllers.
ReplicaSet
A ReplicaSet is a controller whose sole purpose is to maintain a stable set of replica Pods running at any given time. If a Pod crashes, the ReplicaSet's control loop detects this and creates a new one to replace it. This provides the self-healing capability that is a hallmark of Kubernetes.
Deployment
While you could use a ReplicaSet directly, in practice, you almost never will. Instead, you'll use a Deployment.
A Deployment is a higher-level object that manages ReplicaSets and provides declarative updates to Pods. A Deployment is what you will typically use to run your stateless applications (like a Spring Boot microservice) on Kubernetes.
Here’s the hierarchy of control:
- You define a Deployment, specifying your container image and the number of
replicas. - The Deployment creates a ReplicaSet.
- The ReplicaSet creates and manages the Pods.

When you want to update your application (e.g., with a new Docker image), you simply update the Deployment's definition. The Deployment controller then handles the update gracefully by:
- Creating a new ReplicaSet with the new configuration.
- Gradually scaling up the new ReplicaSet while scaling down the old one (this is called a rolling update).
- Ensuring zero downtime for your application.
Day-34 | KUBERNETES DEPLOYMENT | REPLICASETS | #k8s #devopscourse #kubernetes #devops
Let's continue with the same video to see this hierarchy in action. The demonstration of self-healing and scaling is particularly insightful.
Watch from 06:01 to 27:12. This covers: The relationship between Deployments and ReplicaSets. A live demo of a ReplicaSet automatically recreating a deleted Pod (auto-healing). A live demo of scaling an application by changing the replica count in the Deployment. A summary of why Deployments are the standard for real-world applications.
4. Enabling Communication: The Service
We now have a resilient, scalable set of Pods managed by a Deployment. But there's a problem: Pods have dynamic, unpredictable IP addresses. How can other services, or external users, reliably connect to them?
The answer is the Service object.
A Service defines a logical set of Pods and a policy by which to access them. It provides a stable endpoint (a single, static IP address and a DNS name) that forwards traffic to the underlying Pods.
The magic that connects a Service to a set of Pods is a combination of labels and selectors.
- Labels: Key-value pairs you attach to objects, like Pods (e.g.,
app: my-springboot-app,tier: backend). - Selector: A query in the Service's definition that identifies which Pods to target based on their labels.
This loose coupling is extremely powerful. The Service doesn't care about individual Pods or their IPs; it only cares about which Pods match its selector. As Pods are created and destroyed, the Service automatically updates its list of healthy endpoints.
Test your understanding! (Interview Question)
You've applied the following YAML manifest to your cluster. You find that the my-service Service is not sending any traffic to the Pods created by the my-deployment Deployment. Why?
# deployment.yaml
apiVersion: apps/v1
kind: Deployment
metadata:
  name: my-deployment
spec:
  replicas: 3
  selector:
    matchLabels:
      app: my-app
  template:
    metadata:
      labels:
        app: my-app # <-- Pods get this label
    spec:
      containers:
      - name: my-container
        image: my-image:1.0
---
# service.yaml
apiVersion: v1
kind: Service
metadata:
  name: my-service
spec:
  selector:
    app: my-application # <-- Service is looking for this label
  ports:
    - protocol: TCP
      port: 80
      targetPort: 8080
Show answer
The Service will not bind to the Pods because of a mismatch between the Service's selector and the Pods' labels.
- The Deployment's template specifies that all created Pods will have the label
app: my-app. - However, the Service is configured with a selector looking for Pods with the label
app: my-application.
Because no Pods match the Service's selector, the Service has no endpoints to forward traffic to. To fix this, you must change the Service's selector to app: my-app to match the Pods' label. This label/selector mechanism is a fundamental concept frequently tested in Kubernetes interviews.
This scenario is adapted from the article 'Hands-on Kubernetes interview questions' (resource_id LINK).
Common Service Types
A Service can expose your application in different ways, specified by its type:
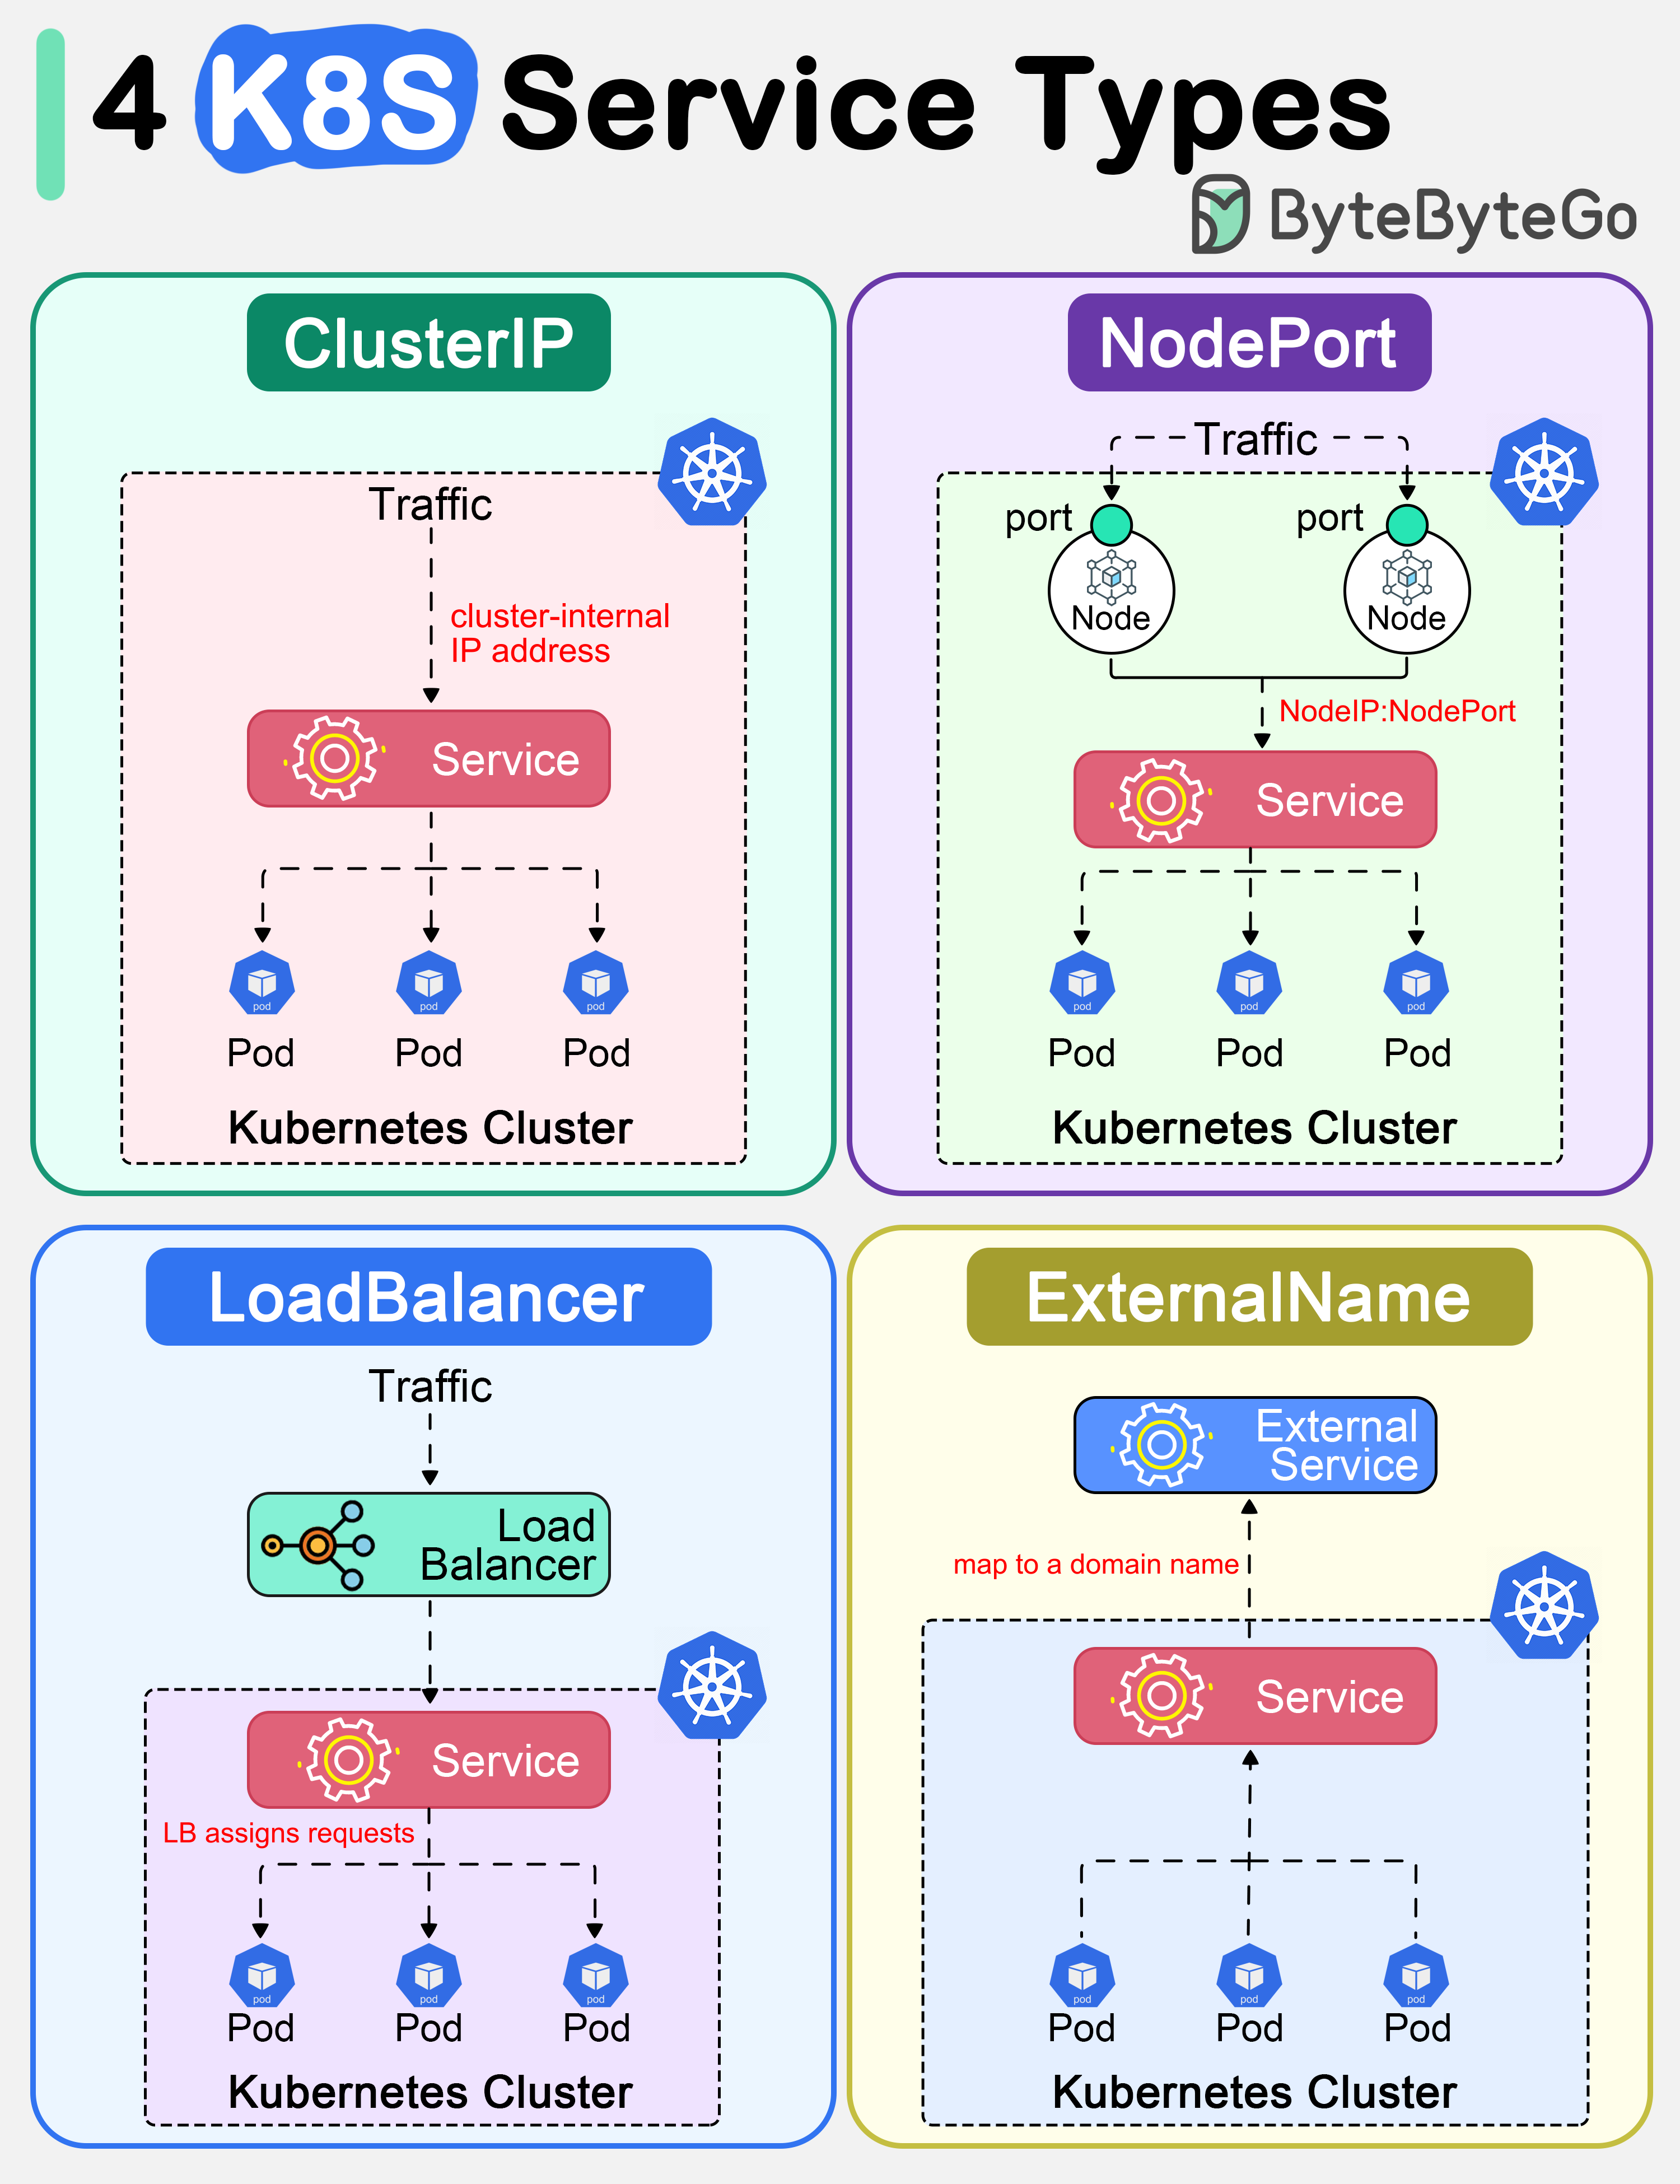
- ClusterIP (Default): Exposes the Service on an IP that is only reachable from within the cluster. This is perfect for internal communication, like a front-end service calling a back-end Spring Boot service.
- NodePort: Exposes the Service on a static port on each Node's IP address. This allows external traffic to reach the service at
<NodeIP>:<NodePort>. It's useful for development and testing but generally not used for production. - LoadBalancer: Exposes the Service externally using a cloud provider's load balancer (e.g., an AWS Elastic Load Balancer). Kubernetes automatically creates the load balancer and configures it to route traffic to your Service's Pods via a NodePort. This is the standard way to expose a production application to the internet.
Kubernetes Services explained | ClusterIP vs NodePort vs LoadBalancer vs Headless Service
To see these concepts explained with clear visuals, watch this video from TechWorld with Nana. It provides an excellent overview of why Services are necessary and how the different types work.
Watch the following segments: 00:00 - 02:14: Explains what a Service is and why it's needed. 02:14 - 07:30: Covers the ClusterIP type and how selectors and target ports work. 18:25 - 23:41: Details the NodePort and LoadBalancer types, explaining how they expose services externally and build upon each other.
Conclusion
You have now explored the four pillars of a Kubernetes application deployment. Understanding their roles and relationships is fundamental to working with Kubernetes.
Key Takeaways:
- Pod: The basic execution unit, a wrapper around one or more containers. Pods are ephemeral.
- ReplicaSet: A controller that ensures a specific number of Pod replicas are always running, providing self-healing.
- Deployment: A high-level controller that manages ReplicaSets to provide declarative scaling and zero-downtime rolling updates. This is your primary tool for deploying stateless applications.
- Service: A stable network endpoint (IP and DNS name) that provides load balancing and discovery for a set of ephemeral Pods using labels and selectors.
You don't manage individual Pods; you define a Deployment to manage their lifecycle and a Service to manage their network access. This declarative approach is what makes Kubernetes so robust and scalable.
Preview of the Next Lesson:
We've covered the core theory. In the next lesson, we'll get hands-on. You will learn how to deploy a Spring Boot application to Kubernetes using a Deployment manifest, applying these concepts to bring our containerized application to life in a Kubernetes cluster.