Hello! Welcome back to our journey into Kubernetes.
In our last lesson, we successfully defined and deployed a Spring Boot application using a Deployment manifest. Our application is now running in Pods within the cluster. However, it's currently isolated—it can't be reached by other services or by external users.
Today, we will solve that problem. This lesson addresses the learning outcome: Expose a Kubernetes Deployment to internal and external traffic using a Service (e.g., ClusterIP, LoadBalancer). We will explore the Kubernetes Service object, a crucial abstraction that provides a stable network identity for your application Pods. Understanding how to correctly expose services is fundamental to building and operating microservice architectures, and it's a common topic in system design and backend engineering interviews.
1. The Problem: Why Can't We Just Use Pod IPs?
You might wonder why we can't just communicate with our application Pods using their IP addresses. The core reason is that Pods are ephemeral. They can be created, destroyed, and rescheduled by Kubernetes at any time for reasons like node failure, scaling, or updates. Each time a Pod is recreated, it gets a new IP address. Relying on these transient IPs would make our system incredibly fragile.
We need a stable endpoint that doesn't change, even when the Pods behind it do. This is precisely the problem that Kubernetes Services are designed to solve.
Kubernetes Services explained | ClusterIP vs NodePort vs LoadBalancer vs Headless Service
To grasp this core concept, let's watch the first couple of minutes of the 'Kubernetes Services explained' video by TechWorld with Nana. It clearly explains why services are necessary.
Watch from the beginning until 02:14. Focus on understanding why Pod IPs are unreliable and how a Service acts as a stable abstraction.
As the video explained, a Service provides two key things:
- A stable virtual IP address and DNS name within the cluster.
- Load balancing of network traffic to the set of Pods that make up the service.
A Service discovers which Pods to send traffic to using labels and selectors, the same mechanism our Deployment uses to manage its Pods. The Service's selector must match the labels on the Pods.
2. An Overview of Service Types
Kubernetes offers several types of Services to handle different use cases, primarily differing in how they expose the application. The three main types you'll use are ClusterIP, NodePort, and LoadBalancer.
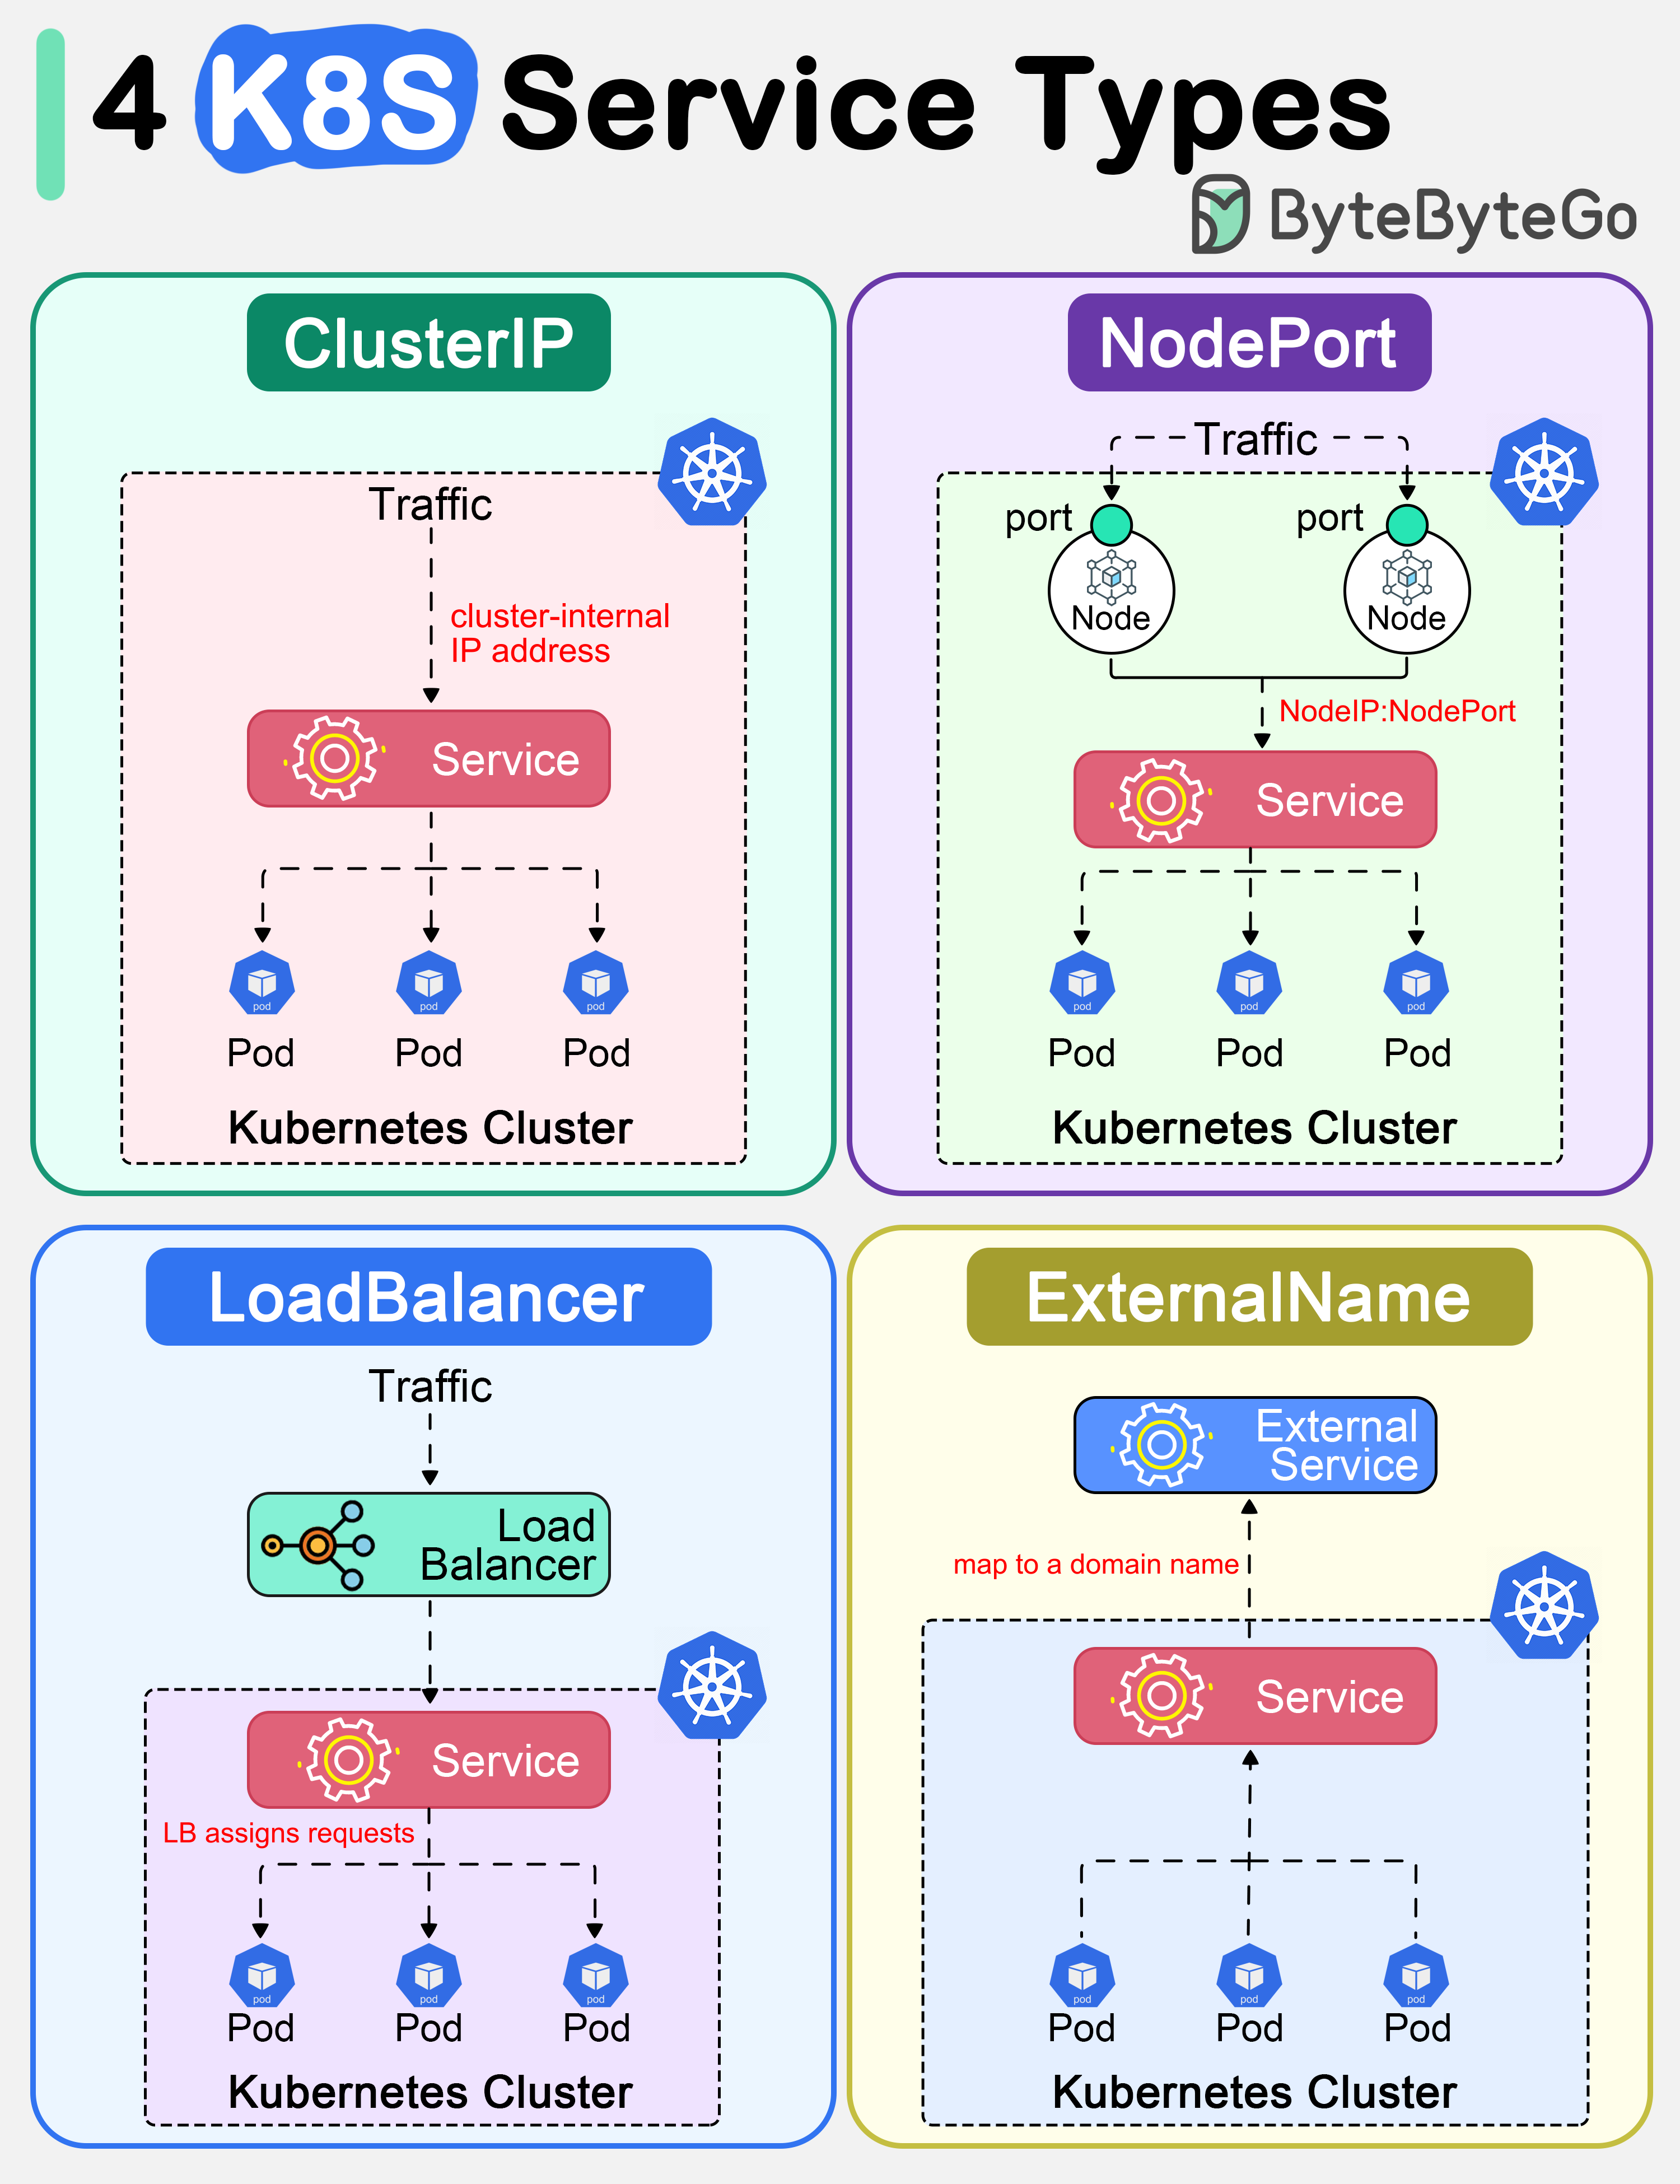
Let's dive into each one.
3. ClusterIP: For Internal Communication
The ClusterIP service type is the default in Kubernetes. It exposes the service on an internal IP address that is only reachable from within the cluster.
- Use Case: This is the perfect choice for backend-to-backend communication. For example, if your
order-serviceneeds to call youruser-service, you would expose theuser-servicewith aClusterIP. You would almost never expose a database this way to the outside world. - How it works: The service gets a stable IP and a DNS name (e.g.,
my-springboot-app.default.svc.cluster.local). Other Pods in the cluster can reliably connect to this address.
Here’s how you would define a ClusterIP service for the my-springboot-app-deployment from our previous lesson:
# service-clusterip.yaml
apiVersion: v1
kind: Service
metadata:
  name: my-springboot-app-svc
spec:
  # type: ClusterIP is the default, so it can be omitted
  type: ClusterIP
  selector:
    app: my-springboot-app  # This MUST match the 'labels' in your Deployment's Pod template
  ports:
    - protocol: TCP
      port: 80                # The port the Service will be available on inside the cluster
      targetPort: 8080          # The port your Spring Boot container is listening on (from the Dockerfile)
Key fields to note:
selector: This tells the Service which Pods to target. Theapp: my-springboot-appkey-value pair must match the labels defined inspec.template.metadata.labelsof yourDeploymentmanifest.ports: This is an array of port definitions.port: The port that other services within the cluster will use to talk to this service.targetPort: The actual port on the container that the traffic should be forwarded to. For our Spring Boot app, this is typically8080.
Kubernetes Services explained | ClusterIP vs NodePort vs LoadBalancer vs Headless Service
Let's continue with the TechWorld with Nana video to see a detailed breakdown of ClusterIP.
Watch from 02:14 to 08:30. Pay close attention to the explanation of selectors and the difference between the service port and the container's targetPort.
4. NodePort: Exposing for Development & Testing
The NodePort service type exposes the service on a static port on each Node’s IP address. This means you can contact the service from outside the cluster by using <Node_IP>:<NodePort>.
- Use Case: Useful for quickly exposing a service for development, testing, or demos. It is not recommended for production because you would have to manage which node IPs to hit, and it exposes a high-numbered port directly.
- How it works: A
NodePortservice is built on top ofClusterIP. It automatically creates aClusterIPservice, then exposes it on a specific port (by default, in the range30000-32767) on every node in the cluster.
Here is the YAML definition:
# service-nodeport.yaml
apiVersion: v1
kind: Service
metadata:
  name: my-springboot-app-svc-nodeport
spec:
  type: NodePort # Specify the service type
  selector:
    app: my-springboot-app
  ports:
    - protocol: TCP
      port: 80
      targetPort: 8080
      nodePort: 30080 # Optional: specify a static port within the range. If omitted, Kubernetes assigns a random one.
When this service is created, you could access your application at http://<any-node-ip>:30080.
Kubernetes Services explained | ClusterIP vs NodePort vs LoadBalancer vs Headless Service
The 'Kubernetes Services explained' video also has a great segment on NodePort.
Watch from 18:25 to 21:28. The video clearly explains the traffic flow for a NodePort and highlights why it's not ideal for production.
5. LoadBalancer: Production-Grade External Exposure
The LoadBalancer service type is the standard and most common way to expose an application to the internet in a production environment.
- Use Case: Exposing a web-facing application (like an API gateway or a frontend UI) to the public internet with a stable, single IP address.
- How it works: This service type only works when running Kubernetes on a cloud provider (like AWS, GCP, Azure) that can provision an external load balancer. When you create a
LoadBalancerservice, Kubernetes tells the cloud provider to create a load balancer, which then gets a public IP address and automatically forwards traffic to theNodePortservice on your cluster's nodes. It is an extension ofNodePort.
The YAML is very simple:
# service-loadbalancer.yaml
apiVersion: v1
kind: Service
metadata:
  name: my-springboot-app-svc-lb
spec:
  type: LoadBalancer # The magic happens here
  selector:
    app: my-springboot-app
  ports:
    - protocol: TCP
      port: 80
      targetPort: 8080
After applying this manifest, you would run kubectl get services and wait for the EXTERNAL-IP field to be populated with the public IP of the newly created load balancer.
Kubernetes Services explained | ClusterIP vs NodePort vs LoadBalancer vs Headless Service
Finally, let's see how the LoadBalancer type works.
Watch from 21:28 to 23:55. Notice how this service type builds upon the concepts of NodePort and ClusterIP and integrates with the cloud provider.
6. Consolidation and Further Reading
You've now seen the three primary ways to expose a deployment. For a concise written summary and a handy comparison table, the following resource is excellent.
ClusterIP, NodePort, and LoadBalancer - Kubernetes
The article 'ClusterIP, NodePort, and LoadBalancer' on Baeldung provides clear explanations and YAML examples for each service type. It's a great resource to reinforce what you've just watched.
Read sections 3.1 ('ClusterIP Services'), 3.2 ('NodePort Services'), 3.3 ('LoadBalancer Services'), and pay close attention to the summary table in section 4 ('Choosing the Right Service Type').
Test your understanding! (Interview Question)
You are designing an e-commerce platform on Kubernetes. The architecture consists of three microservices:
- A
frontend-uiservice (React-based, serves the website to users). - An
order-service(Spring Boot, manages orders). - A
product-catalog-service(Spring Boot, manages product data).
The frontend-ui needs to call the order-service, and the order-service needs to call the product-catalog-service. Which Kubernetes Service type would you choose for each of the three services, and why?
Show answer
This is a classic system design interview question that tests your understanding of applying Kubernetes concepts.
-
product-catalog-service:ClusterIP. This service only needs to be accessed by other services within the cluster (specifically, theorder-service). There is no reason for it to be exposed to the public internet. UsingClusterIPensures internal-only accessibility, which is more secure. -
order-service:ClusterIP. Similar to the product service, the order service is a backend component. It is only called by thefrontend-uiservice, which also resides within the cluster's network boundary (before being exposed). Exposing it directly to the internet would be a security risk. -
frontend-ui:LoadBalancer. This is the user-facing entry point to your application. It needs to be accessible from the public internet. ALoadBalancerservice provides a stable, public IP address and distributes incoming user traffic to thefrontend-uipods, making it the ideal choice for production.
This answer demonstrates an understanding of both functionality (how to expose services) and security principles (the principle of least privilege, by not exposing backend services unnecessarily).
Conclusion
Today you've bridged the gap between a running application and a reachable one. By mastering Kubernetes Services, you can now control network traffic flow both within and into your cluster.
Key Takeaways:
- A
Serviceprovides a stable network endpoint for a group of ephemeral Pods, identified by labels and selectors. ClusterIPis for internal communication between services within the cluster. It's the default and most secure option for backend components.NodePortexposes your application on a port on each cluster node, useful for development and testing but not for production.LoadBalanceris the production-standard way to expose an application to the internet, integrating with your cloud provider to provision an external load balancer.
Preview of the Next Lesson:
Our application is now deployed and exposed. However, we hardcoded some configuration (like the active Spring profile) in our Deployment manifest. This isn't ideal for managing different environments (dev, staging, prod) or for handling sensitive information like API keys or database passwords. In our next lesson, "Manage application configuration in Kubernetes using ConfigMaps and Secrets," we will learn how to decouple configuration from our application code and deployment manifests, making our setup much more flexible and secure.