Hello! Welcome to the next lesson in our Kubernetes module.
In our previous session, we configured our Spring Boot application to consume configuration securely and flexibly using Kubernetes ConfigMaps and Secrets. While our application is now well-configured, a running Pod doesn't automatically mean it's healthy or ready to serve traffic. It could be stuck initializing, deadlocked, or unable to connect to a downstream dependency.
This lesson addresses that critical reliability gap and is dedicated to the learning outcome: Implement liveness and readiness probes for a Spring Boot application to improve service reliability. We will configure health checks that empower Kubernetes to automatically manage our application's lifecycle, restarting failed instances and routing traffic away from unready ones. This capability is fundamental to building self-healing systems and a key topic in interviews for senior roles.
1. The Core Concepts: Liveness, Readiness, and Startup Probes
To build resilient systems, Kubernetes needs to be able to ask your application two fundamental questions:
- "Are you alive?": If the answer is no, the application has irrecoverably failed, and the container should be restarted.
- "Are you ready to serve traffic?": If the answer is no, the application is temporarily busy or still initializing and shouldn't receive new requests.
Kubernetes uses probes to ask these questions. Let's look at the three main types.
| Probe | Purpose | Effect of Failure |
|---|---|---|
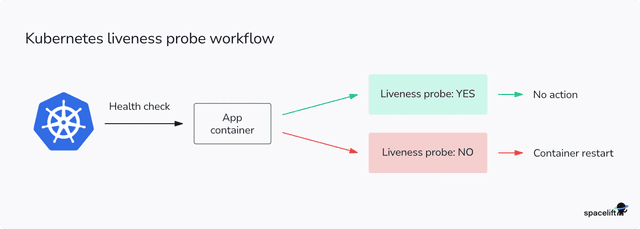
| Liveness | Checks if the application is running and responsive (not deadlocked). | The container is restarted. |
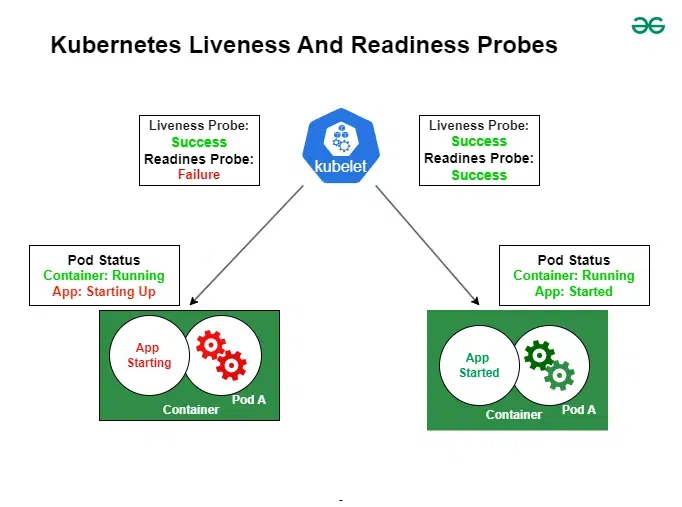
| Readiness | Checks if the application is ready to handle traffic. | The Pod is removed from the Service's load balancer pool. |
| Startup | Checks if a slow-starting application has finished its initialization. | The container is restarted. Delays liveness/readiness probes. |
The Liveness Probe acts as a safeguard against application freezes or deadlocks. If the probe fails, Kubernetes assumes the application is in a broken state and restarts it, hoping to return it to a healthy state.
The Readiness Probe is for managing traffic flow. An application might be "alive" but not "ready"—for example, it might be warming up a cache or waiting for a database connection during startup. By failing the readiness probe, the application tells Kubernetes, "I'm alive, but don't send me any traffic just yet."
To get a more detailed conceptual overview and see how these probes are configured in a Kubernetes manifest, please watch the following video.
Kubernetes Probes- livenessProbe, readinessProbe, startupProbe |How to use kubernetes probes-part 14
The video 'Kubernetes Probes' by Rahul Wagh provides a clear explanation of liveness, readiness, and startup probes and their configuration parameters.
Watch the first seven minutes of the video (00:26 - 06:56). Focus on understanding: The purpose of the Liveness probe for restarting containers (00:26). The role of the Readiness probe as a 'gatekeeper' for traffic (03:06). The function of the Startup probe for applications with long startup times (04:26). The common configuration parameters like initialDelaySeconds and periodSeconds.
2. Spring Boot Integration: The Actuator Health Endpoints
Now that we understand what Kubernetes needs, how does our Spring Boot application provide the answers? The solution is Spring Boot Actuator.
Since Spring Boot 2.3, Actuator includes first-class support for Kubernetes probes. When you add the Actuator dependency and enable the feature, Spring Boot automatically exposes dedicated health endpoints that Kubernetes can poll.
Let's walk through the implementation steps.
Step 1: Add the Actuator Dependency
First, ensure your pom.xml includes the spring-boot-starter-actuator:
<dependency>
    <groupId>org.springframework.boot</groupId>
    <artifactId>spring-boot-starter-actuator</artifactId>
</dependency>
Step 2: Enable the Probe Endpoints
Next, in your application.properties or application.yml, you need to enable the probe-specific endpoints.
For application.yml:
management:
  endpoint:
    health:
      probes:
        enabled: true
This single property tells Spring Boot to expose two crucial endpoints:
/actuator/health/liveness: For the Liveness Probe. It returns HTTP 200 OK as long as the application context is running. If the application's internal state becomes broken, it will return HTTP 503 Service Unavailable./actuator/health/readiness: For the Readiness Probe. It returns HTTP 200 OK only after the application is fully started and ready to accept traffic. During startup, it will return HTTP 503.
To learn more about how Spring Boot manages the internal states for liveness and readiness, the following article provides an excellent deep dive.
Liveness and Readiness Probes in Spring Boot
The article 'Liveness and Readiness Probes in Spring Boot' from Baeldung is a definitive guide on this topic. It explains the integration in detail.
Read sections 2 ('Kubernetes Probes'), 3 ('Liveness and Readiness in Actuator'), and 3.1 ('Readiness and Liveness State Transitions'). Focus on: The distinction between kubelet's role and Spring Boot's role. The specific endpoints exposed by Actuator. The meaning of the LivenessState (CORRECT, BROKEN) and ReadinessState (ACCEPTING_TRAFFIC, REFUSING_TRAFFIC) enums.
3. Configuring the Probes in Kubernetes
With our Spring Boot application now exposing the correct endpoints, the final step is to configure our Kubernetes Deployment to use them. This is done by adding livenessProbe and readinessProbe sections to the container specification in your deployment.yaml.
The configuration tells the kubelet on each node how and when to check your application's health.
# In your deployment.yaml, inside spec.template.spec.containers[]
...
ports:
  - containerPort: 8080
livenessProbe:
  httpGet:
    path: /actuator/health/liveness
    port: 8080
  initialDelaySeconds: 15  # Wait 15s before first probe
  periodSeconds: 20      # Probe every 20s
  failureThreshold: 3      # Restart after 3 consecutive failures
readinessProbe:
  httpGet:
    path: /actuator/health/readiness
    port: 8080
  initialDelaySeconds: 5   # Wait 5s before first probe
  periodSeconds: 10      # Probe every 10s
...
Let's break down the key parameters:
httpGet: Specifies that the probe is an HTTP GET request to the givenpathandport.initialDelaySeconds: How long Kubernetes should wait after the container starts before sending the first probe. This is critical! If this value is too low for a Spring Boot application (which can take several seconds to start), the probes will fail, and Kubernetes might get stuck in a crash loop.periodSeconds: The interval between probes.failureThreshold: The number of consecutive probe failures required before Kubernetes takes action (restarting for liveness, removing from service for readiness).
Tuning these values is essential for a stable system. A too-aggressive liveness probe can restart your application unnecessarily, while a too-lenient one can leave a deadlocked service running for too long.
Test your understanding! (Interview Question)
A Spring Boot microservice you deployed takes approximately 45 seconds to start up because it needs to populate a large in-memory cache. Your junior colleague configured the following liveness probe:
livenessProbe:
  httpGet:
    path: /actuator/health/liveness
    port: 8080
  initialDelaySeconds: 10
  periodSeconds: 5
  failureThreshold: 3
After deploying, you notice the Pod is constantly restarting and never becomes stable. What is the problem, and how would you fix it using two different probe types?
Show answer
The Problem:
The initialDelaySeconds is set to 10 seconds, but the application takes 45 seconds to start. The kubelet will start probing at 10 seconds. Since the application isn't up, the probe will fail. After 3 consecutive failures (at 10s, 15s, and 20s), Kubernetes will kill and restart the container at the 20-second mark, long before it has a chance to finish its 45-second startup. This creates a "CrashLoopBackOff" state.
The Fix:
-
Simple Fix (Using Liveness/Readiness Only):
The most straightforward fix is to adjust theinitialDelaySecondsof the liveness probe to be greater than the startup time.livenessProbe: httpGet: path: /actuator/health/liveness port: 8080 initialDelaySeconds: 60 # Give it a full minute to start up periodSeconds: 20You would also have a readiness probe to ensure traffic isn't sent until the cache is warm.
-
Advanced Fix (Using a Startup Probe):
A more robust solution is to use astartupProbe. This probe is designed specifically for slow-starting applications. It disables the liveness and readiness probes until it succeeds.startupProbe: httpGet: path: /actuator/health/liveness # Can use the same endpoint port: 8080 failureThreshold: 30 # (30 failures * 5s period = 150s max startup time) periodSeconds: 5 livenessProbe: httpGet: path: /actuator/health/liveness port: 8080 # initialDelaySeconds is not needed as startupProbe handles this periodSeconds: 20In this configuration, the
startupProberuns every 5 seconds. The liveness probe won't start until the startup probe has succeeded once. This is the idiomatic Kubernetes way to handle slow-starting containers.
4. Custom Health Indicators and Graceful Shutdown
For senior-level roles, demonstrating knowledge beyond the basics is key.
-
Custom Health Indicators: What if "healthy" means your application can connect to its database? Spring Boot allows you to create custom health checks by implementing the
HealthIndicatorinterface. Actuator automatically aggregates these custom checks into the main/actuator/healthendpoint. For example, if your database health indicator fails, the main health endpoint will also fail. -
Graceful Shutdown: When a liveness probe fails, Kubernetes sends a
SIGTERMsignal to the container, asking it to shut down gracefully. If the container doesn't shut down within a timeout period (default 30s), it sends aSIGKILL, terminating it forcefully. A robust application should handleSIGTERMto finish in-flight requests and release resources. You can enable this in Spring Boot:server: shutdown: graceful spring: lifecycle: timeout-per-shutdown-phase: 20s
Conclusion
You have now learned how to implement a fundamental pattern for building resilient, self-healing applications in Kubernetes. By correctly configuring liveness and readiness probes, you allow Kubernetes to become an active manager of your application's health, not just a passive host.
Key Takeaways:
- Liveness Probes restart unhealthy containers to recover from fatal errors like deadlocks.
- Readiness Probes control traffic flow, ensuring requests are only sent to fully initialized and ready services.
- Spring Boot Actuator provides the
/actuator/health/livenessand/actuator/health/readinessendpoints needed by Kubernetes. - Configuring probes in your
Deployment.yamlis crucial, and tuning parameters likeinitialDelaySecondsandfailureThresholdis essential for stability. - Advanced concepts like custom
HealthIndicators and graceful shutdown elevate your application from simply "running" to "production-ready."
Preview of the Next Lesson:
Our application is now deployed, exposed, configured, and self-healing. But how much CPU and memory should it be allowed to use? Without constraints, a single memory-leaking application could destabilize an entire cluster. In the next lesson, "Configure resource requests and limits for Pods to ensure cluster stability and efficient resource usage," we will tackle this critical aspect of resource management.