Hello! Welcome to your next lesson on containerization and deployment.
In our last session, we mastered how to configure resource requests and limits for our Spring Boot applications. We established that setting a CPU request is vital for guaranteeing resources, while for Java, setting a memory request equal to the limit is key for stability.
Today, we will build directly on that knowledge. We'll answer the question: "Now that Kubernetes knows how much CPU our application requests, how can it use that information to automatically handle fluctuating traffic?"
This lesson addresses the learning outcome: Explain how Horizontal Pod Autoscaling (HPA) works and configure it based on CPU utilization. This is a fundamental concept for building resilient, cost-effective microservices and a common topic in senior engineering and system design interviews.
1. The "Why" and "How" of Horizontal Pod Autoscaling
Manually adjusting the number of replicas for a service is not a viable strategy in a dynamic production environment. Traffic patterns change—think of an e-commerce site during a flash sale or a fintech platform at market open. We need a system that responds automatically.
Horizontal Pod Autoscaling (HPA) is Kubernetes' solution to this problem. It automatically increases or decreases the number of Pod replicas (scaling "out" or "in") based on observed metrics like CPU or memory utilization.
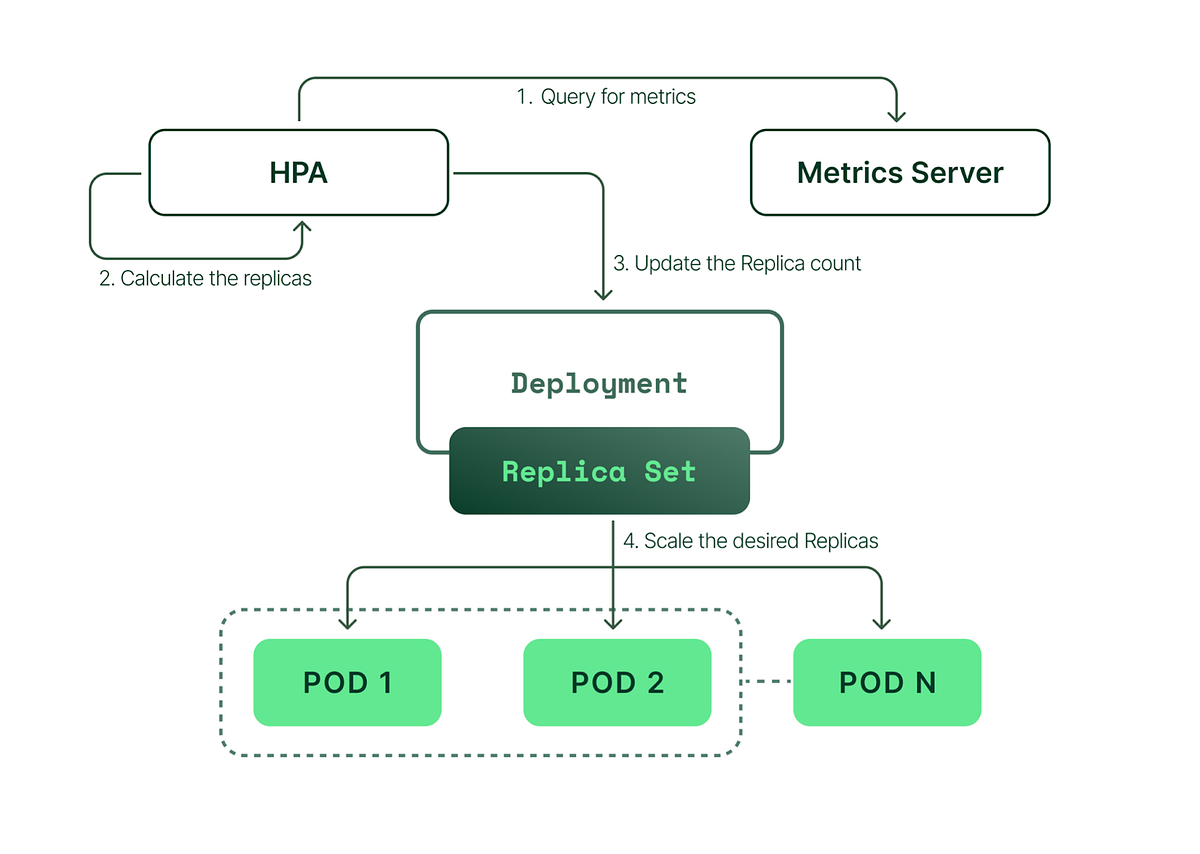
The mechanism behind HPA involves a few key components in a continuous control loop:
- Metrics Server: This is a cluster-wide aggregator of resource usage data. It collects metrics from the
kubeleton each node (which gets them from a container monitoring agent called cAdvisor) and exposes them through a Kubernetes API. - HPA Controller: This controller, running within the Kubernetes control plane, periodically checks the metrics from the Metrics Server.
- HPA Object: This is a resource you define, specifying your scaling rules, such as the minimum/maximum number of replicas and the target metric value (e.g., "keep average CPU utilization at 70%").
- Deployment/ReplicaSet: The HPA controller doesn't create pods directly. Instead, it updates the
replicasfield in the target object (like a Deployment), which then handles the creation or termination of Pods.
The following diagram provides a clear visual of this control loop.
To dive deeper into this architecture and the core scaling algorithm, the following video provides an excellent explanation.
The video 'Autoscaling in Kubernetes' from Pavan Elthepu provides a concise explanation of the HPA architecture and, most importantly, the formula Kubernetes uses to decide when and how much to scale.
Watch the video from the beginning to 06:06. Focus on: The roles of the cAdvisor, Metrics Server, and HPA Controller. The scaling formula: desiredReplicas = ceil[currentReplicas * ( currentMetricValue / desiredMetricValue )]. The frequency of metric collection and HPA checks.
The Scaling Algorithm in Detail
As the video explained, the HPA's decision-making is based on a simple ratio. For CPU utilization, the formula is:
This is where our last lesson becomes critical. The currentCPUUtilization is not an absolute value but is measured against the Pod's CPU request.
Let's say:
- Your Pod has
requests.cpu: "500m"(0.5 cores). - Your HPA has
targetCPUUtilizationPercentage: 80. - This means your actual target CPU usage per pod is
500m * 80% = 400m. - If the current average usage across all Pods is
600m, the HPA controller calculates:desiredReplicas = ceil[currentReplicas * (600m / 400m)]. It will scale up. - If the current average is
200m, the calculation becomesceil[currentReplicas * (200m / 400m)], and it will scale down.
This direct link between requests and HPA targets is a key concept often probed in interviews.
2. Configuring HPA for a Spring Boot Application
Now, let's put theory into practice. We'll walk through the steps to enable HPA for a Spring Boot application. This requires three YAML files: a Deployment, a Service to expose it, and the HPA object itself.
The following article provides a clear, step-by-step guide with all the necessary manifests.
Implementing Horizontal Pod Autoscaling (HPA) in ...
The article 'Implementing Horizontal Pod Autoscaling (HPA) in Kubernetes for a Spring Boot Application' by Bansikah provides the exact YAML files we need and demonstrates the process.
Review the YAML definitions provided in the article under '1. Define the Spring Boot Application Deployment' and '3. Define the Horizontal Pod Autoscaler (HPA)'. You don't need to read the whole article, just focus on the structure of these two manifests.
Let's break down the two most important manifests.
1. The Deployment Manifest (Prerequisite)
# From deployment.yaml
apiVersion: apps/v1
kind: Deployment
metadata:
  name: spring-boot-hpa-app
spec:
  replicas: 1
  template:
    spec:
      containers:
      - name: spring-boot-hpa-app
        image: bansikah/spring-boot-hpa:latest
        ports:
        - containerPort: 8082
        resources:
          requests:
            cpu: "250m" # This is CRITICAL for HPA
            memory: "512Mi"
          limits:
            cpu: "500m"
            memory: "1Gi"
The most important line here is requests.cpu: "250m". Without a CPU request, the HPA has no baseline against which to calculate utilization percentage.
2. The HPA Manifest
# From hpa.yaml
apiVersion: autoscaling/v2
kind: HorizontalPodAutoscaler
metadata:
  name: spring-boot-hpa-app
spec:
  scaleTargetRef:
    apiVersion: apps/v1
    kind: Deployment
    name: spring-boot-hpa-app # Points to our Deployment
  minReplicas: 1
  maxReplicas: 5
  metrics:
  - type: Resource
    resource:
      name: cpu
      target:
        type: Utilization
        averageUtilization: 50 # Target 50% of the requested 250m CPU
Here we define the scaling behavior:
scaleTargetRef: Identifies the Deployment the HPA should manage.minReplicas&maxReplicas: Sets the lower and upper bounds for scaling.metrics: Specifies the metric to monitor. Here, we target an average CPU utilization of 50% across all pods.
To see this all come together in a live demonstration, let's return to the video from Pavan Elthepu.
This section of the 'Autoscaling in Kubernetes' video provides a full, end-to-end demonstration of deploying an HPA for a Spring Boot application, generating load, and observing the automatic scaling.
Watch from 06:06 to the end (13:13). The video walks through: Deploying a Spring Boot app with a CPU-intensive /stress endpoint. Creating an HPA object to target the deployment. Observing the initial state (HPA might scale down if there's no load). Using a load generator to increase CPU usage. Watching the HPA scale up the number of replicas. Stopping the load and seeing the HPA scale back down.
3. Interview-Level Discussion: HPA Gotchas & Best Practices
Understanding how to configure an HPA is expected. A senior engineer is expected to understand why it might not behave as expected.
For a deeper dive into debugging and optimizing HPA behavior, the following article provides invaluable insights from a real-world scenario.
A Guide to Horizontal Pod Autoscaler - Miguel Mendez
The article 'A Guide to Horizontal Pod Autoscaler' by Miguel Mendez uses a real-world debugging scenario to explore the nuances of the HPA algorithm and the critical importance of choosing the right metric.
Please read the sections 'How does HPA work?', 'Debugging HPA', and 'What can we do?'. Pay close attention to: The worked example of applying the scaling formula. Why a brief CPU spike on startup can cause unexpected scaling. The concept of the scale-down stabilization window. The argument for scaling on CPU rather than Memory for most stateless applications.
Let's summarize the key interview talking points from this material:
- Why isn't HPA scaling down immediately? Kubernetes uses a stabilization window (defaulting to 5 minutes for scaling down) to prevent "flapping"—rapidly scaling replicas up and down. It waits for a period to ensure the load reduction is stable before removing pods.
- Why did my pods scale up to the max on startup? A brief, high CPU spike during application startup can be enough to trigger the scaling algorithm. If
currentCPUis much higher thantargetCPUeven for a short time, the formula can calculate a highdesiredReplicascount. This highlights the importance of setting a realistictargetCPUUtilizationPercentagethat accounts for normal bursts. - Should I scale on Memory? For many applications, especially Java applications, memory usage is not directly proportional to traffic. The JVM claims a large heap on startup and keeps it. Scaling on memory can lead to a stable number of pods regardless of load. CPU utilization is almost always a better metric for scaling stateless, traffic-driven services.
Test your understanding! (Interview Question)
You have a Kubernetes Deployment with a CPU request of 1000m (1 core) per Pod. You configure an HPA with minReplicas: 2, maxReplicas: 10, and targetCPUUtilizationPercentage: 75%.
Currently, there are 4 pods running. You check your monitoring system and see the average CPU usage across these 4 pods is 900m.
- Will the HPA scale the deployment up or down?
- What is the target number of replicas the HPA will calculate?
Show answer
-
The HPA will scale the deployment UP.
- The
targetCPUUtilizationis 75% of the1000mrequest, which is750m. - The
currentCPUUtilizationis900m. - Since
current(900m) >target(750m), a scale-up event will be triggered.
- The
-
The HPA will calculate a target of 5 replicas.
- Using the formula:
desiredReplicas = ceil[currentReplicas * (currentMetricValue / desiredMetricValue)] desiredReplicas = ceil[4 * (900m / 750m)]desiredReplicas = ceil[4 * 1.2]desiredReplicas = ceil[4.8]desiredReplicas = 5
The HPA controller will update the Deployment's replica count to 5.
- Using the formula:
Conclusion
Today you've learned how to make your Kubernetes deployments dynamically adapt to real-world demand. This is a powerful combination of resource management and automation that is essential for building robust, cloud-native systems.
Key Takeaways:
- HPA automatically scales the number of Pods based on metrics, with CPU utilization being the most common for stateless services.
- The HPA control loop relies on the Metrics Server to collect data and the HPA controller to make scaling decisions.
- The scaling behavior is dictated by the formula
desiredReplicas = ceil[currentReplicas * (current / target)], where the CPU metric is calculated against the Pod's CPU request. - For production, it's crucial to understand nuances like the scale-down stabilization window and to choose the right metric for scaling (typically CPU over memory).
Preview of the Next Lesson:
We are now at the end of the "Containerization & Kubernetes" module. You've learned how to package your application with Docker, and then deploy, configure, probe, and automatically scale it in Kubernetes.
The next module, "CI/CD & System Design Interview Practice," will focus on automating this entire process. In the first lesson, "Create a CI/CD pipeline using GitHub Actions to build, test, and package a Spring Boot application," you will learn how to automate the steps of turning your source code into a runnable artifact, laying the groundwork for automated deployments.